Demystifying Web Push Notifications
For my recent One Day Build: Expense Tracking project I wanted to enable notifications in a progressive web app. ChatGPT struggled to generate any good code for me, and I also struggled to find any minimal clear explanations online.
This blog post aims to walk through all the pieces needed to implement web push notifications. I’ve also created a complete minimal working example with a node.js backend, for those who prefer to just view the code instead:
https://github.com/pqvst/minimal-web-push
How does Web Push work?
In short, web push works by your app interacting with a “push service” provided by the browser vendor. There are three main steps for this, outlined in the diagram below:
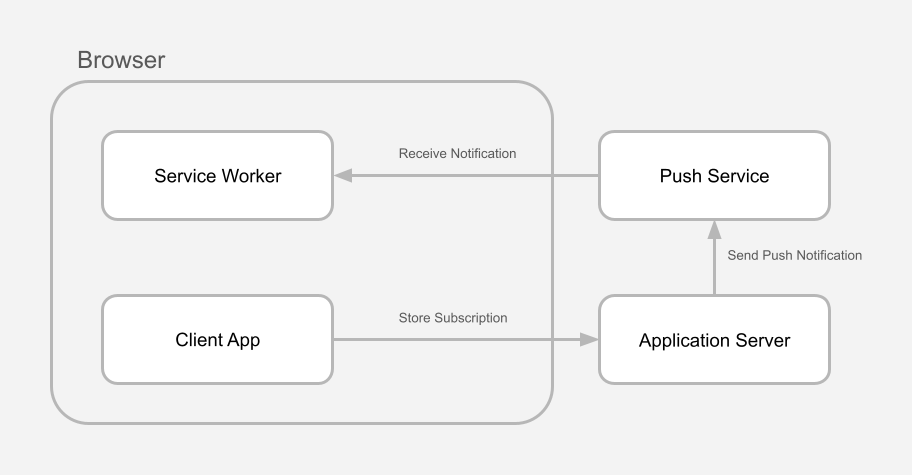
1. Create Subscription
Your client-side code creates a Web Push Subscription, and sends the subscription to your backend. A subscription is simply a bit of JSON that contains a unique (browser specific) endpoint and some encryption keys. Here’s an example of what a subscription looks like for Firefox (hence the mozilla.com endpoint).
{
  "endpoint": "https://updates.push.services.mozilla.com/wpush/v2/...",
  "expirationTime": null,
  "keys": {
    "auth": "...",
    "p256dh": "..."
  }
}
With Safari you’ll receive an Apple endpoint (https://web.push.apple.com/...) and in Chrome you’ll get a Google endpoint (https://fcm.googleapis.com/fcm/send/...).
2. Send Notification
Your backend code uses the subscription details to send a push notification to the push service hosted by the browser vendor. The push service then makes sure to send it back to your browser.
3. Handle Notification
Your browser receives the push notification and triggers a callback in your service worker. Your service worker can then choose to display a notification or do whatever else you want to do.
Pre-Requisite: VAPID keys
VAPID keys are required to make sure Web Push works on all the main browsers. VAPID stands for Voluntary Application Server Identification (VAPID) and is essentially just a spec for how to generate a set of public-private keys. Despite the name, they are in fact not really voluntary, since both Chrome and Safari require you to provide VAPID keys. The only browser I’ve tested that does not require them is Firefox.
If you try to subscribe to push notifications in Safari without VAPID keys you will receive the following error:
Subscribing for push requires an applicationServerKey
In Chrome you will receive this:
DOMException: Registration failed - missing applicationServerKey, and gcm_sender_id not found in manifest
While you can technically generate your VAPID keys by yourself, it is much easier to use a generator, like vapidkeys.com, which will generate a set of keys for you.
Server-Side Implementation
In order to send web push notifications from your backend application server, you have to construct, encode, and encrypt the messages properly. Depending on the programming language you’re using, it’s likely you’ll be able to find a library to help you with this.
If you’re using a node.js backend then adding web-push support is really easy. There’s a nice library called web-push that takes care of crafting web push notifications for you.
1. Import and configure web push
import webPush from 'web-push';
To get started with web-push simply call the function to set your VAPID keys. Be sure to include an email address as well (prefixed with mailto:).
// TODO: Generate VAPID keys (e.g. https://vapidkeys.com/)
const vapid = {
  publicKey: '...',
  privateKey: '...',
};

webPush.setVapidDetails(
  'mailto:<email-address>',
  vapid.publicKey,
  vapid.privateKey
);
2. Store subscriptions
Web push subscriptions are generated on the client side, so you will most likely need some way to pass subscriptions from your frontend to your backend. You’ll then also want to save these in some way, for example by storing it in your database or just saving them in a persisted JSON file. If you don’t save the subscription data then you’ll lose all your existing subscriptions when your server restarts!
app.post('/subscribe', authenticateRequest, (req, res) => {
  const sub = req.body;
  // TODO: Persist subscription (e.g. to db)
  res.status(200).end();
});
Broadcast notifications
The only other thing you need to implement is a way to actually create and send new notifications. If we’re broadcasting a notification to all subscriptions then we just simply loop through our array of saved subscriptions and call sendNotification using the web-push library.
You’ll receive an error if a user has revoked the notification permission on your page (or if the subscription has expired). You can catch these errors and remove invalid subscriptions.
async function pushNotification(payload) {
  await Promise.all(subscriptions.map(async (sub) => {
    try {
      await webPush.sendNotification(sub, payload); // throws if not successful
    } catch (err) {
      console.log(sub.endpoint, '->', err.message);
      // TODO: Delete subscription (e.g. from db)
    }
  }));
}

// Test send notification
pushNotification('This is a test notification!');
Client-Side
The client-side implementation is a bit more complicated. You will need two files: one for your service worker and one for your main client-side application. The only thing we need to put in our server-worker is handling the callback for incoming notifications.
Service Worker: /sw.js
self.addEventListener('push', (event) => {
  const options = {
    body: event.data.text(),
    icon: '/apple-touch-icon.png',
    badge: '/badge.png',
  };
  event.waitUntil(self.registration.showNotification('My App', options));
});
Why do we wrap our calls in event.waitUntil? Since service-workers run as a background process, there’s a chance that the server worker pauses/terminates it. By wrapping promises in
waitUntilwe tell the browser that work is on-going and that it shouldn’t terminate our service worker until the work is finished.
Client App: /client.js
In our main application script we have to take care of requesting the notifications permission, register our service worker, and actually create a push notification subscription using the browser’s pushManager API.
1. Request notifications permission
First we need to make sure we have permission to push notifications (without this our notifications are pointless). Somewhere on your page you’ll probably want to display a link or button that user’s can click to enable notifications.
<a id="promptLink" onclick="onPromptClick()">Enable notifications</a>
If notifications are already granted (or denied) we can hide the link, or update the UI accordingly.
function updatePrompt() {
  if ('Notification' in window) {
    if (Notification.permission == 'granted' || Notification.permission == 'denied') {
      promptLink.style.display = 'none';
    } else {
      promptLink.style.display = 'block';
    }
  }
}

function onPromptClick() {
  if ('Notification' in window) {
    Notification.requestPermission().then((permission) => {
      updatePrompt();
      if (permission === 'granted') {
        console.log('Notification permission granted.');
        init();
      } else if (permission === 'denied') {
        console.warn('Notification permission denied.');
      }
    });
  }
}
2. Register Service Worker and Enable Push Notifications
Next we make sure service workers are supported and register our service worker so that we can receive notifications. Finally we will use the browser pushManager API to request a push notification subscription, which we will then send to our backend server.
For this step you’ll need your VAPID public key (make sure to only include your public key in client-side code, and keep your private key secret).
The process is pretty self explanatory. Make sure service workers are supported, register the service worker, and then check if we already have an active push notification subscription, otherwise, create a new subscription.
In both cases we send the subscription data to our backend to make sure that it is stored.
const vapidPublicKey = '...';

async function initServiceWorker() {
  if ('serviceWorker' in navigator) {
    const swRegistration = await navigator.serviceWorker.register('sw.js');
    const subscription = await swRegistration.pushManager.getSubscription();
    if (subscription) {
      console.log('User is already subscribed:', subscription);
      sendSubscriptionToServer(subscription);
    } else {
      const subscription = await swRegistration.pushManager.subscribe({
        userVisibleOnly: true,
        applicationServerKey: vapidPublicKey
      });
      console.log('User subscribed:', subscription);
      sendSubscriptionToServer(subscription);
    }
  } else {
    console.warn('Service worker is not supported');
  }
}

function sendSubscriptionToServer(subscription) {
  fetch('/subscribe', {
    method: 'post',
    body: JSON.stringify(subscription),
    headers: { 'content-type': 'application/json' }
  });
}

window.addEventListener('load', () => {
  initServiceWorker();
  updatePrompt();
});
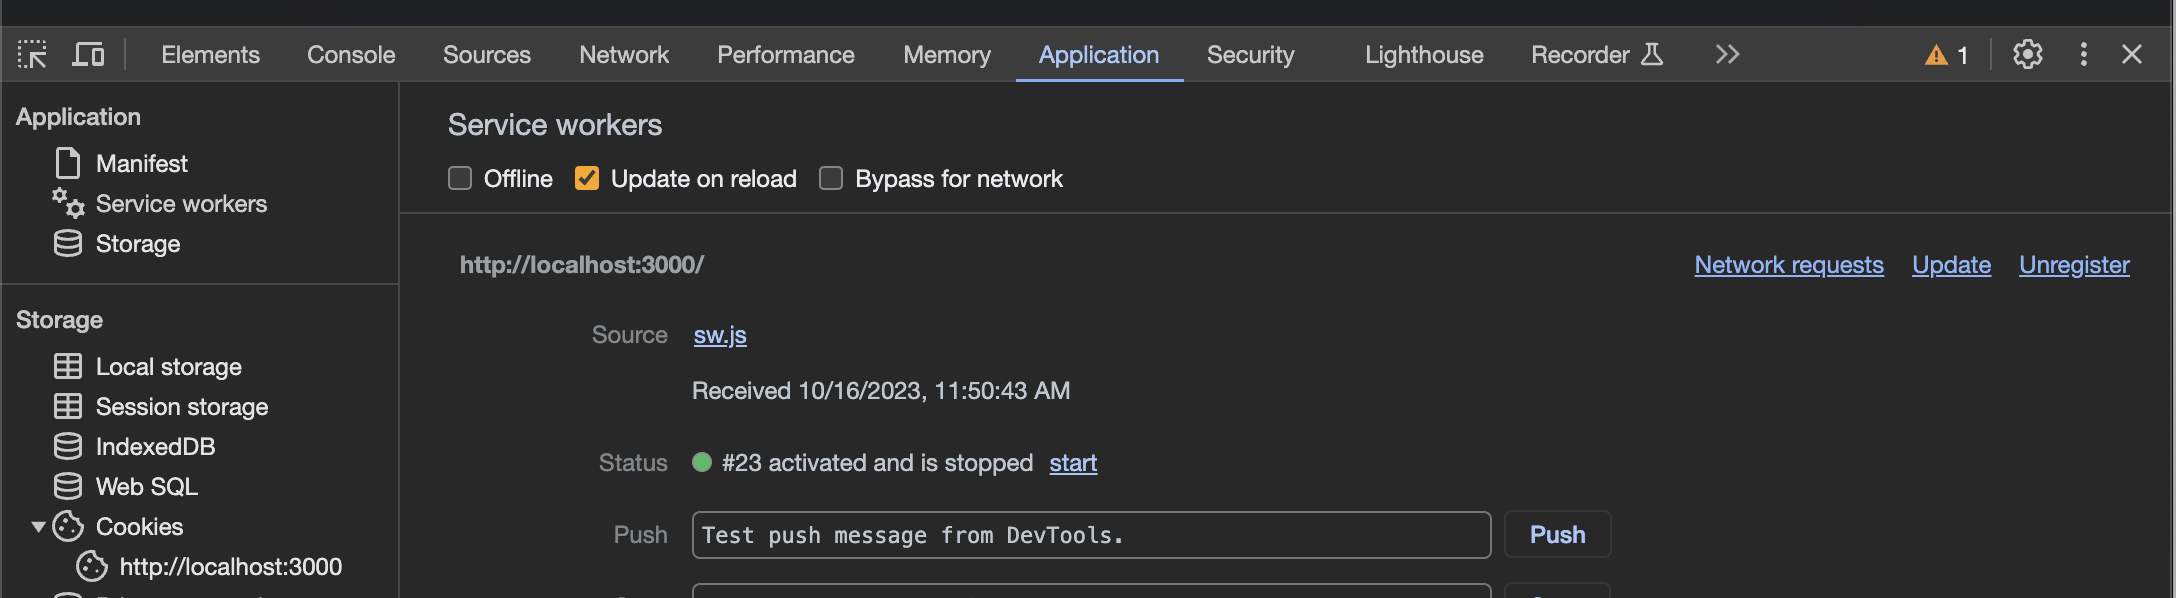
Debugging Tip: Reloading the Service Worker
Note that the service worker does not automatically reload when you reload the page. If you’re working locally and making changes to the service worker, you either need to manually reload the service worker in your browser’s dev tools or you can enable the option to automatically reload the service worker when the page reloads!
Bonus Feature: Clickable notifications
Another thing you’ll probably want to do is make your notifications clickable. Initially I assumed that clicking a notification would automatically open up the associated page. However, this is not the case. You’ll have to implement this yourself in your service worker.
The code to achieve this is a bit more complicated than I anticipated. Here’s the best example I managed to find online, which ensures that the notification is cleared after clicking it, and then either opens a new browser instance/tab or focuses the existing tab if it’s already open.
const targetUrl = '...';

self.addEventListener('notificationclick', (event) => {
  self.console.log('notificationclick');
  event.notification.close(); // Android needs explicit close.
  event.waitUntil(
    clients.matchAll({type: 'window'}).then( windowClients => {
      // Check if there is already a window/tab open with the target URL
      for (var i = 0; i < windowClients.length; i++) {
        var client = windowClients[i];
        // If so, just focus it.
        if (client.url === targetUrl && 'focus' in client) {
          return client.focus();
        }
      }
      // If not, then open the target URL in a new window/tab.
      if (clients.openWindow) {
        return clients.openWindow(targetUrl);
      }
    })
  );
});
From my testing so far, this seems to work well on all browsers (Firefox, Chrome, Safari, Android, iOS).