Self-Hosted Analytics with Umami + Traefik
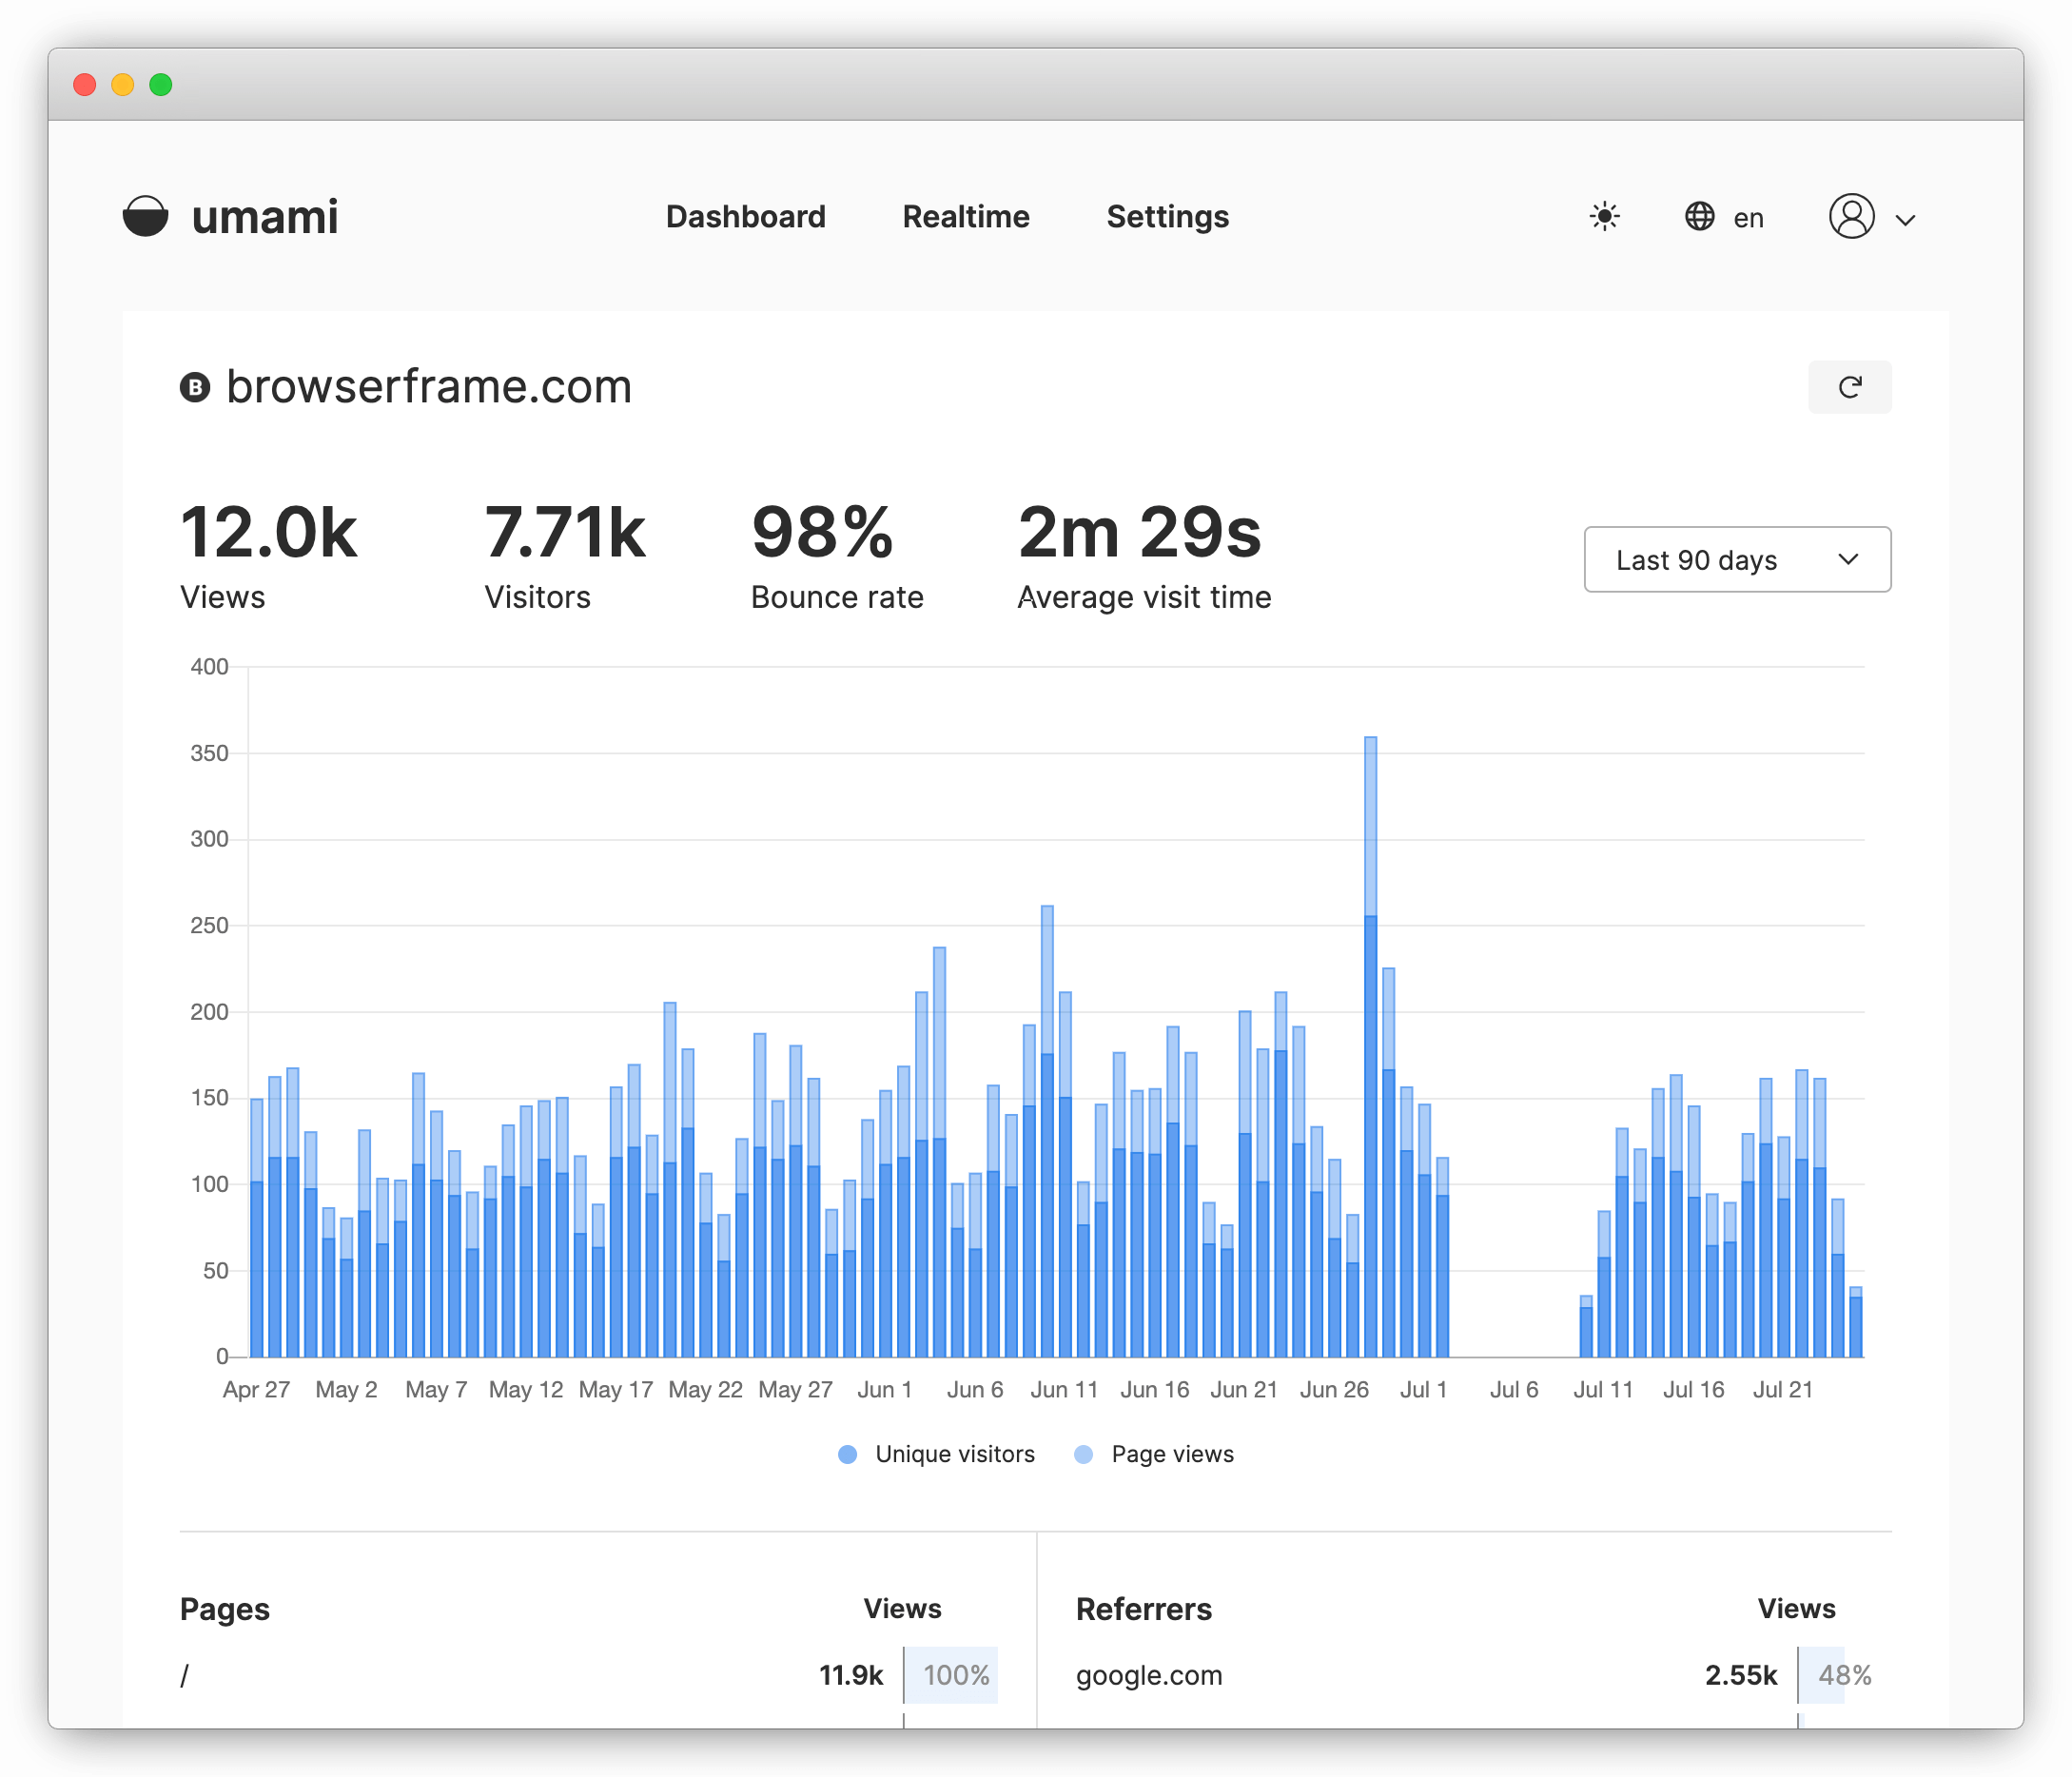
I’ve been adding Umami to most of my websites as an alternative (or potential replacement) to Google Analytics. It’s free, open-source, and has worked great for me during the past couple of months. If you’re comfortable with running your own VPS then you can easily setup a server for $5/mo on DigitalOcean, with minimal maintenance.
In this post I’ll walk through the entire process of setting up Umami on a DigitalOcean droplet with Traefik as a reverse proxy. Then I’ll highlight some quirks, features, and tips. Finally, I’ll also do a quick comparison between Umami and Google Analytics based on the data I’ve collected for some of my sites.
- Part 1: Setting up Umami
- Part 2: Quirks, features, and tips
- Part 3: Comparing Umami and Google Analytics
- Part 4: TL;DR Final thoughts
Setting Up Umami
I’ll be using DigitalOcean, but any other hosting platform should work as well. At first I considered using DigitalOcean’s new App Platform. However, the cost of running that with at least 1 GB of memory and a database would be nearly 4x. So, in the end, for this simple use-case, I decided to just use a cheap $5/mo droplet.
1) Create a droplet
To make your life a little easier, make sure you select the “docker” pre-configured droplet. You’ll save some time by not having to install Docker and Docker Compose. It would be great to see Umami in the DigitalOcean marketplace (maybe a fun project to work on sometime).
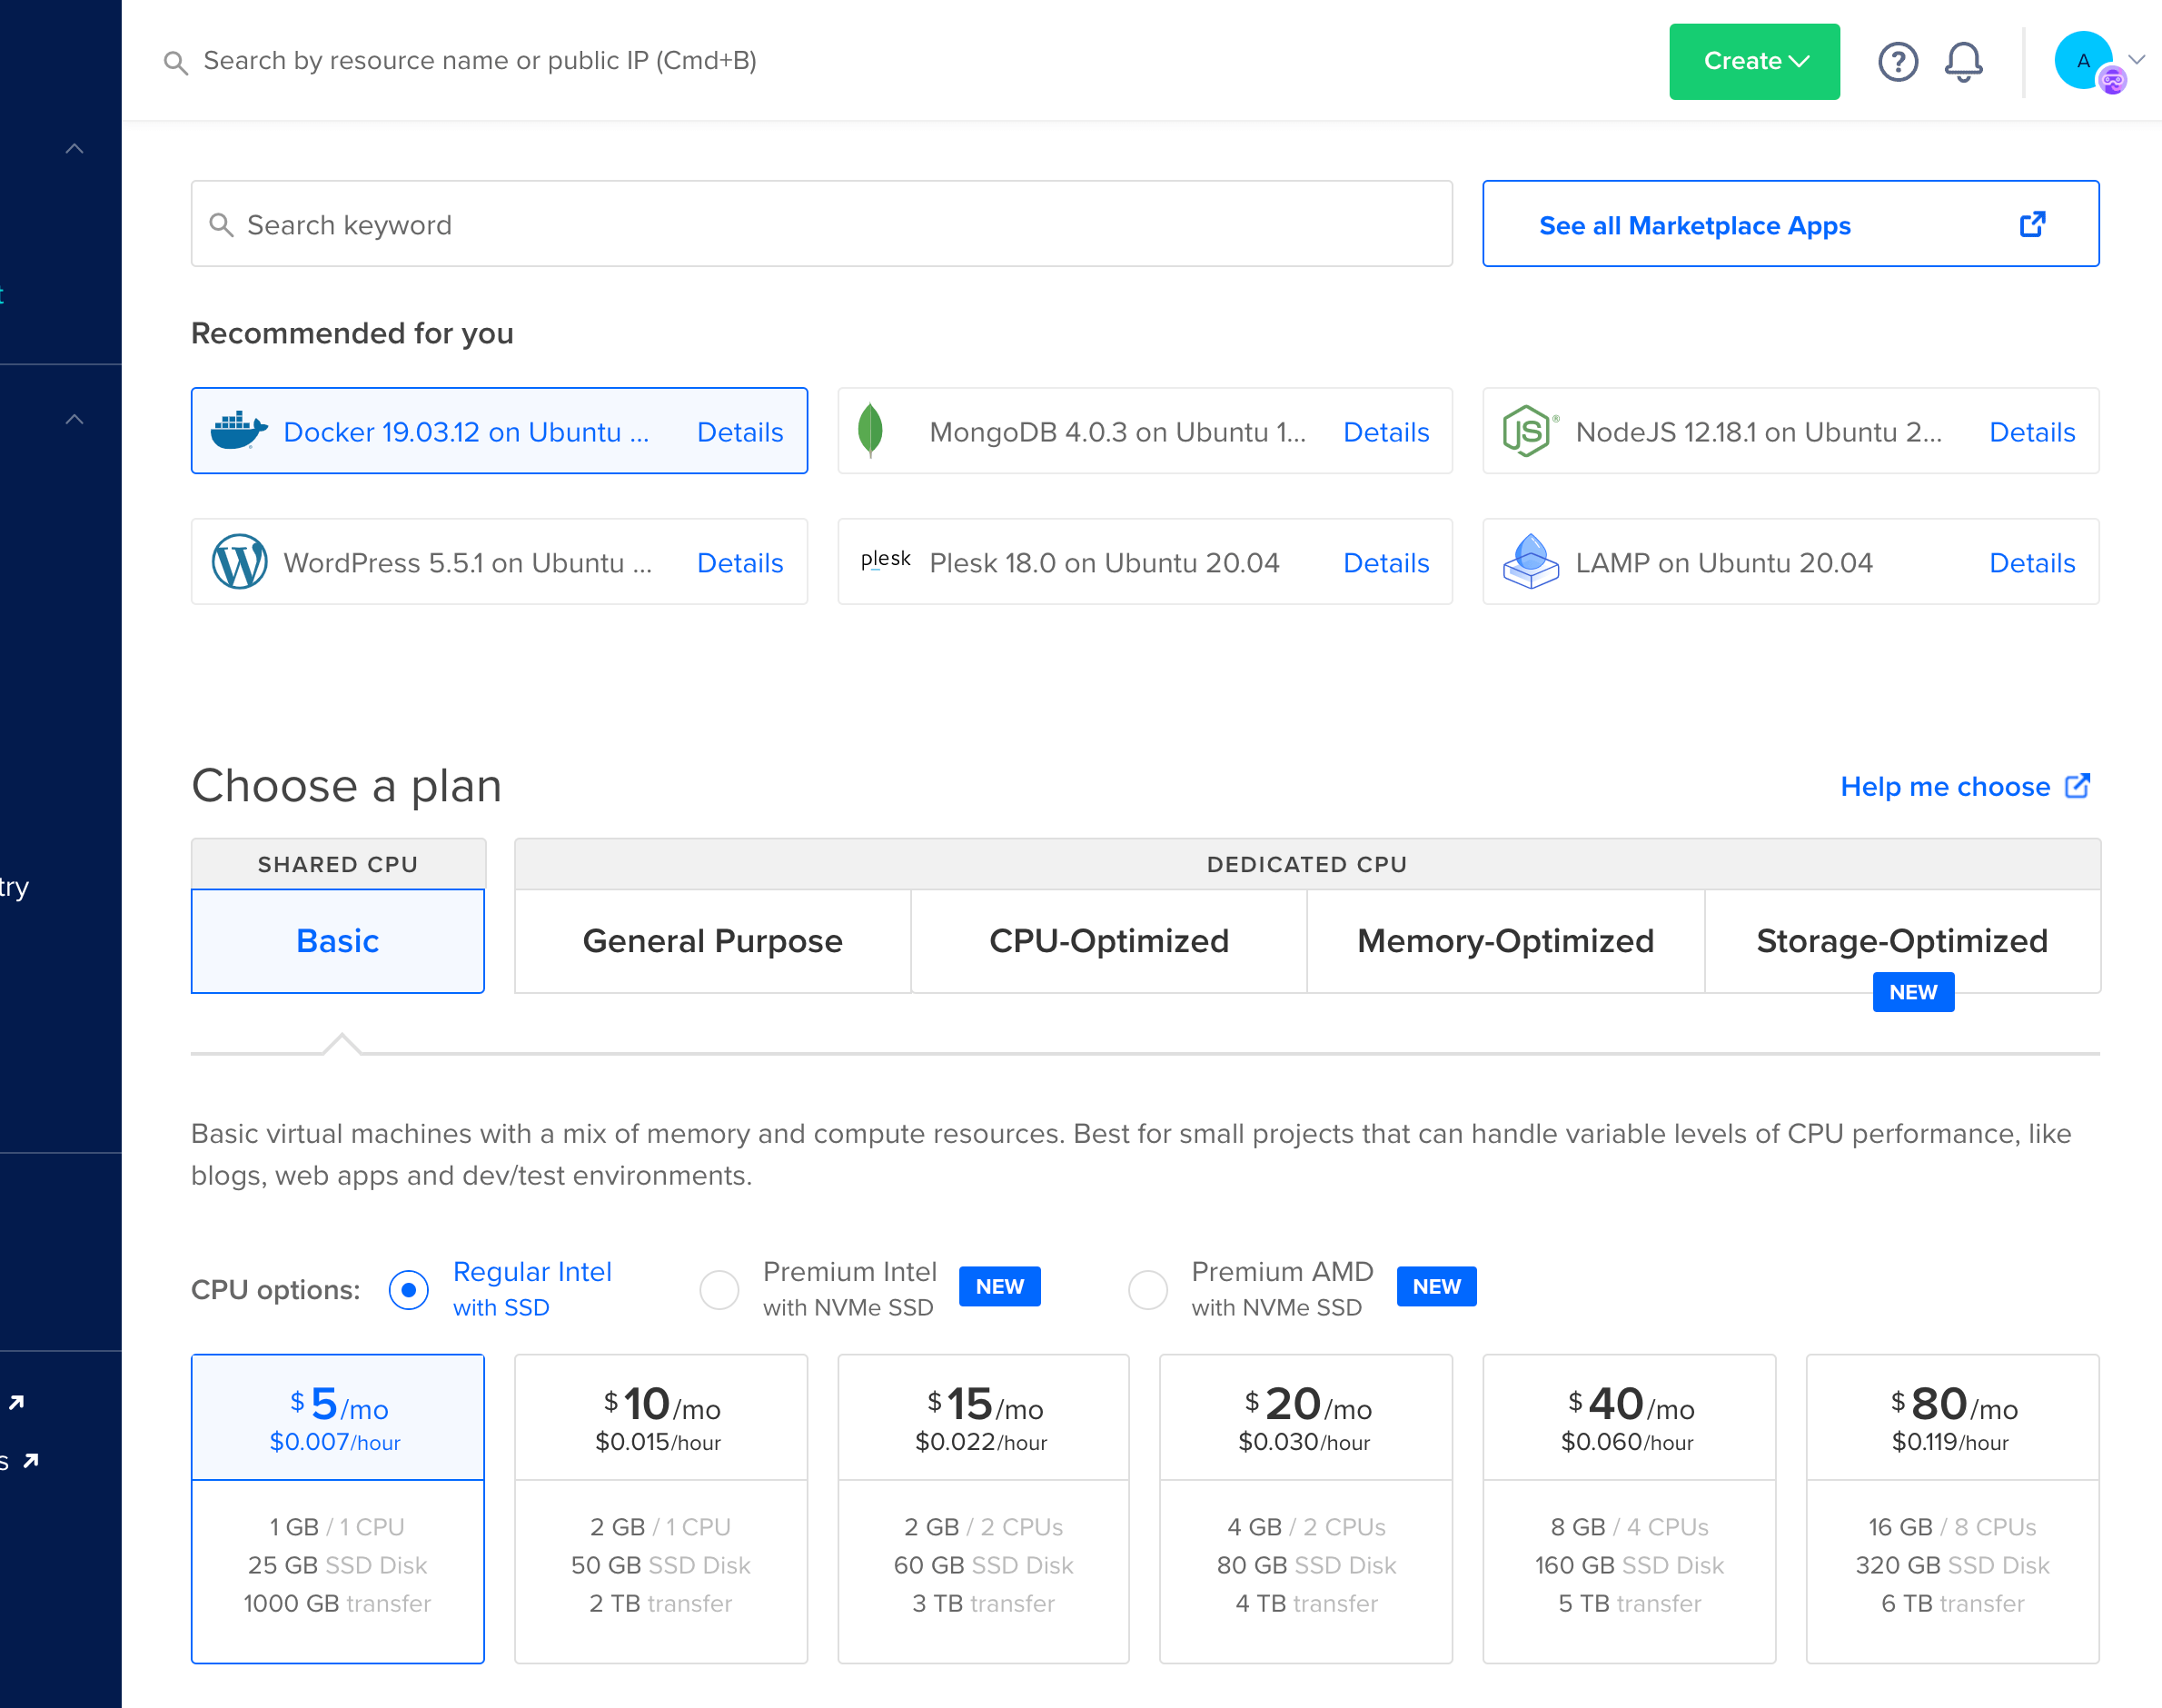
Once the droplet is ready, SSH into it to get started!
2) Clone Umami
Cloning the repo is the easiest way to get started. Even though we’ll be using the Umami docker image, we still need to initialize the database with the schema file located in the repo. It would be nice if this was automatically handled by the app instead.
git clone https://github.com/mikecao/umami.git
3) Replace the default docker-compose.yml file
Umami comes with a basic docker-compose configuration file. However, we’ll replace it to add some improvements (logging limits and a restart policy) and add traefik as a reverse proxy. There are two variables that need to be replaced though:
- Generate yourself a random hash salt
- Replace the hostname rule with your own domain
---
version: '3'
services:

  umami:
    image: ghcr.io/mikecao/umami:postgresql-latest
    container_name: umami
    environment:
      DATABASE_URL: postgresql://umami:umami@db:5432/umami
      DATABASE_TYPE: postgresql
      HASH_SALT: ### RANDOM STRING HERE ###
    labels:
      - traefik.enable=true
      - traefik.http.routers.umami.rule=Host(`### HOSTNAME HERE ###`)
    depends_on:
      - db
    restart: always
    logging:
      options:
        max-size: "10m"
        max-file: "10"

  db:
    image: postgres:12-alpine
    container_name: db
    environment:
      POSTGRES_DB: umami
      POSTGRES_USER: umami
      POSTGRES_PASSWORD: umami
    volumes:
      - ./sql/schema.postgresql.sql:/docker-entrypoint-initdb.d/schema.postgresql.sql:ro
      - umami-db-data:/var/lib/postgresql/data
    restart: always
    logging:
      options:
        max-size: "10m"
        max-file: "10"

  traefik:
    image: traefik
    container_name: traefik
    command:
      - "--log.level=INFO"
      - "--providers.docker=true"
      - "--providers.docker.exposedbydefault=false"
      - "--entrypoints.web.address=:80"
    ports:
      - "80:80"
    volumes:
      - /var/run/docker.sock:/var/run/docker.sock
    restart: always
    logging:
      options:
        max-size: "10m"
        max-file: "10"

volumes:
  umami-db-data:
Just copy-paste the modified file to your server.
cd umami
rm docker-compose.yml
nano docker-compose.yml
4) Optionally enable HTTPS instead
Since I’m running Cloudflare (with HTTPS) in front of my Umami instance, I skipped enabling HTTPS in Traefik. However, for “Strict Security” you can enable Let’s Encrypt in Traefik.
A neat way of doing that is by using DNS challenges. Here’s an example of how to do that with Cloudflare (if you’re using Cloudflare for your DNS). Configuration settings for other providers, besides Cloudflare, are available as well.
To enable HTTPS in traefik using Let’s Encrypt with Cloudflare DNS challenges, we’ll have to make the following changes to our docker-compose.yml file.
- Generate and add an API key for Cloudflare
- Setup a certificate resolver in traefik
- Optional: Specify a custom ACME email address for expiration/renewal emails
- Change port 80 to 443
- Mount
acme.jsonto cache your certificates
traefik:
  image: traefik
  container_name: traefik
  environment:
    - CF_API_EMAIL= ### MY CLOUDFLARE EMAIL ###
    - CF_API_KEY= ### MY CLOUDFLARE API KEY ###
  command:
    - "--log.level=INFO"
    - "--providers.docker=true"
    - "--providers.docker.exposedbydefault=false"
    - "--entrypoints.web.address=:443"
    - "--certificatesresolvers.myresolver.acme.dnschallenge=true"
    - "--certificatesresolvers.myresolver.acme.dnschallenge.provider=cloudflare"
    - "--certificatesresolvers.myresolver.acme.email= ### PUBLIC ACME EMAIL ###"
  ports:
    - "443:443"
  volumes:
    - /var/run/docker.sock:/var/run/docker.sock
    - ./acme.json:/acme.json
  restart: always
  logging:
    options:
      max-size: "10m"
      max-file: "10"
We also need to assign the certificate resolver to the umami service:
umami:
  labels:
    - "traefik.http.routers.umami.tls.certresolver=myresolver"
  ...
5) Start and Configure Umami
With your docker-compose configuration ready, starting Umami is just a matter of running:
docker-compose up -d
Once you have Umami up and running, log in using the default credentials (user: admin, password: umami) and immediately change your password. I wish umami would instead generate a random password.
Then, go ahead and add your first site. Umami will provide you with a simple <script> tag that you’ll need to add to your website.
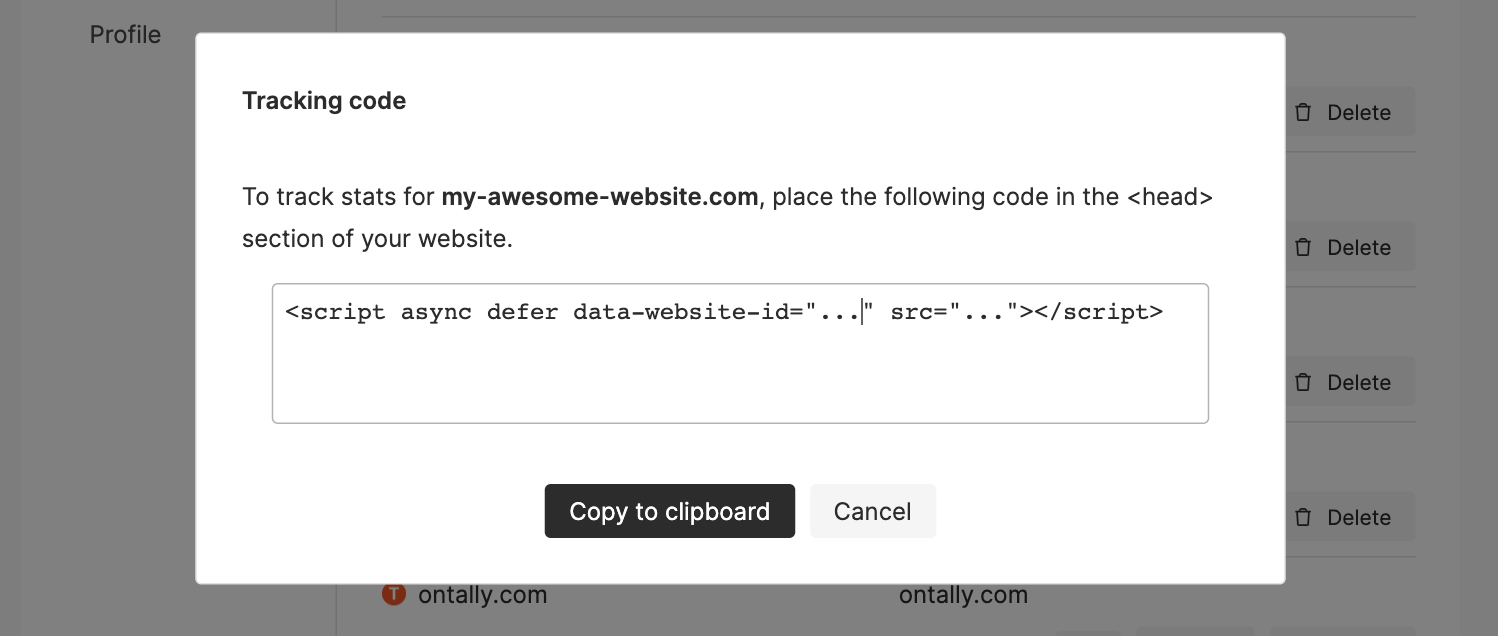
You’re done!
Quirks, features, and tips
1) Keeping Umami updated
A neat future with Umami is that you’ll see a notification banner when a new version of Umami is available.

When that happens I just SSH back into my Umami server, pull the latest image and re-deploy.
docker-compose pull && docker-compose up -d
A future improvement might be to create a small cron job that automatically tries to upgrade Umami once a day. I imagine that wouldn’t be too difficult to do.
2) Add event tracking
Another great feature with Umami is that you can easily add basic event tracking using simple CSS class names. This is great for tracking “Call to Action” buttons or other key actions on your website to get some in-depth analytics.
<button class="umami--click--signup">Sign Up</button>
https://umami.is/docs/track-events
3) Setup uptime monitoring
I use UptimeRobot for most of my projects, and I’d recommend adding basic uptime monitoring to your Umami server as well - just to make sure things are running smoothly.
I was using the default docker-compose file in umami, which previously omitted a restart policy. After Umami having run into a hiccup, my tracking stopped. Unfortunately I wasn’t using UptimeRobot and lost about 1 week’s worth of analytics before realizing what had happened. Lesson learned!
4) Bot-detection
The very first time I tried out Umami I noticed I was getting very large spikes of bot traffic. After digging into the code I noticed Umami was using a package called isbot-fast, which only contains a small list of bot filters.
I suggested switching to isbot instead, which contains a much larger list, and the project author quickly accommodated my request. Since then I haven’t had any issues with bot traffic.
While the current bot detection likely isn’t 100% fool proof, it is likely just as good as the other solutions available. Indeed, someone could be crawling my website using a non-headless instance of puppeteer, which would indeed be counted as a “real” visitor. However, I imagine even Google Analytics would count that case as well.
5) Filtering IPs
Another useful feature is that you can ignore data from specific IP addresses. For example, if you visit your own websites/applications frequently and want to exclude that traffic you could filter your home/office IP address.
https://umami.is/docs/environment-variables
6) User/role management
User/role management is a little “quirky”. You can add multiple users to your Umami server. However, every user has it’s own set of websites, which cannot be shared between users. Also, only one user can be admin. So, for giving multiple team members access, sharing the login credentials seems like the best option.
7) GDPR compliant and cookie-less
Umami is GDPR compliant and cookie-less, you can read more about that on Umami’s website: https://umami.is/docs/faq
For those who are wondering, instead of using cookies, Umami computes a session uuid for every visitor based on their IP, User-Agent, and OS. Unique values are rotated monthly for further privacy.
Also, Umami does respect “Do Not Track”.
Umami vs. Google Analytics
Umami and Google Analytics are clearly two very different products. Umami has nowhere near the number of features that Google Analytics has, but, that’s kind of the point. It offers all of the essentials though: visitors, views, events, browsers, operating systems, device type, and location. You can drill-down by page or referrer. There’s a realtime event stream (across all your sites!).
Running multiple analytics tools in parallel is always useful to uncover any discrepancies. In general, the number of visitors/users is fairly consistent across both Umami and Google Analytics, although on my sites, I consistently see roughly 25% more visitors reported by Umami vs. Google Analytics. I’m guessing this is probably due to:
- A certain number of visitors are blocking Google Analytics, using a browser that automatically blocks Google Analytics.
- Umami might be double counting some users, since Umami doesn’t use cookies to track users across browser sessions or different devices.
- Google Analytics might be slightly better at filtering bad/bot traffic (although I think this is the least significant).
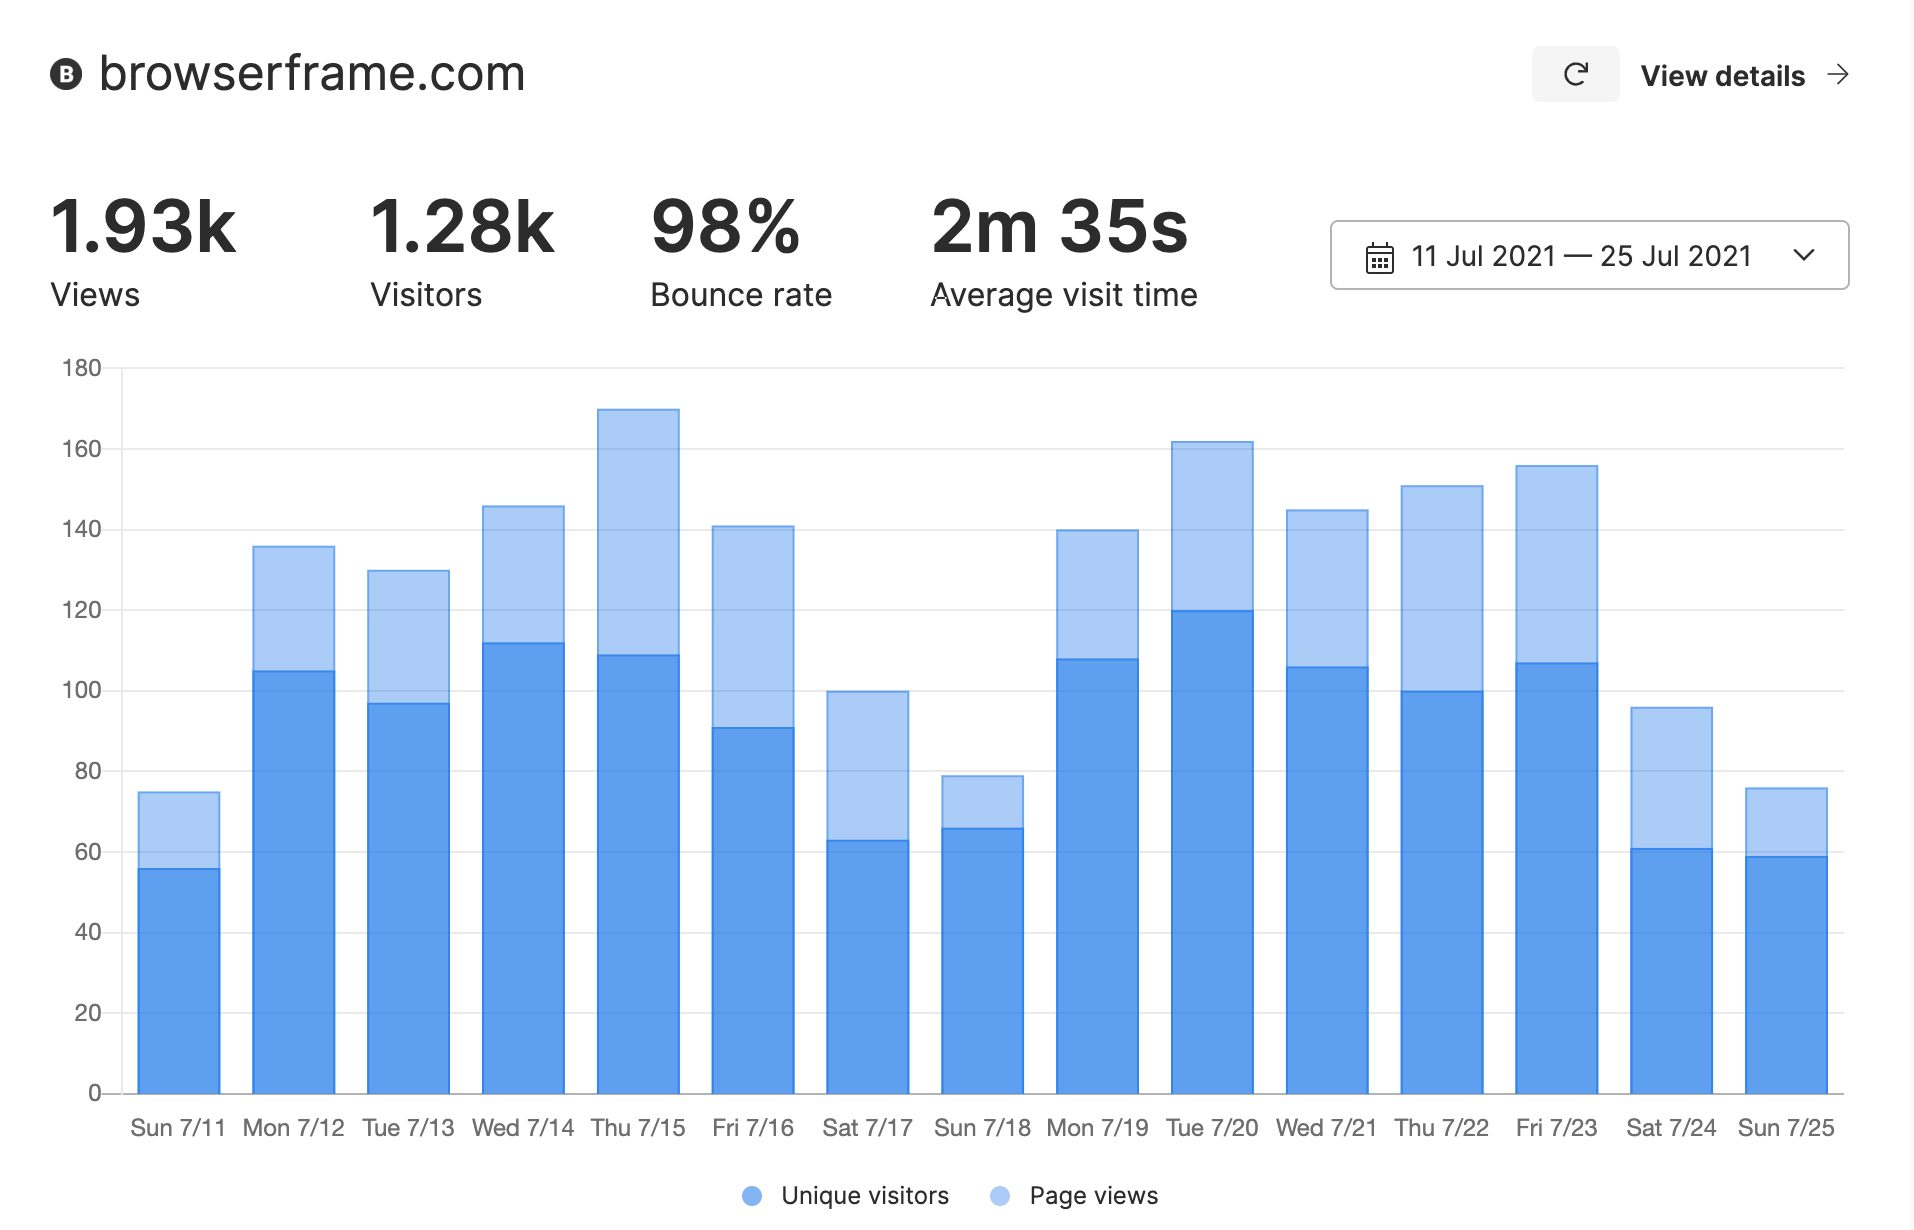
Example 1: BrowserFrame
Over a 2 week period, for one of my sites BrowserFrame, Umami reported roughly 25% more visitors and 20% more page views than Google Analytics. BrowserFrame actually gets most of it’s traffic from China, which I figured would be blocking Google Analytics, but that doesn’t really seem to be the case.
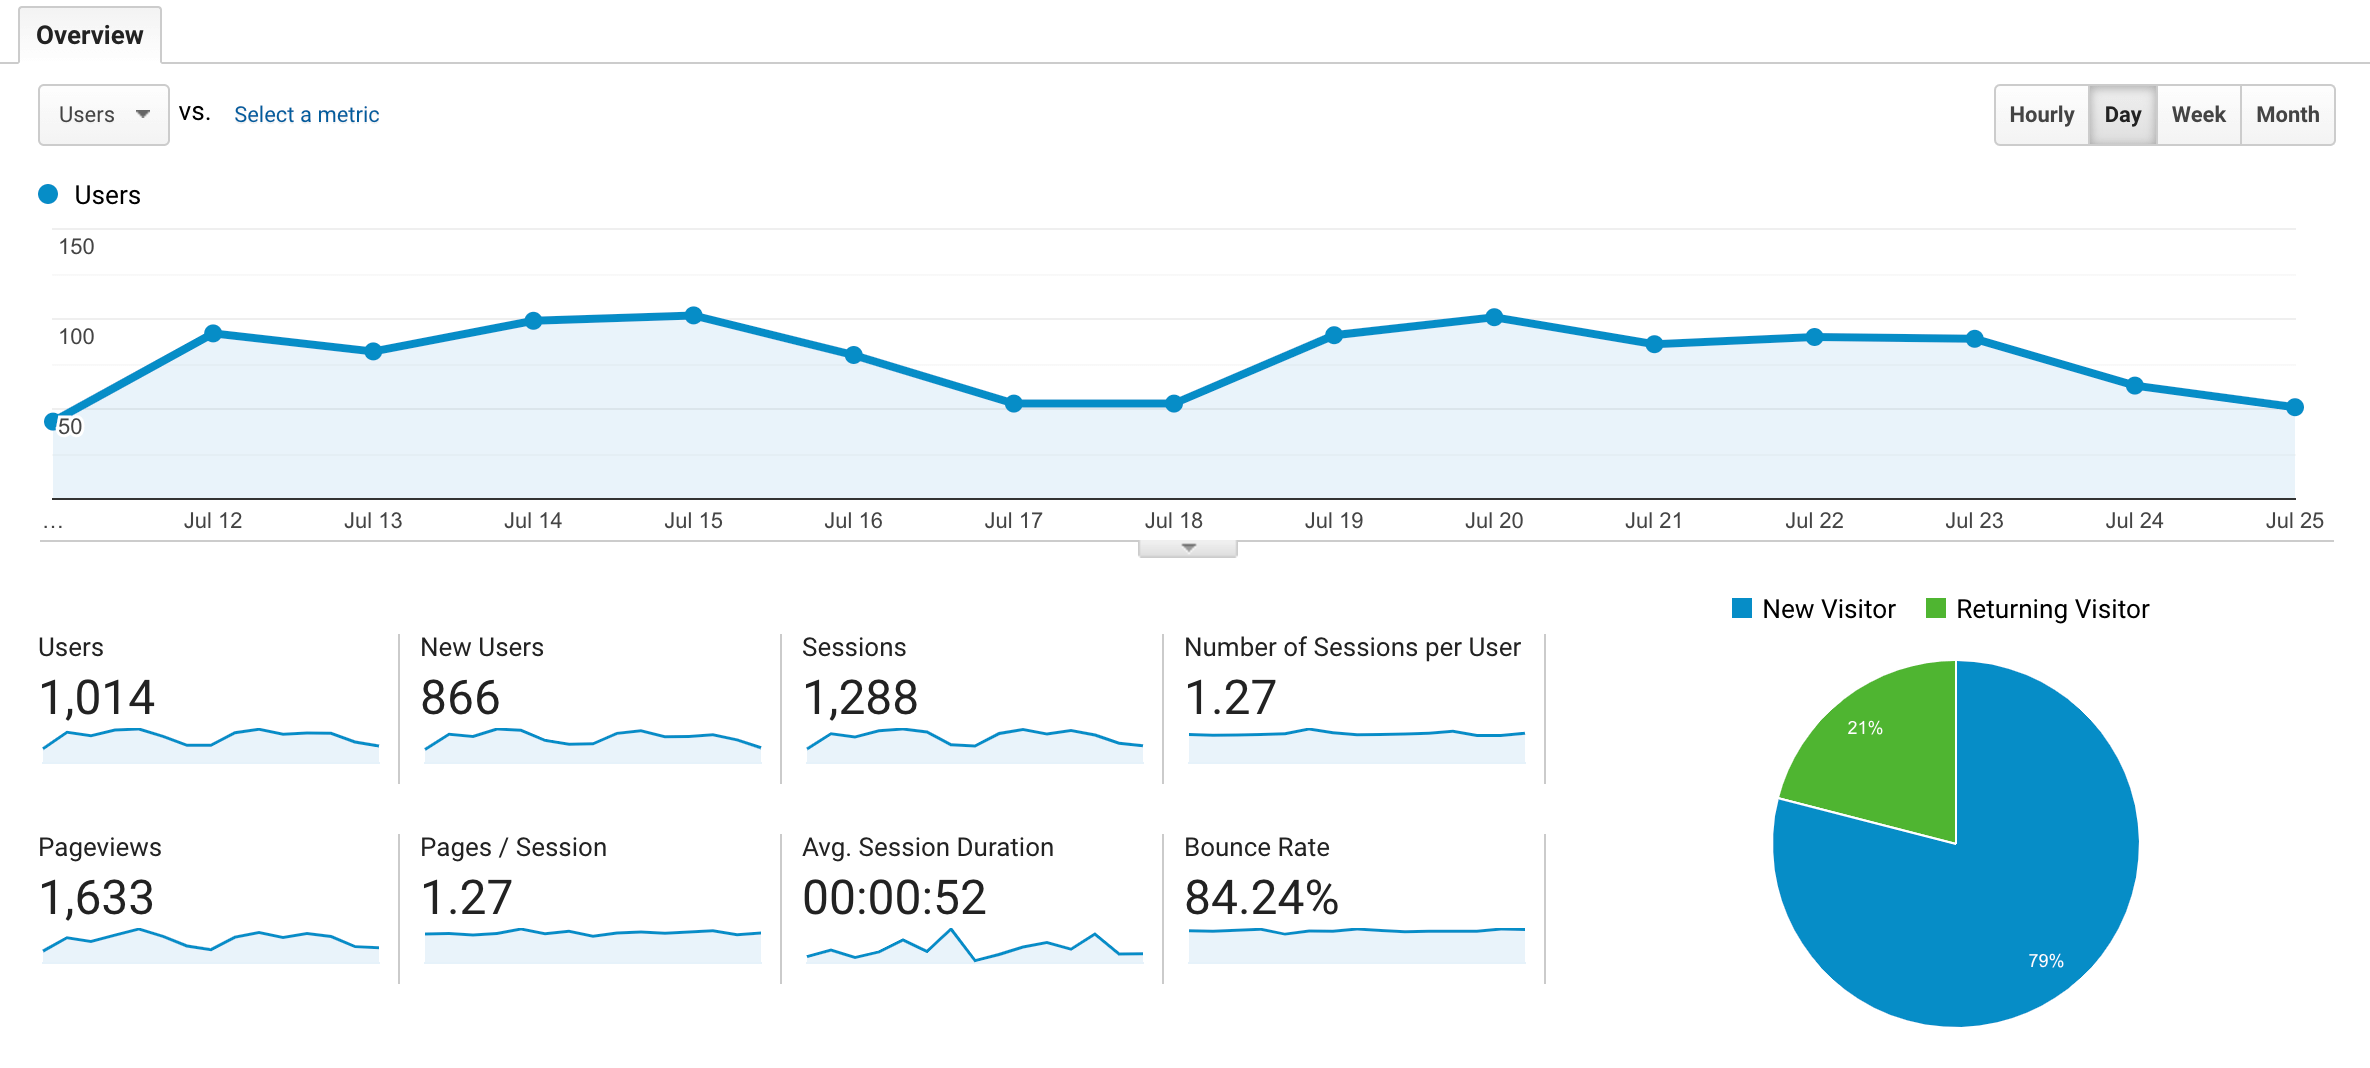
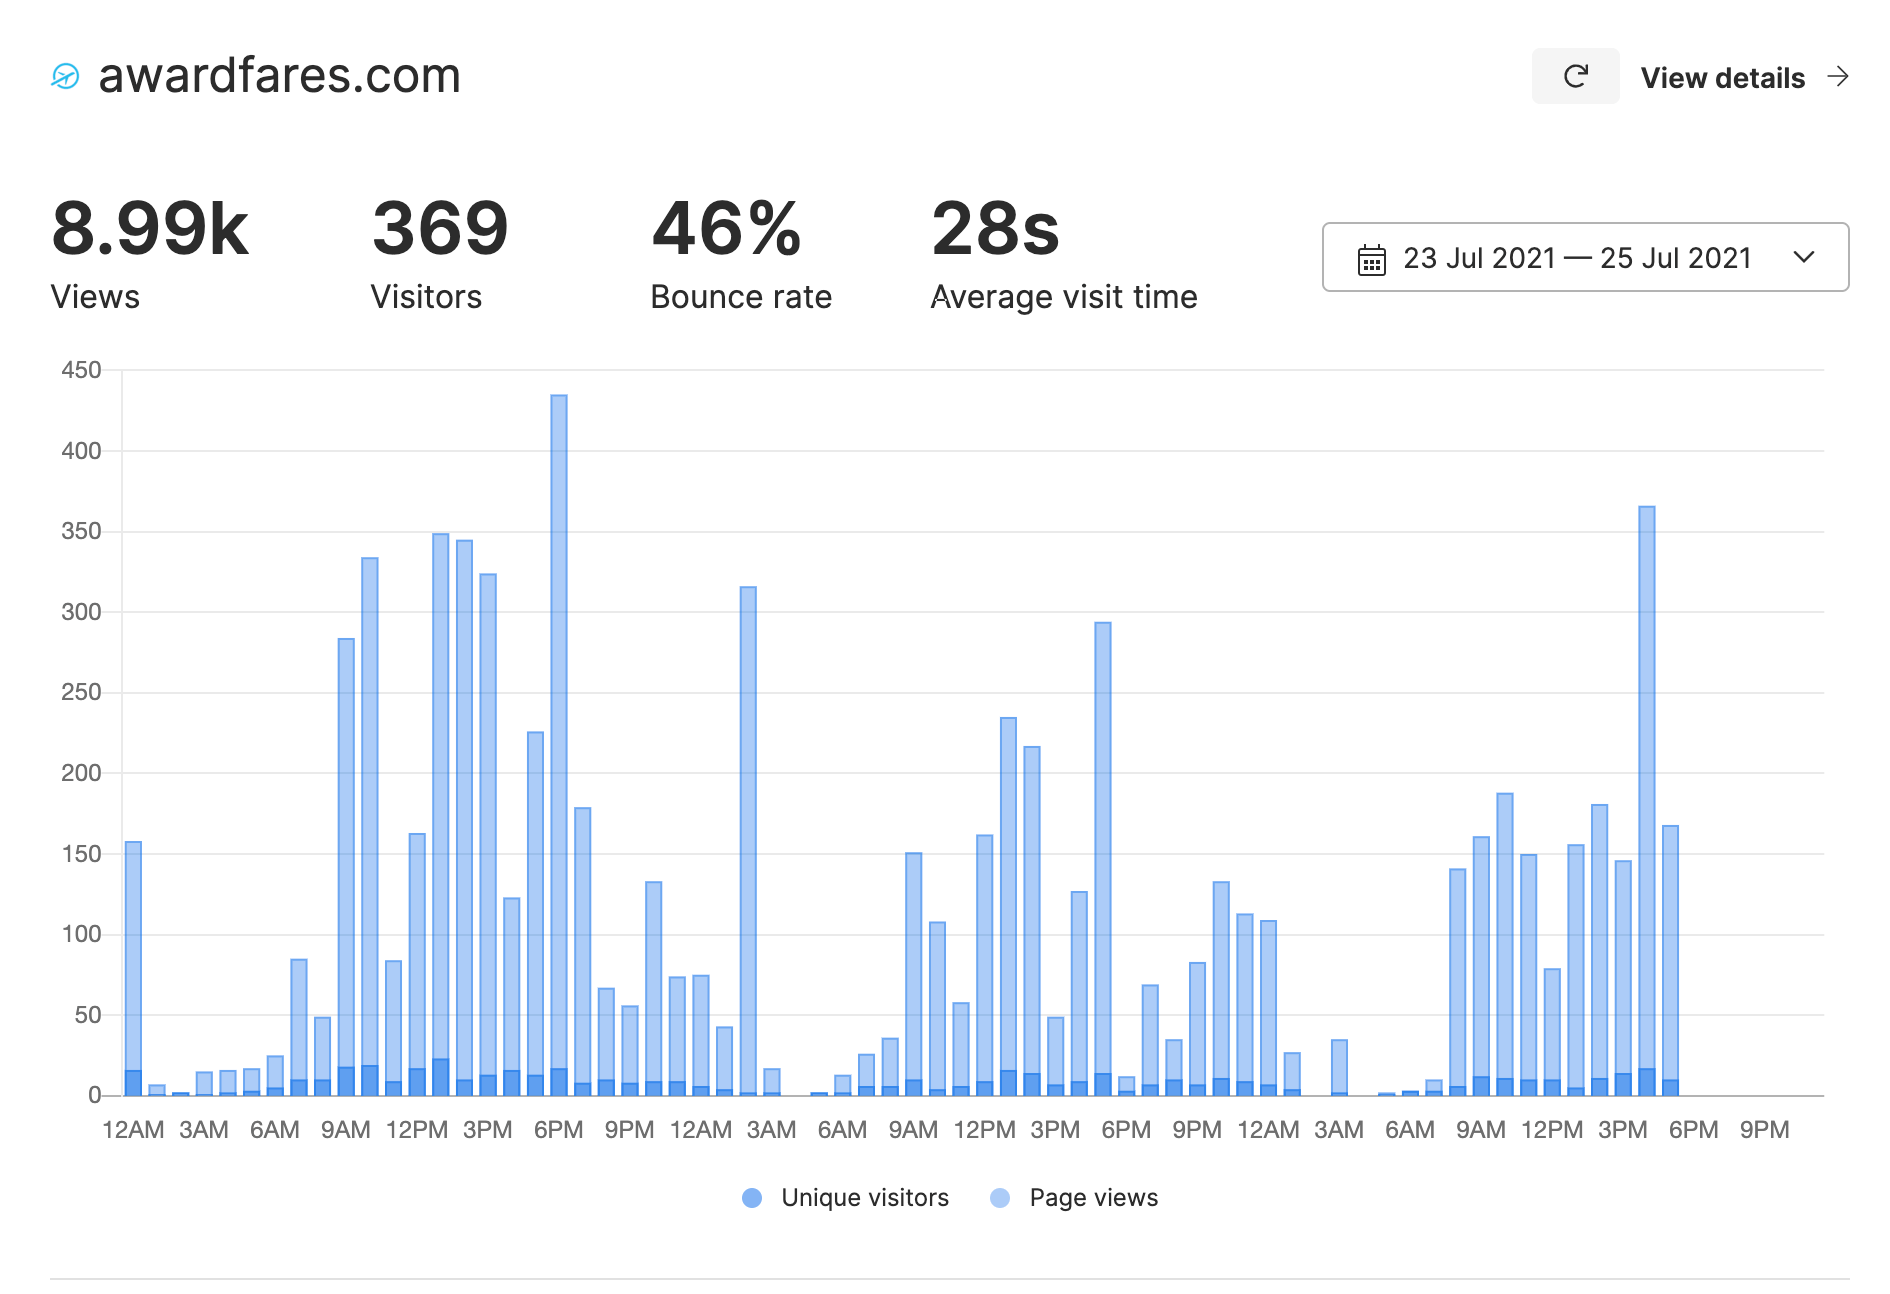
Example 2: AwardFares
I wrote this blog post as I was adding Umami to another one of my sites, AwardFares (hence the short comparison period). Again, Umami reported roughly 25% more visitors than Google Analytics.
However, the large discrepancy in page views is most likely due to the fact that this site uses dynamically updated page URLs in some places (which umami seems to count, but Google Analytics does not).
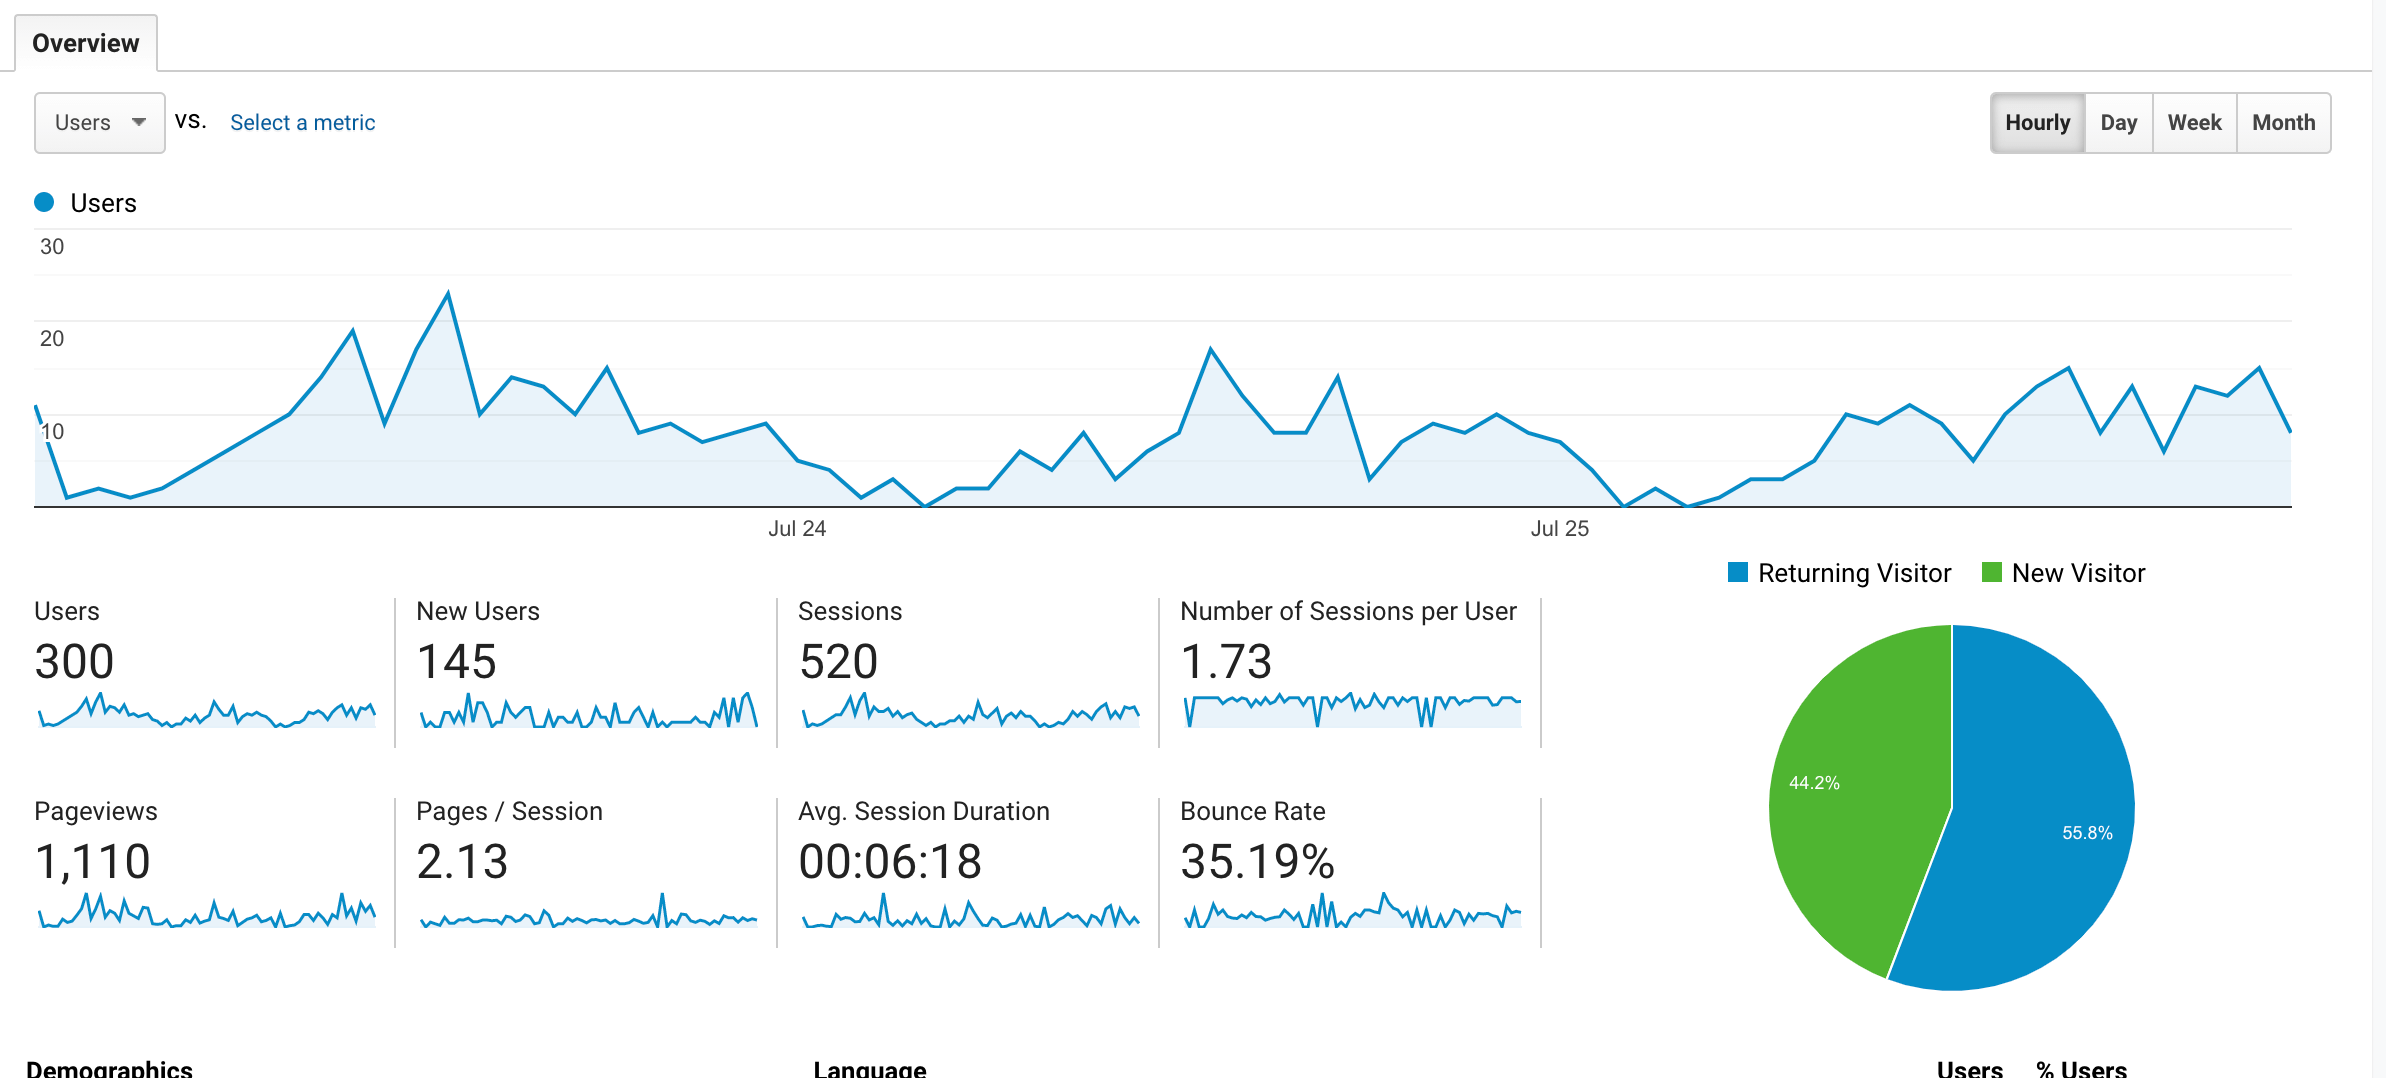
Example 3: My blog while trending on Hacker News
There’s clearly one exception though, namely, Hacker News traffic. Last month, my blog (which normally barely gets any traffic) reached the front page, and the discrepancy here was much larger, Umami reported roughly double the traffic compared to Google Analytics.

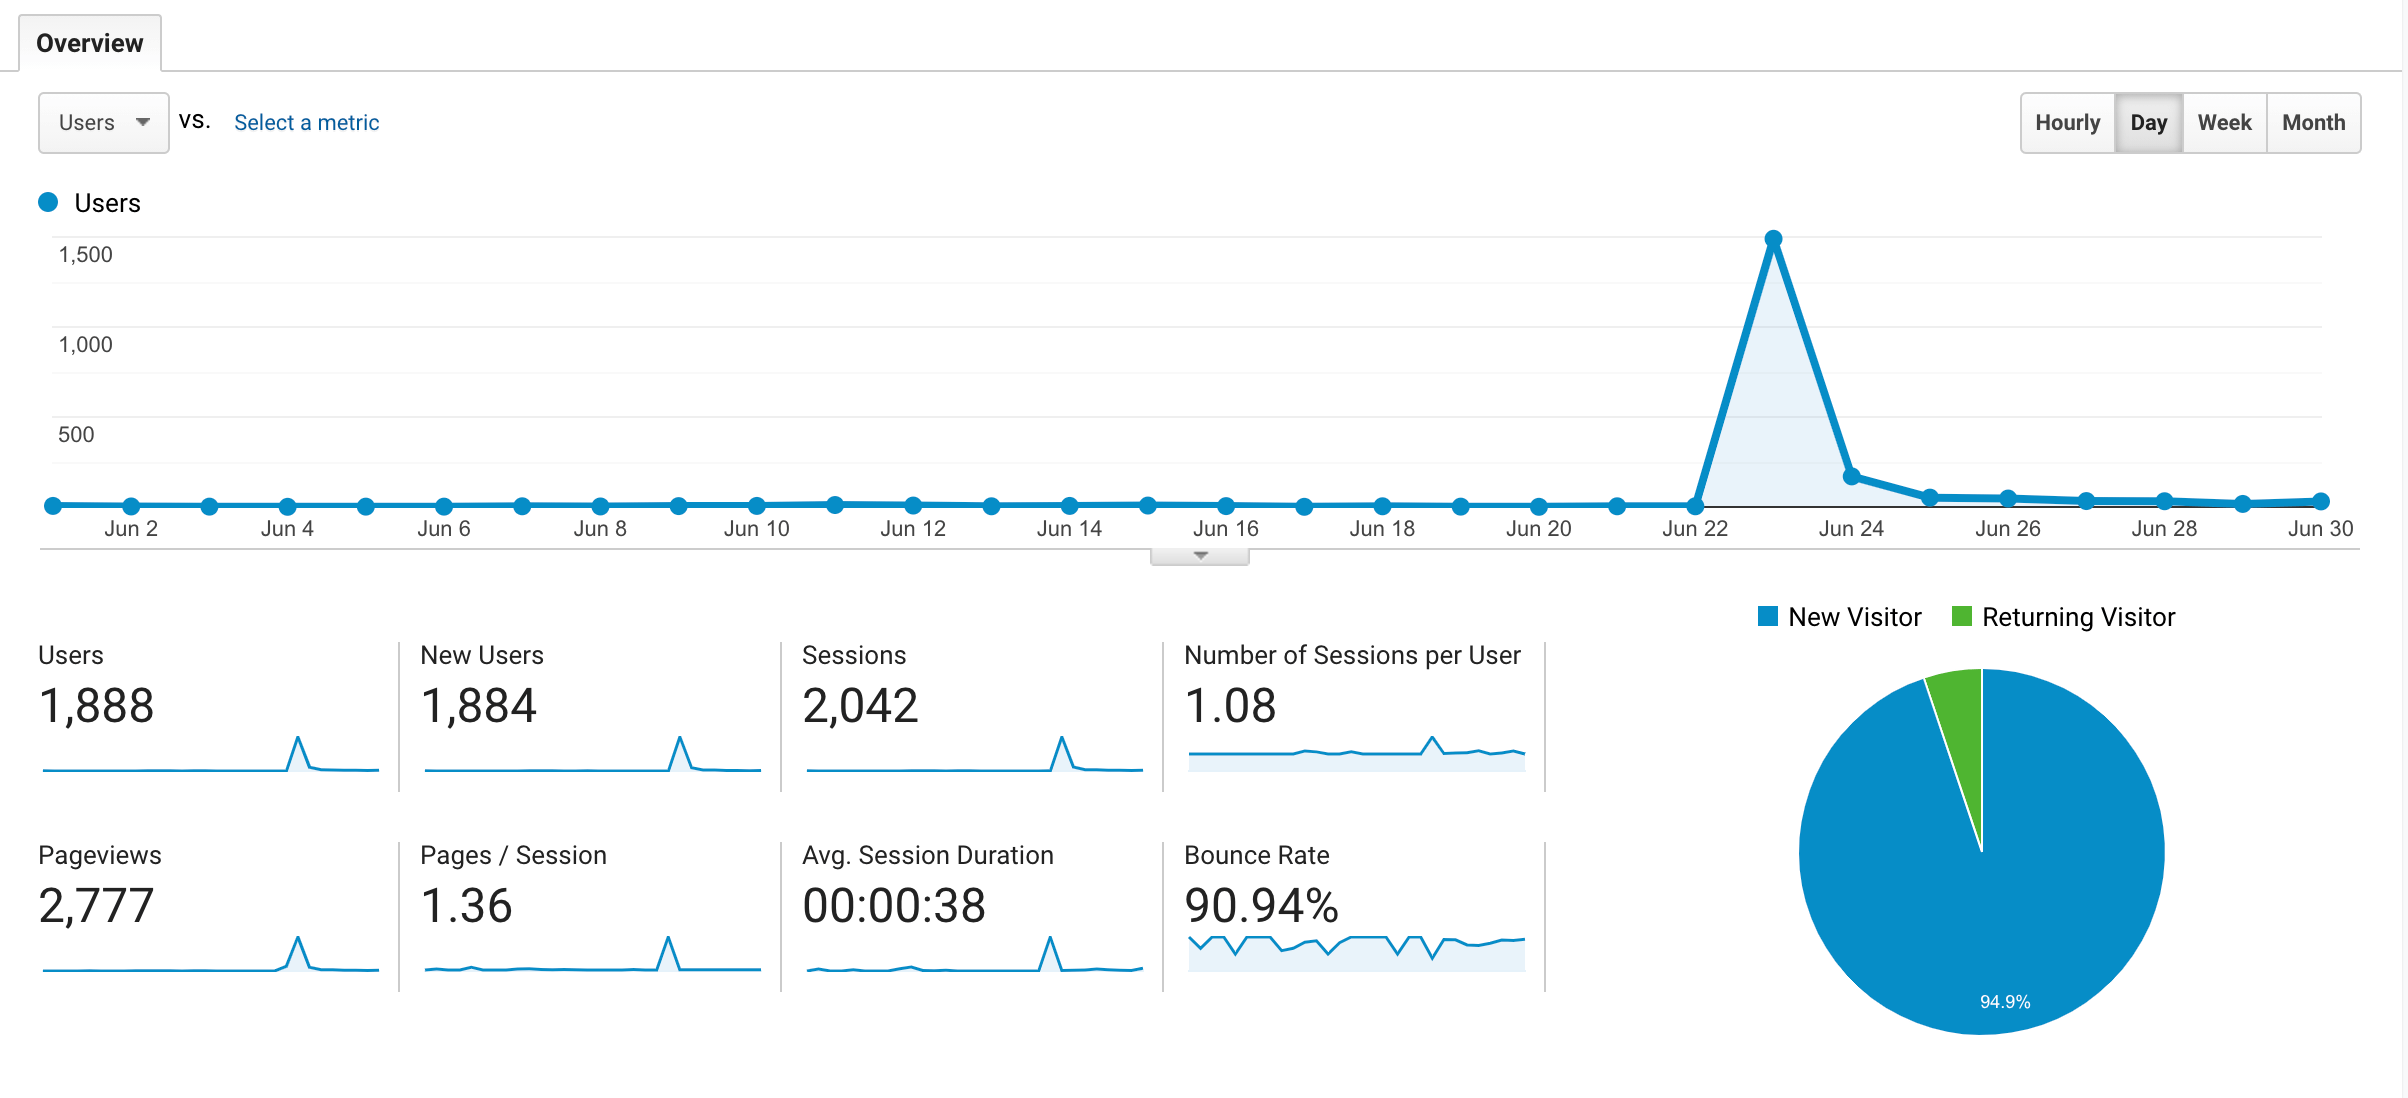
I guess this makes sense, a tech-savvy audience is more likely to be running an ad/tracking blocker. The moral of the story is, understand your audience.
Final thoughts
I think Umami is a great compliment to other analytics tools, and I could even see myself switching over to it completely and removing Google Analytics in the future.
For me the main benefit with Umami is simplicity. It’s easy to setup, it has all the features I need, and the analytics seems relatively accurate. Whereas, Google Analytics has become a tool that I dread having to login to…
On the other hand, as a free, open-source project, you never know what will happen in the future. At least for now the project is actively maintained, and I hope it keeps going for the foreseeable future!
Everything I used in this tutorial:
- Umami - https://umami.is/
- Traefik - https://github.com/traefik/traefik
- DigitalOcean - https://www.digitalocean.com/
- Cloudflare - https://www.cloudflare.com/
- UptimeRobot - https://uptimerobot.com/