Integrating iOS 12 Siri Shortcuts using Objective-C
A simple, straight-forward, step-by-step guide to implementing iOS 12 Siri Shortcuts using Objective-C. I noticed that the documentation for integrating the new iOS Shortcuts API is very sparse. After a lot of trial and error, combined with reading the official docs and various tutorials and forum threads, I managed to get everything to work.
Introduction
Siri Shortcuts is a new feature in iOS 12 that enables 3rd party apps on iOS to be controlled using Siri. Essentially Siri “learns” as you use apps and then suggests actions. Furthermore, the new Shortcuts app let’s you build more complex sequences of actions, which is actually really cool.
For this tutorial I will be showing all of the steps I took to integrate shortcuts in Unified Remote. Unified Remote is an app that turns your smartphone into a remote control for your computer. By integrating Shortcuts into Unified Remote you will be able to create shortcuts to open a remote on your device and to send remote actions directly using Siri Shortcuts or the Shortcuts app.
Implementing Shortcuts
Apps can Donate Shortcuts, which basically just means making iOS aware of what shortcuts are available in your app. There are two ways to donate shortcuts:
- Donating a User Activity - A screen of your app that can be resumed.
- Donating an Interaction - An action that can be executed directly from a shortcut.
This tutorial will cover all required steps for donating and implementing both of the above. In my case, the goal was to donate a user activity whenever the user opens a remote in the app, and to donate an interaction when they trigger an action inside a remote.
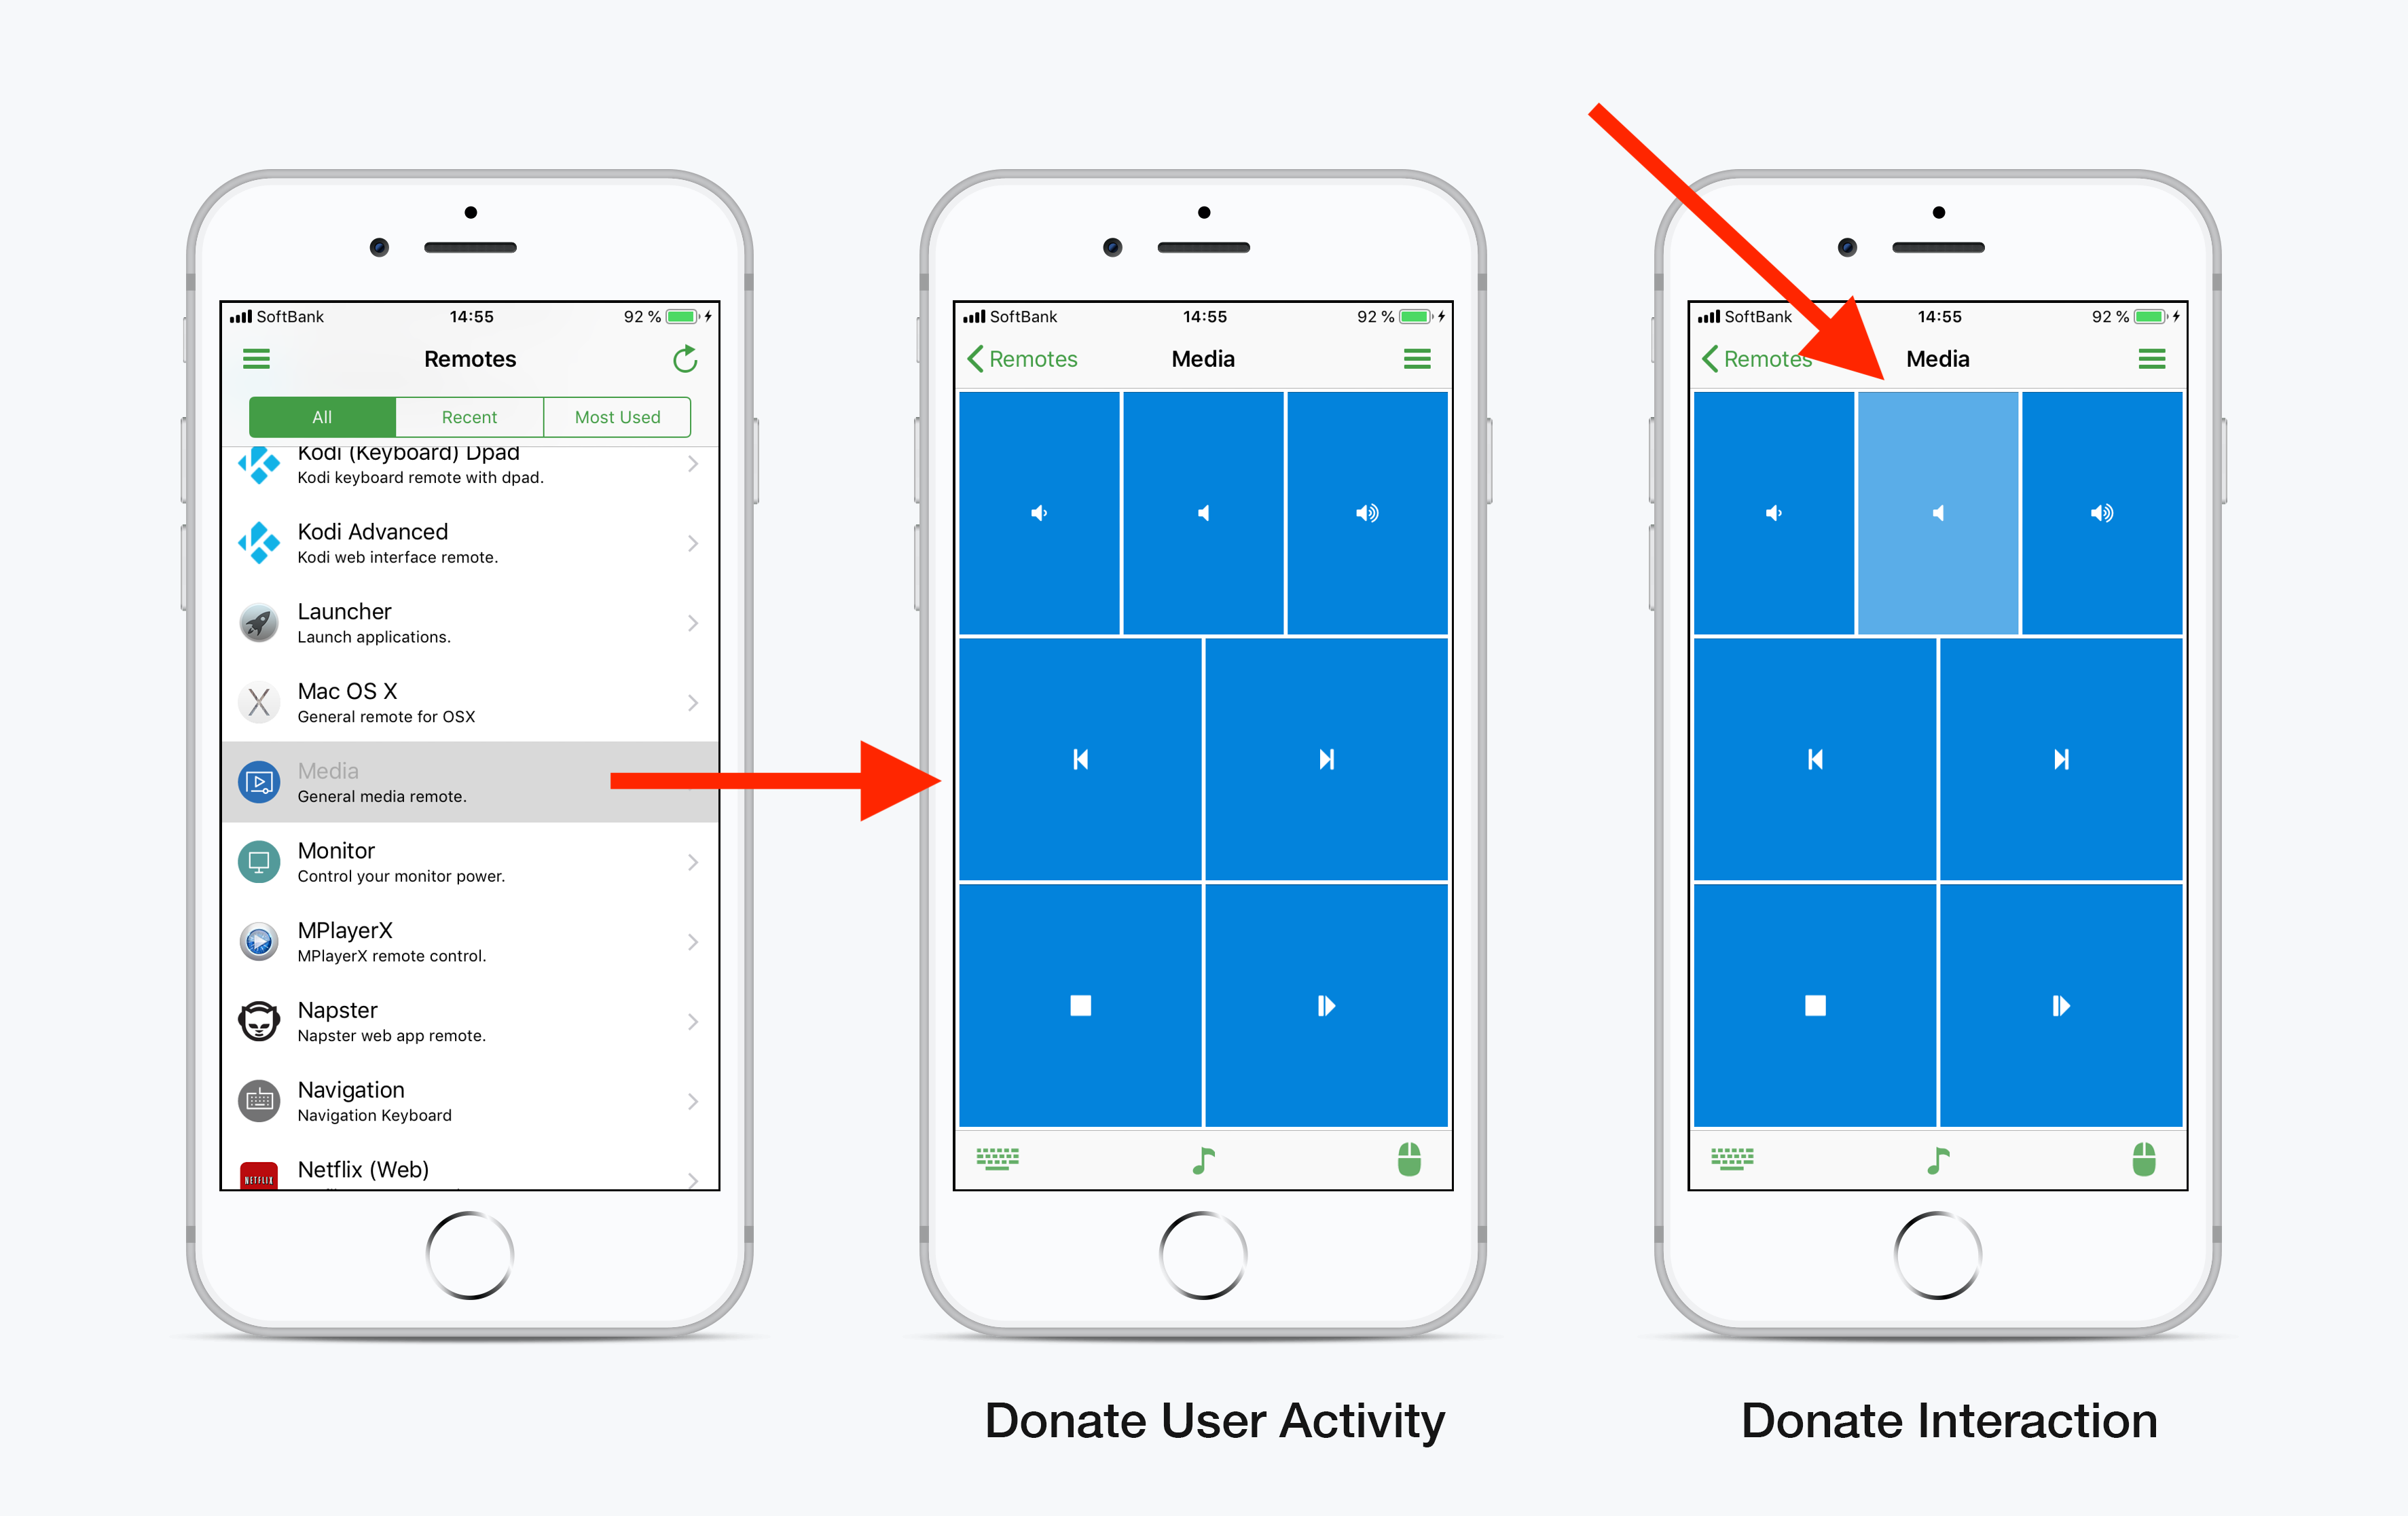
Donating a User Activity
1) Choose a screen where you want to donate a user activity and create an NSUserActivity.
- Construct a
NSUserActivityinviewDidLoadusing an appropriate “activity type” string. - Choose a title.
- Make sure you enable
eligibleForPrediction. - Add any
userInfothat you need to be able resume the screen later. - Set
requiredUserInfoKeys(I’m not sure if this step is required). - IMPORTANT: Assign your
NSUserActivityto the view controller’s built-inuserActivityproperty. The view controller automatically invokesbecomeCurrentandresignCurrentfor us. At first I tried doing this manually but that does not seem to work.
Be sure to wrap your code with @available(iOS 12.0, *) if your app supports older versions of iOS. Choose an appropriate “activity type” (e.g. your app identifier followed by a screen name).
- (void)viewDidLoad
{
    // Create NSUserActivity for Siri Shortcuts
    if (@available(iOS 12.0, *)) {
        NSUserActivity* userActivity = [[NSUserActivity alloc] initWithActivityType:@"com.unified.UR.Remote"];
        userActivity.title = [NSString stringWithFormat:@"Open %@ Remote", self.remote.name];
        userActivity.eligibleForPrediction = YES;
        userActivity.userInfo = @{@"ID" : self.remote.ID};
        userActivity.requiredUserInfoKeys = [NSSet setWithArray:userActivity.userInfo.allKeys];
        self.userActivity = userActivity; // Calls becomeCurrent/resignCurrent for us...
    }
}
2) Implement the updateUserActivityState method as well since (for whatever reason) the userInfo gets cleared by the system. See this Apple forums thread and this medium article for more details.
-(void)updateUserActivityState:(NSUserActivity *)userActivity
{
    [userActivity addUserInfoEntriesFromDictionary:@{@"ID" : self.remote.ID}];
}
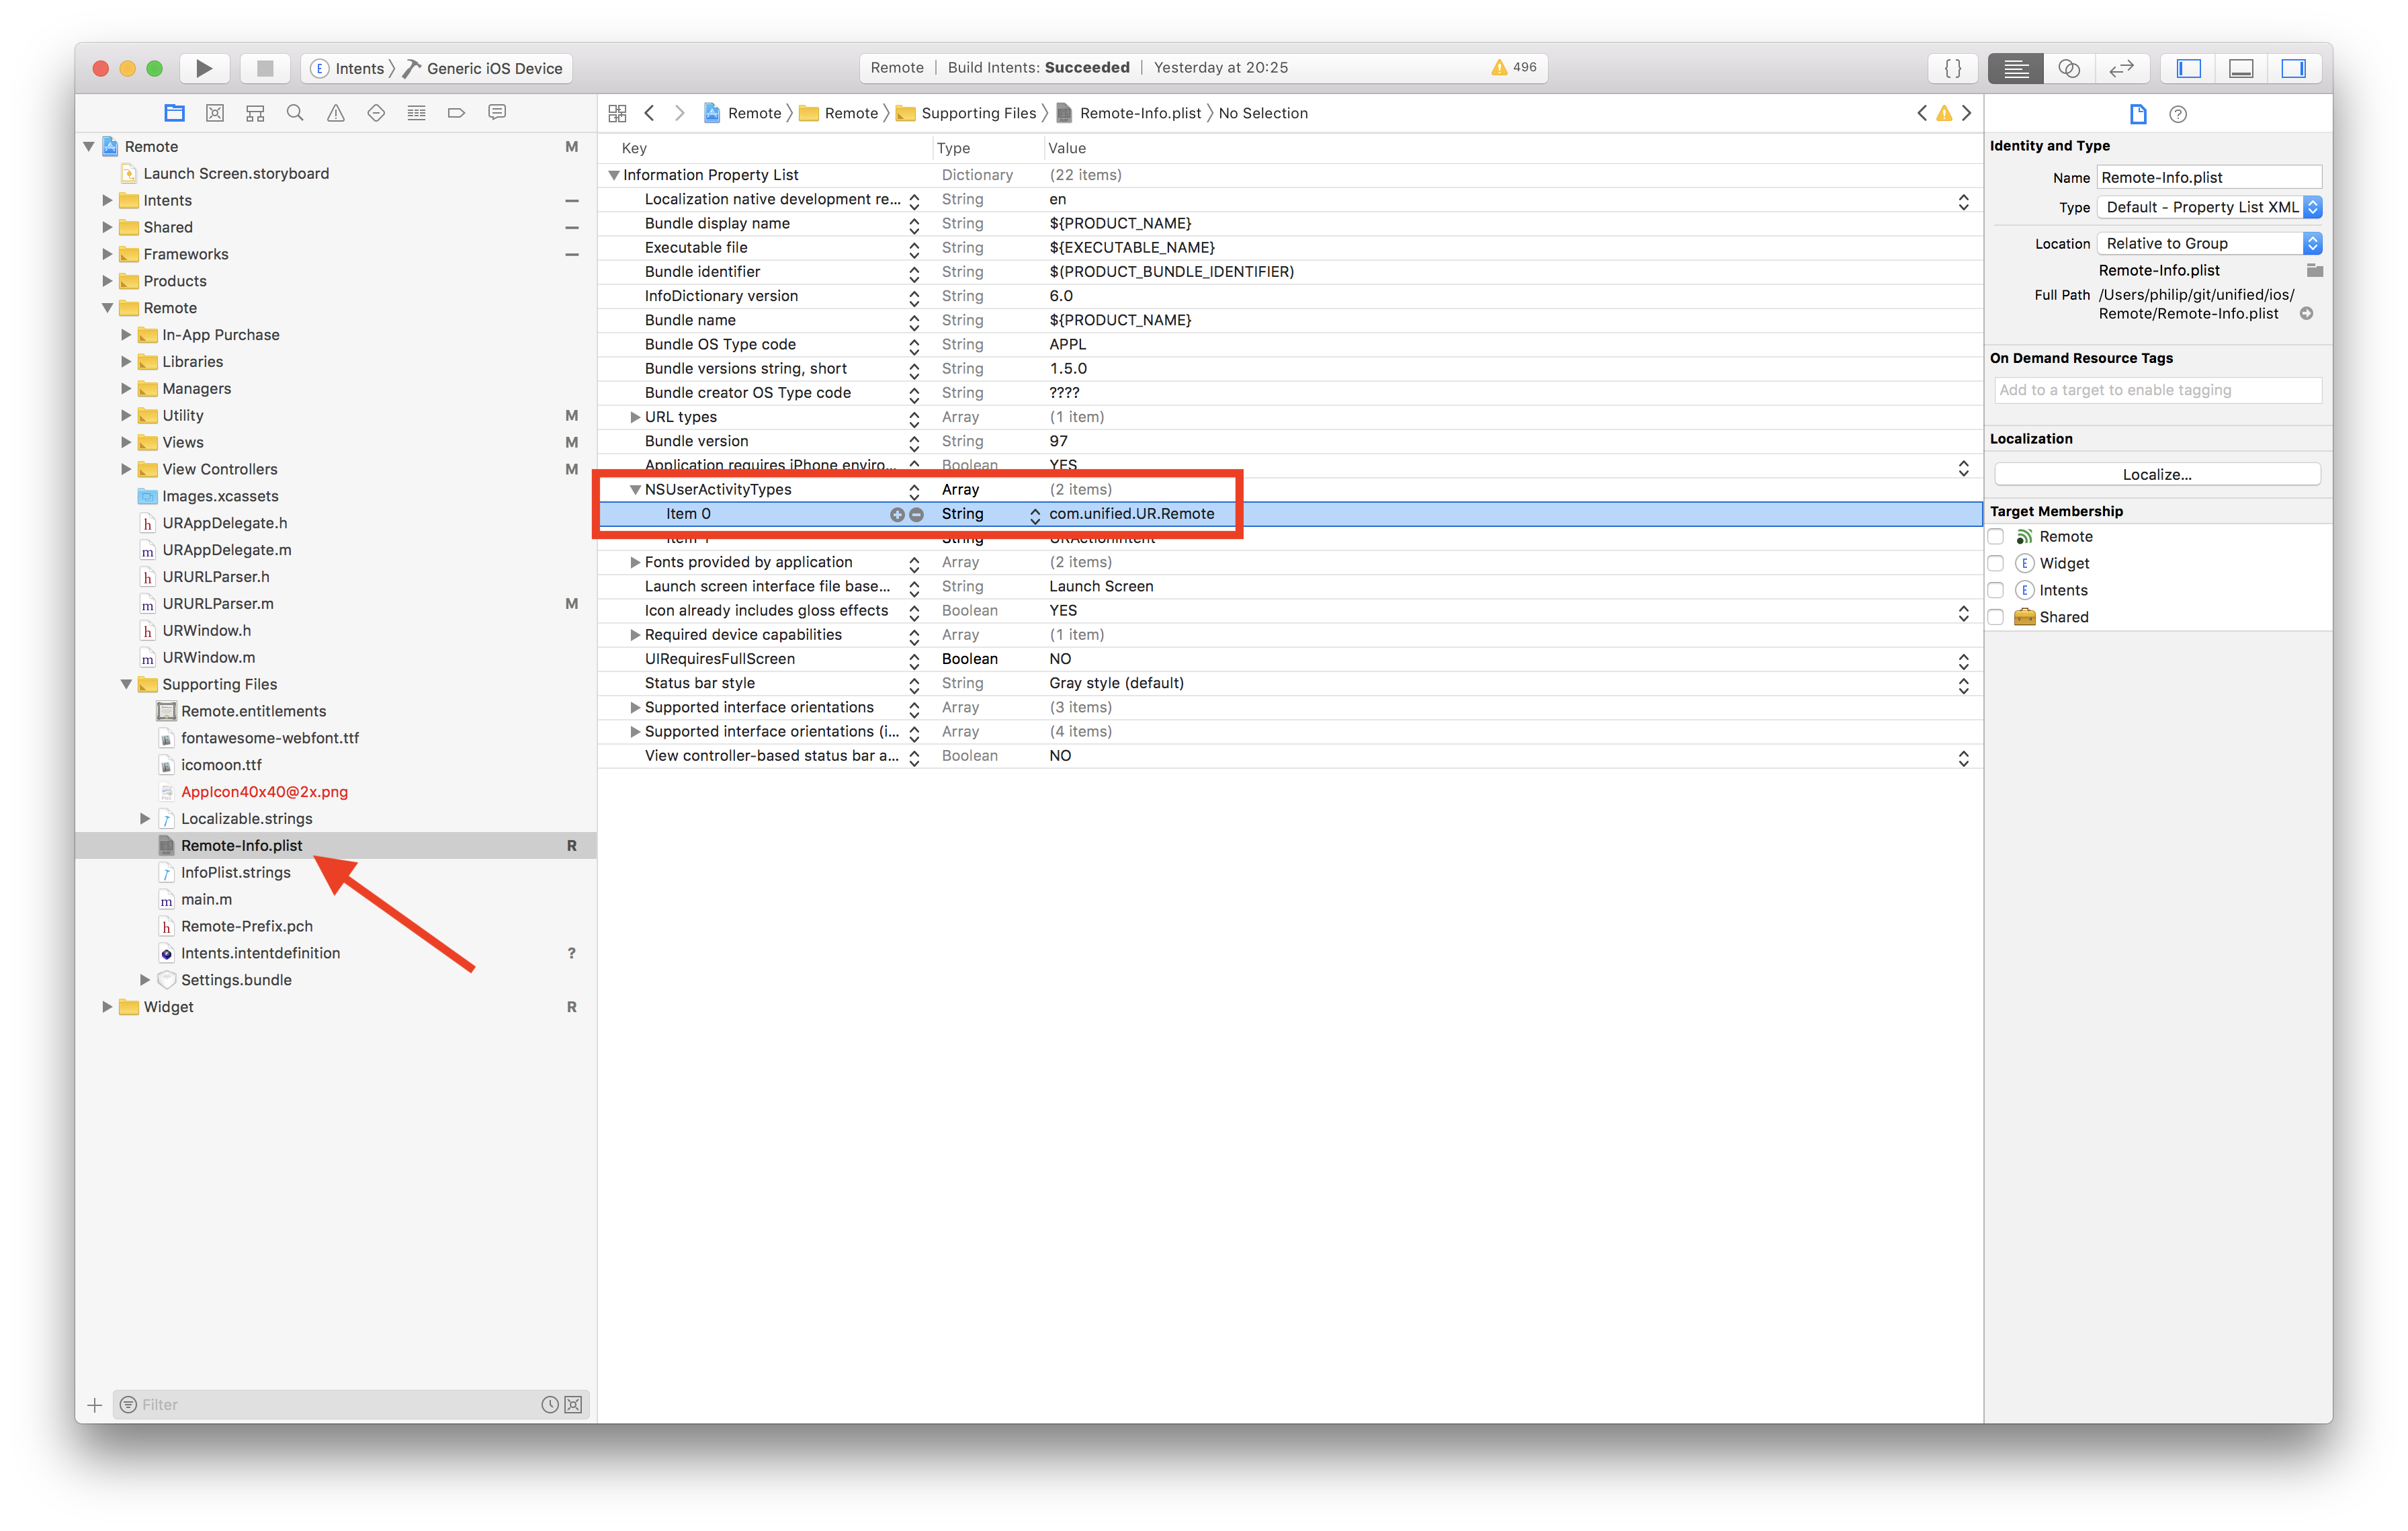
3) Edit your app’s Info.plist file.
- Add a new row called
NSUserActivityTypes. - Right-click and select
Value Type > Array. - Add another row below.
- Right-click and select
Shift Row Right. - Then add your “activity type” that you chose above.
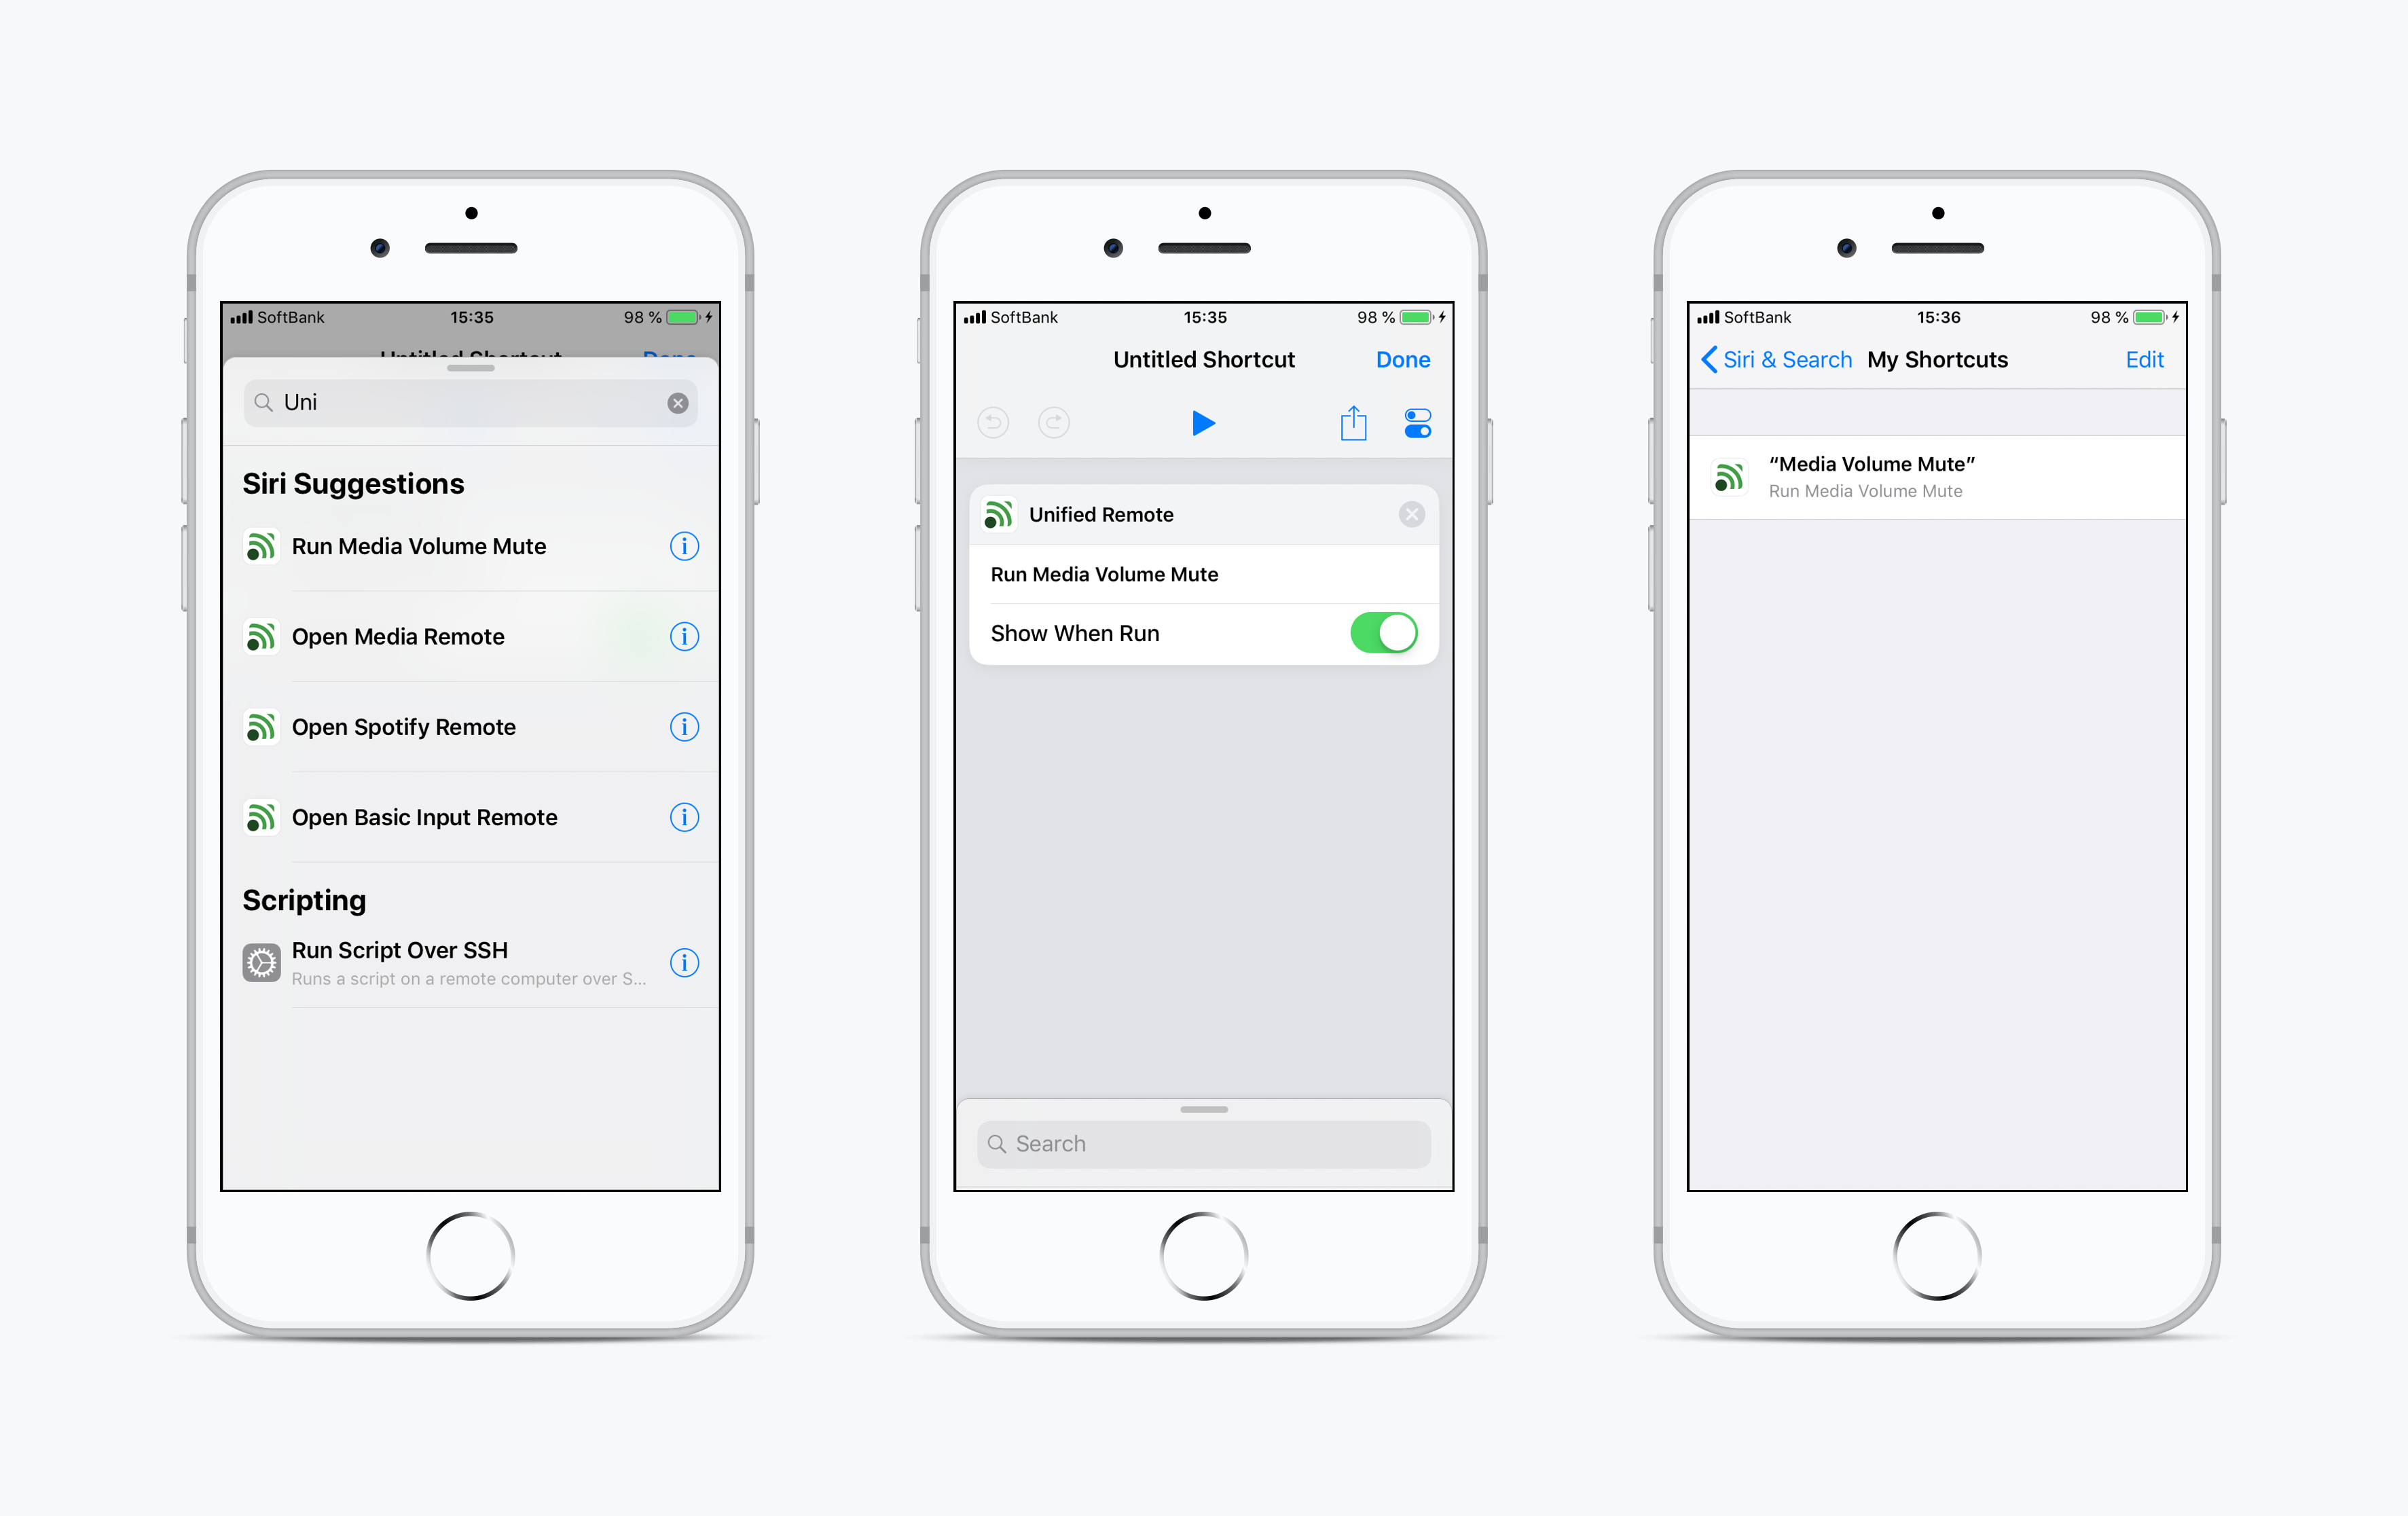
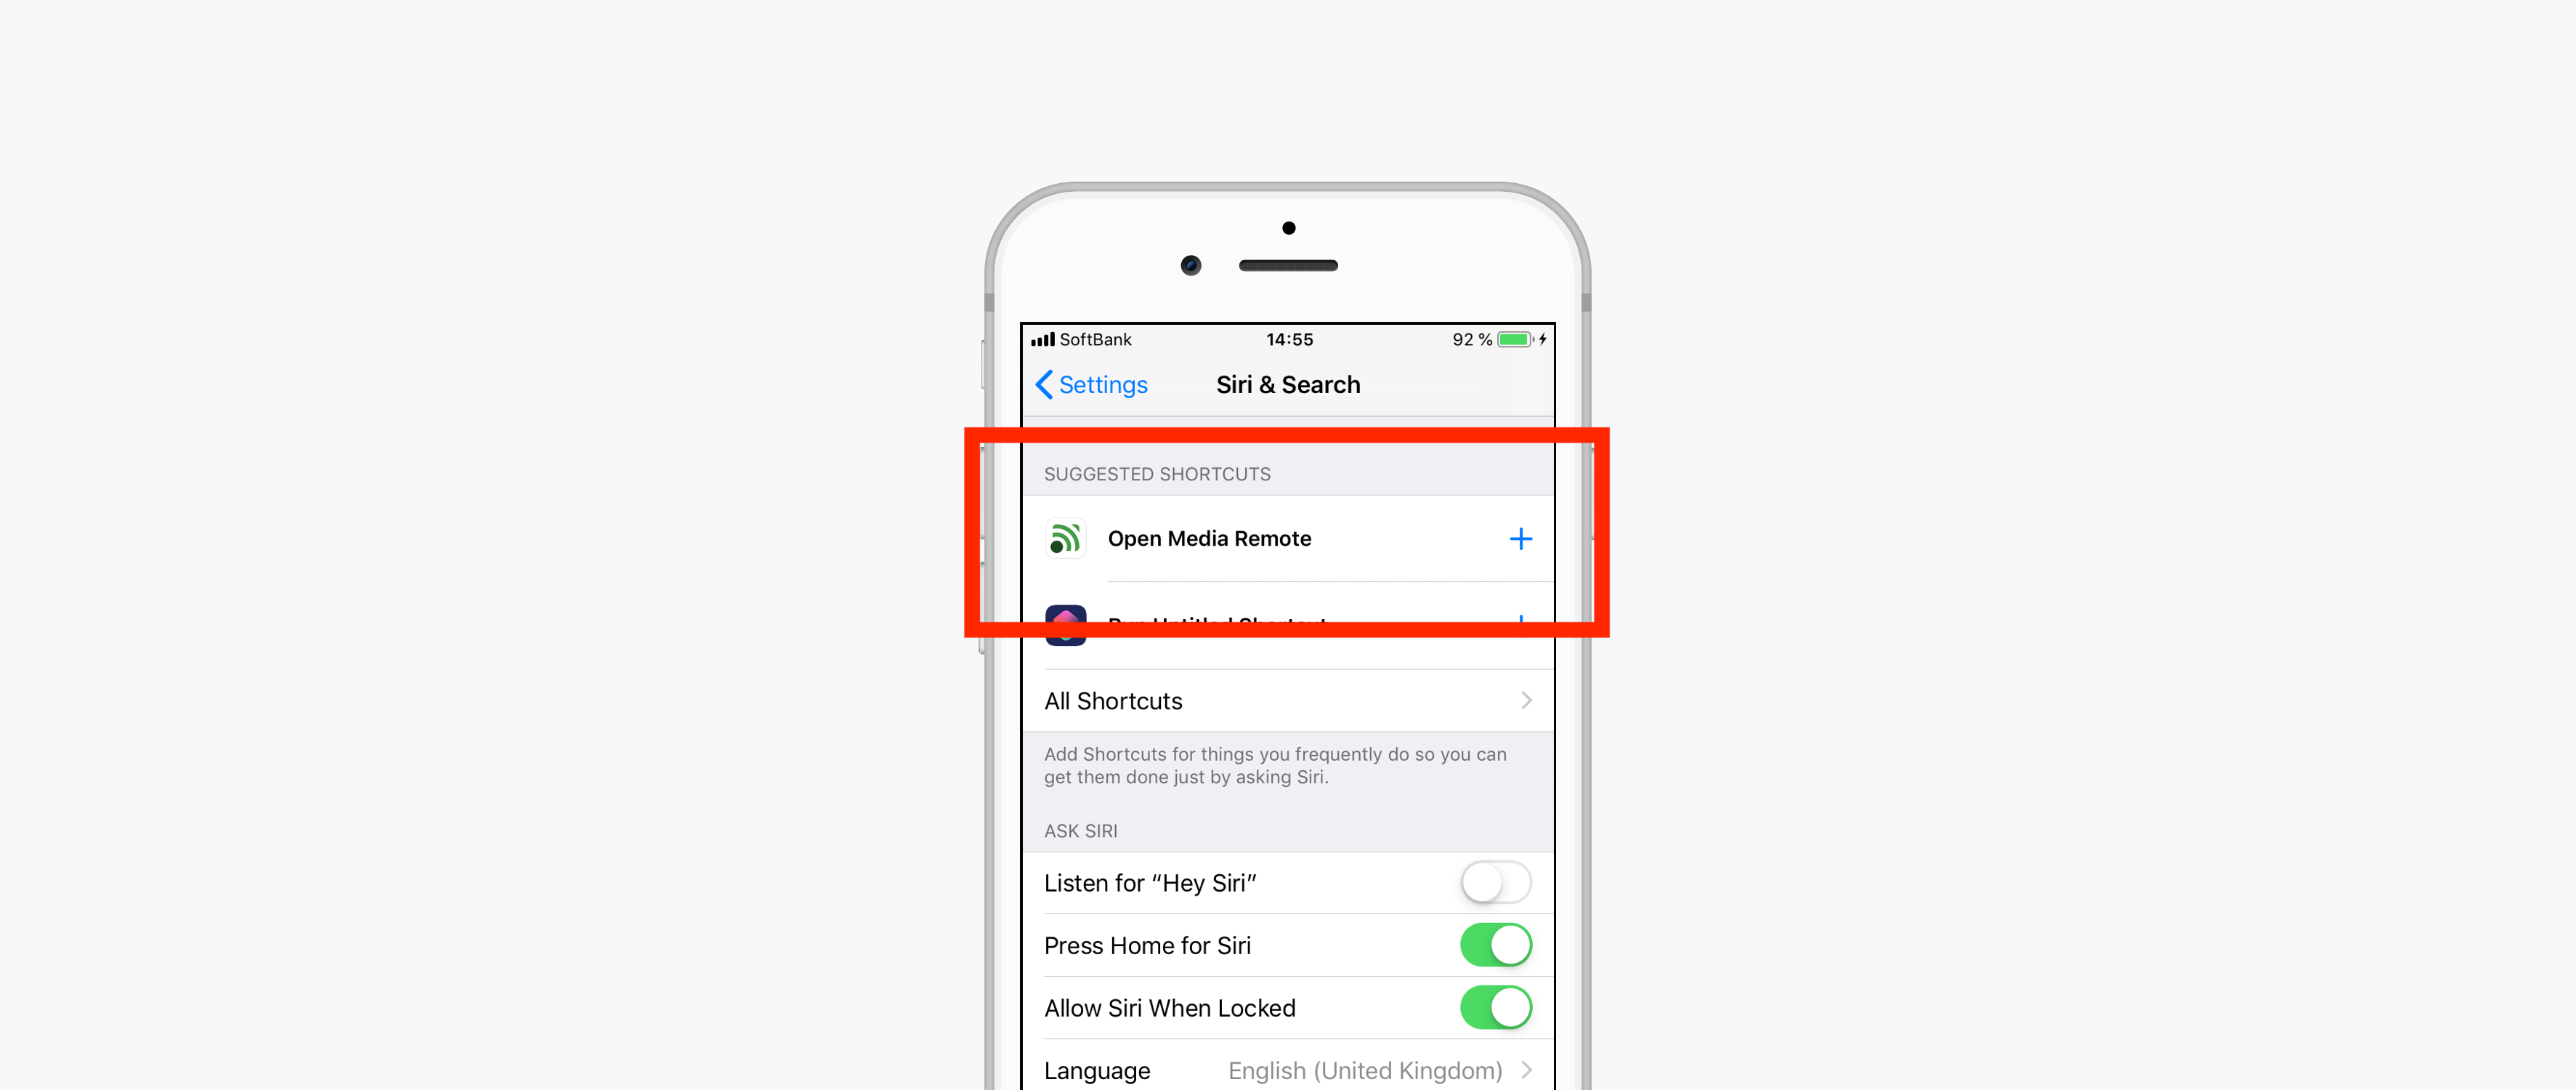
4) Test if your user activity is getting donated.
- Open the screen in your app.
- Go to iOS
Settings > Siri & Searchand check underSuggested Shortcuts.
You may have to trigger it a few times, or select All Shortcuts and search for your shortcut.
Handling a User Activity
Simply add the continueUserActivity handler to your AppDelegate.
- (BOOL)application:(UIApplication *)application continueUserActivity:(NSUserActivity *)userActivity restorationHandler:(void (^)(NSArray<id<UIUserActivityRestoring>> *restorableObjects))restorationHandler
{
    // Check to make sure it's the correct activity type
    if ([userActivity.activityType isEqualToString:@"com.unified.UR.Remote"])
    {
        // Extract the remote ID from the user info
        NSString* id = [userActivity.userInfo objectForKey:@"ID"];

        // Restore the remote screen...

        return YES;
    }
    return NO;
}
Donating an Interaction
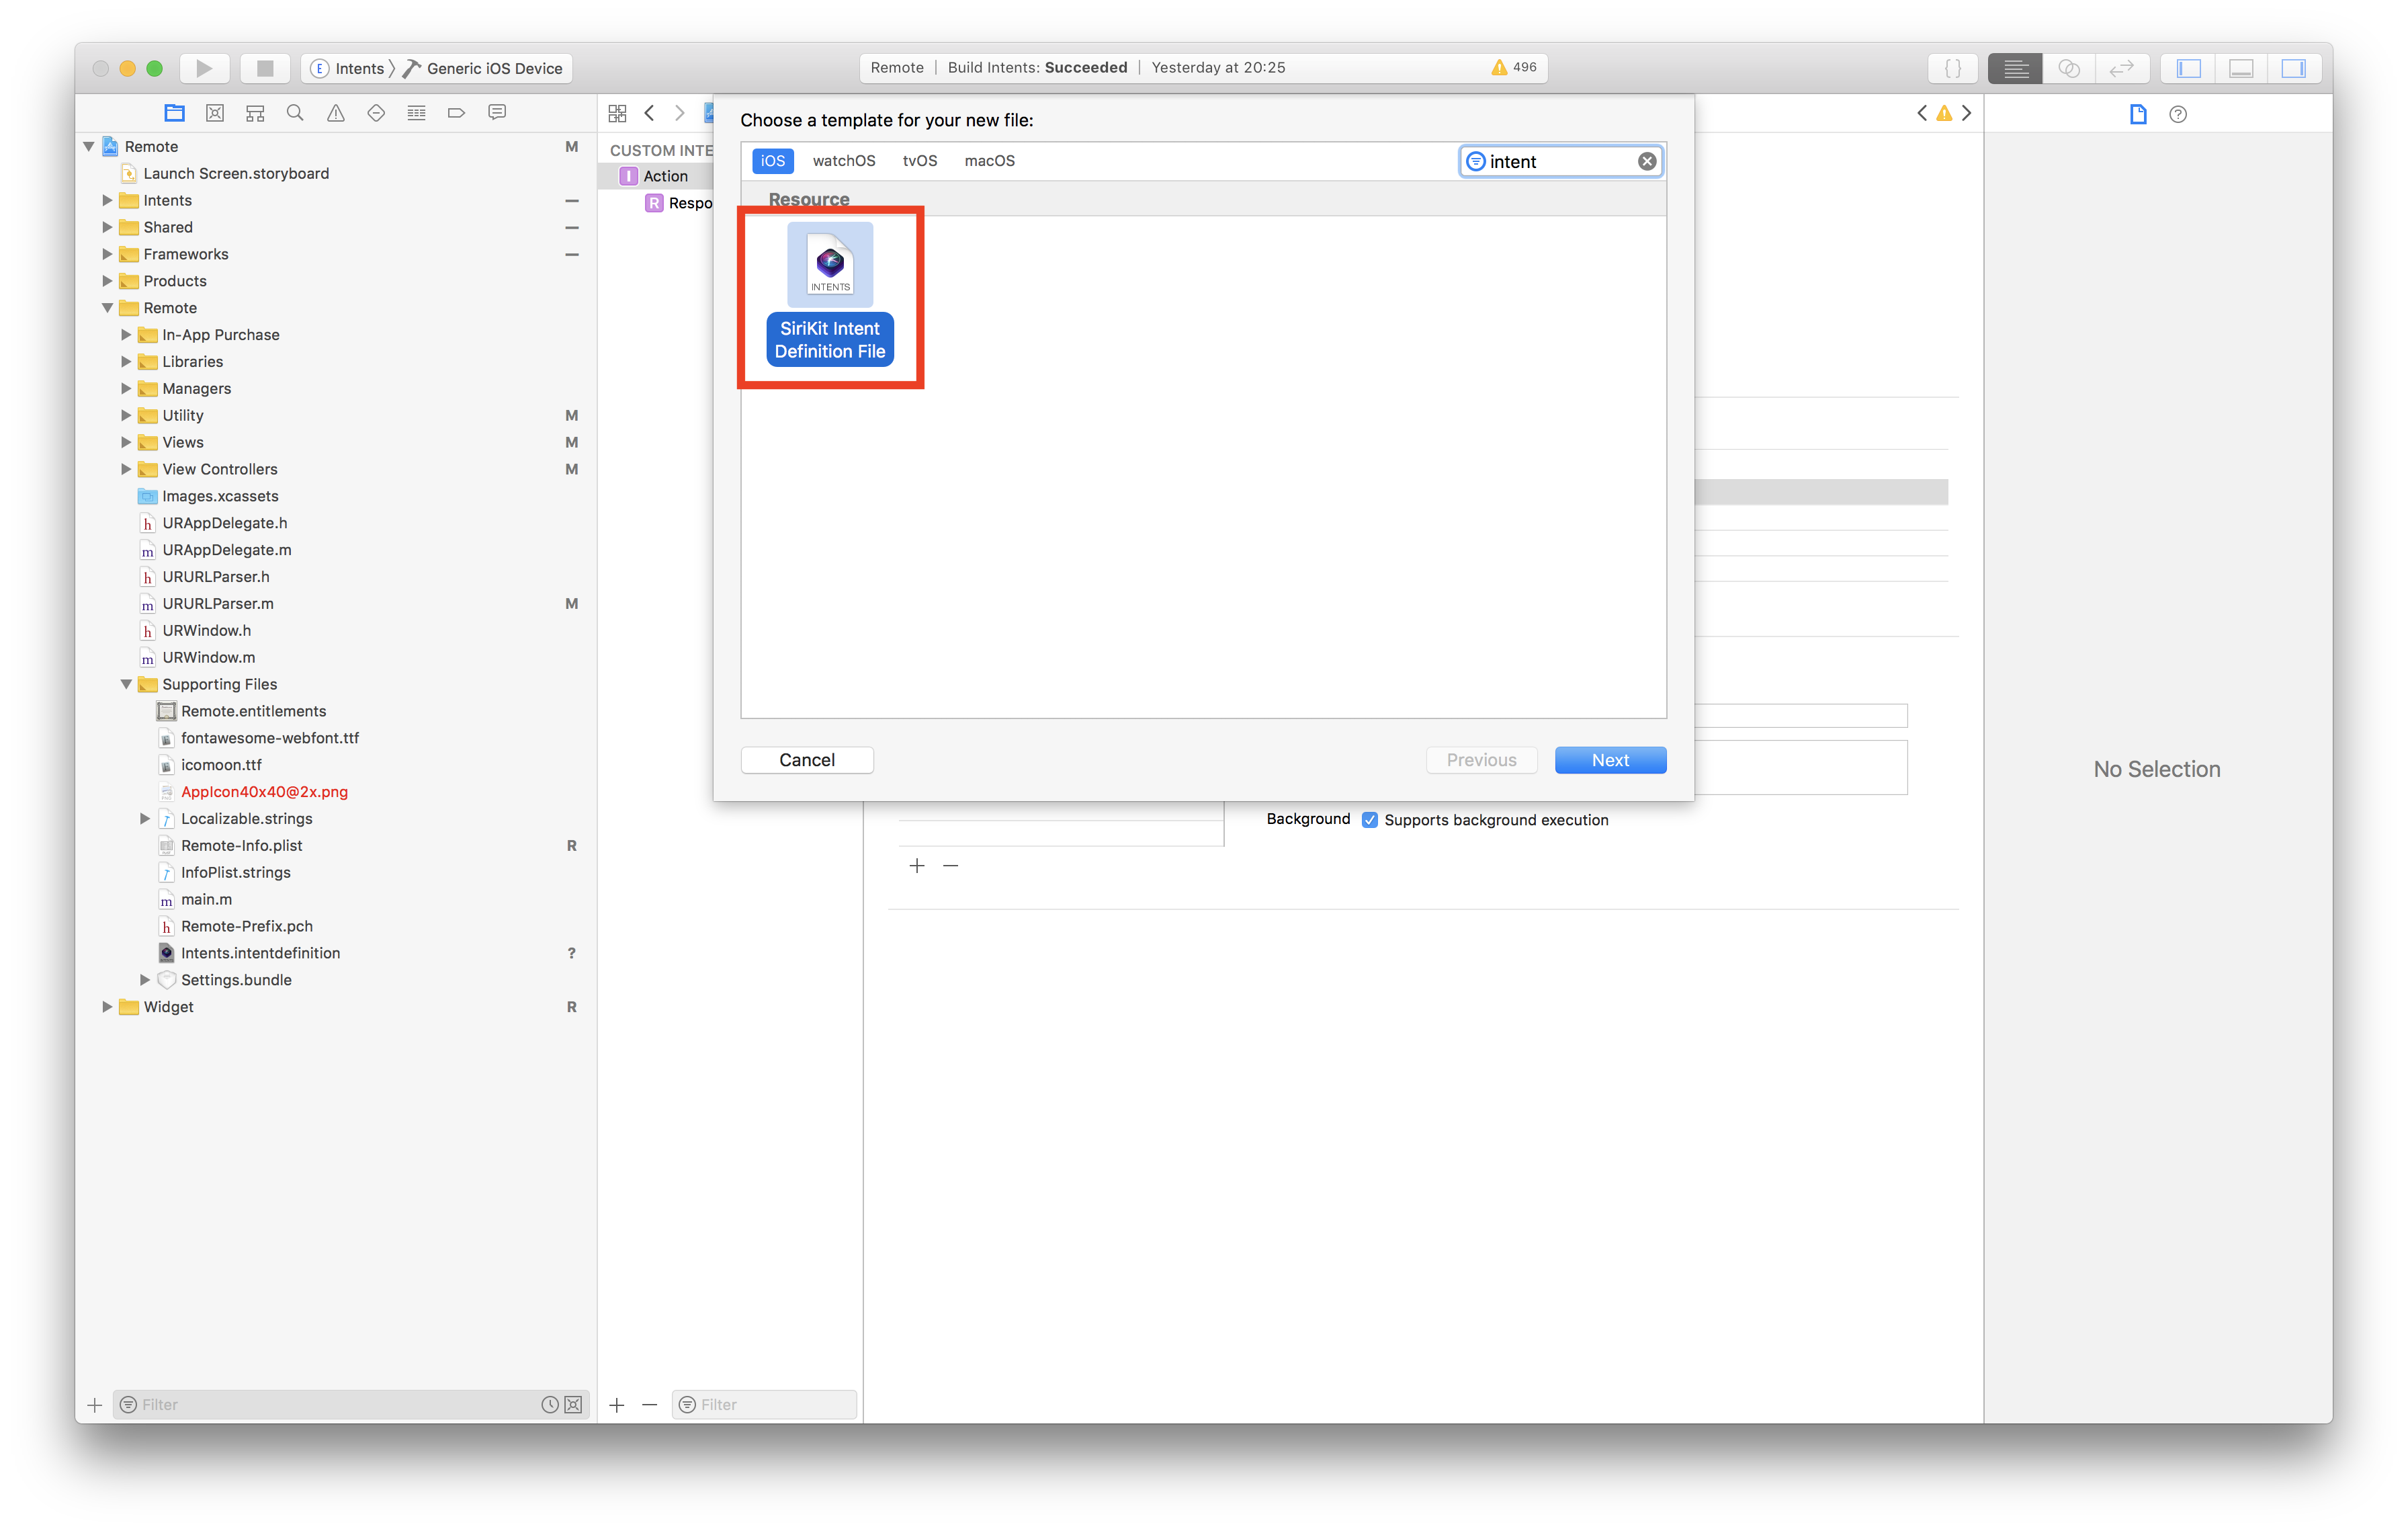
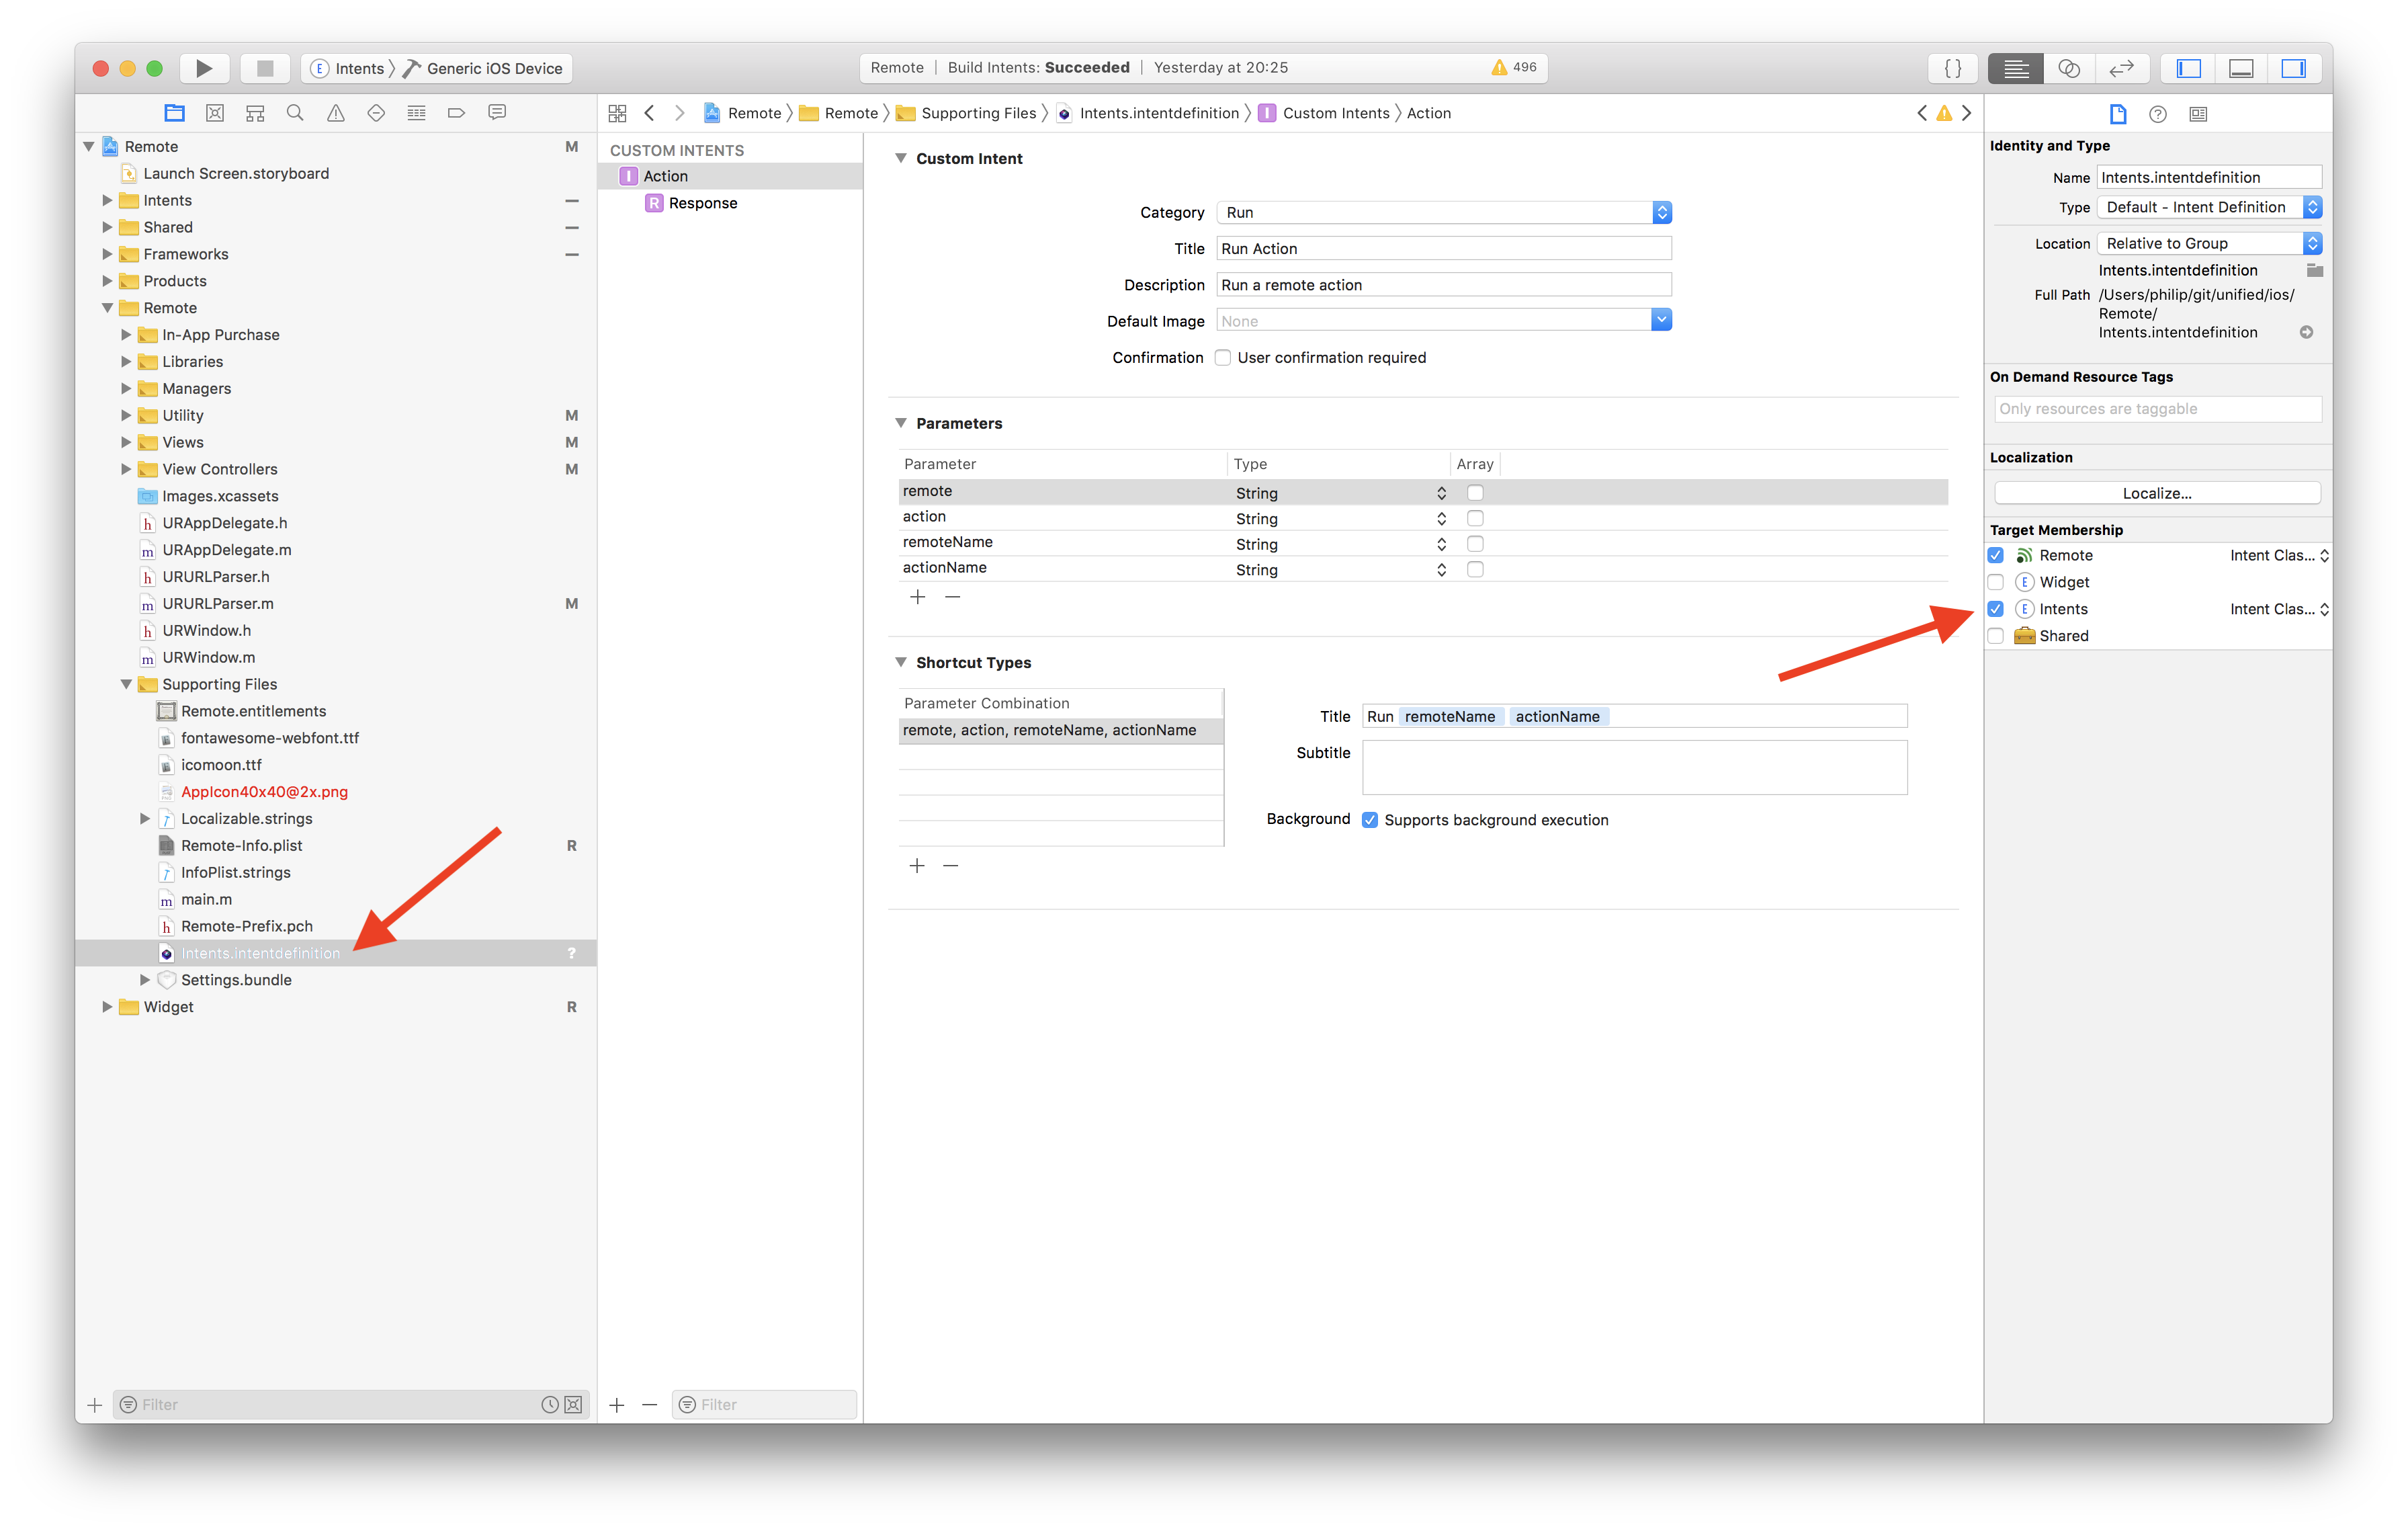
1) Add an Intent Definition File to your main app target so that we can define a custom intent.
- Right-click in your project structure
- Select
New File... - Add a
SiriKit Intent Definition File.
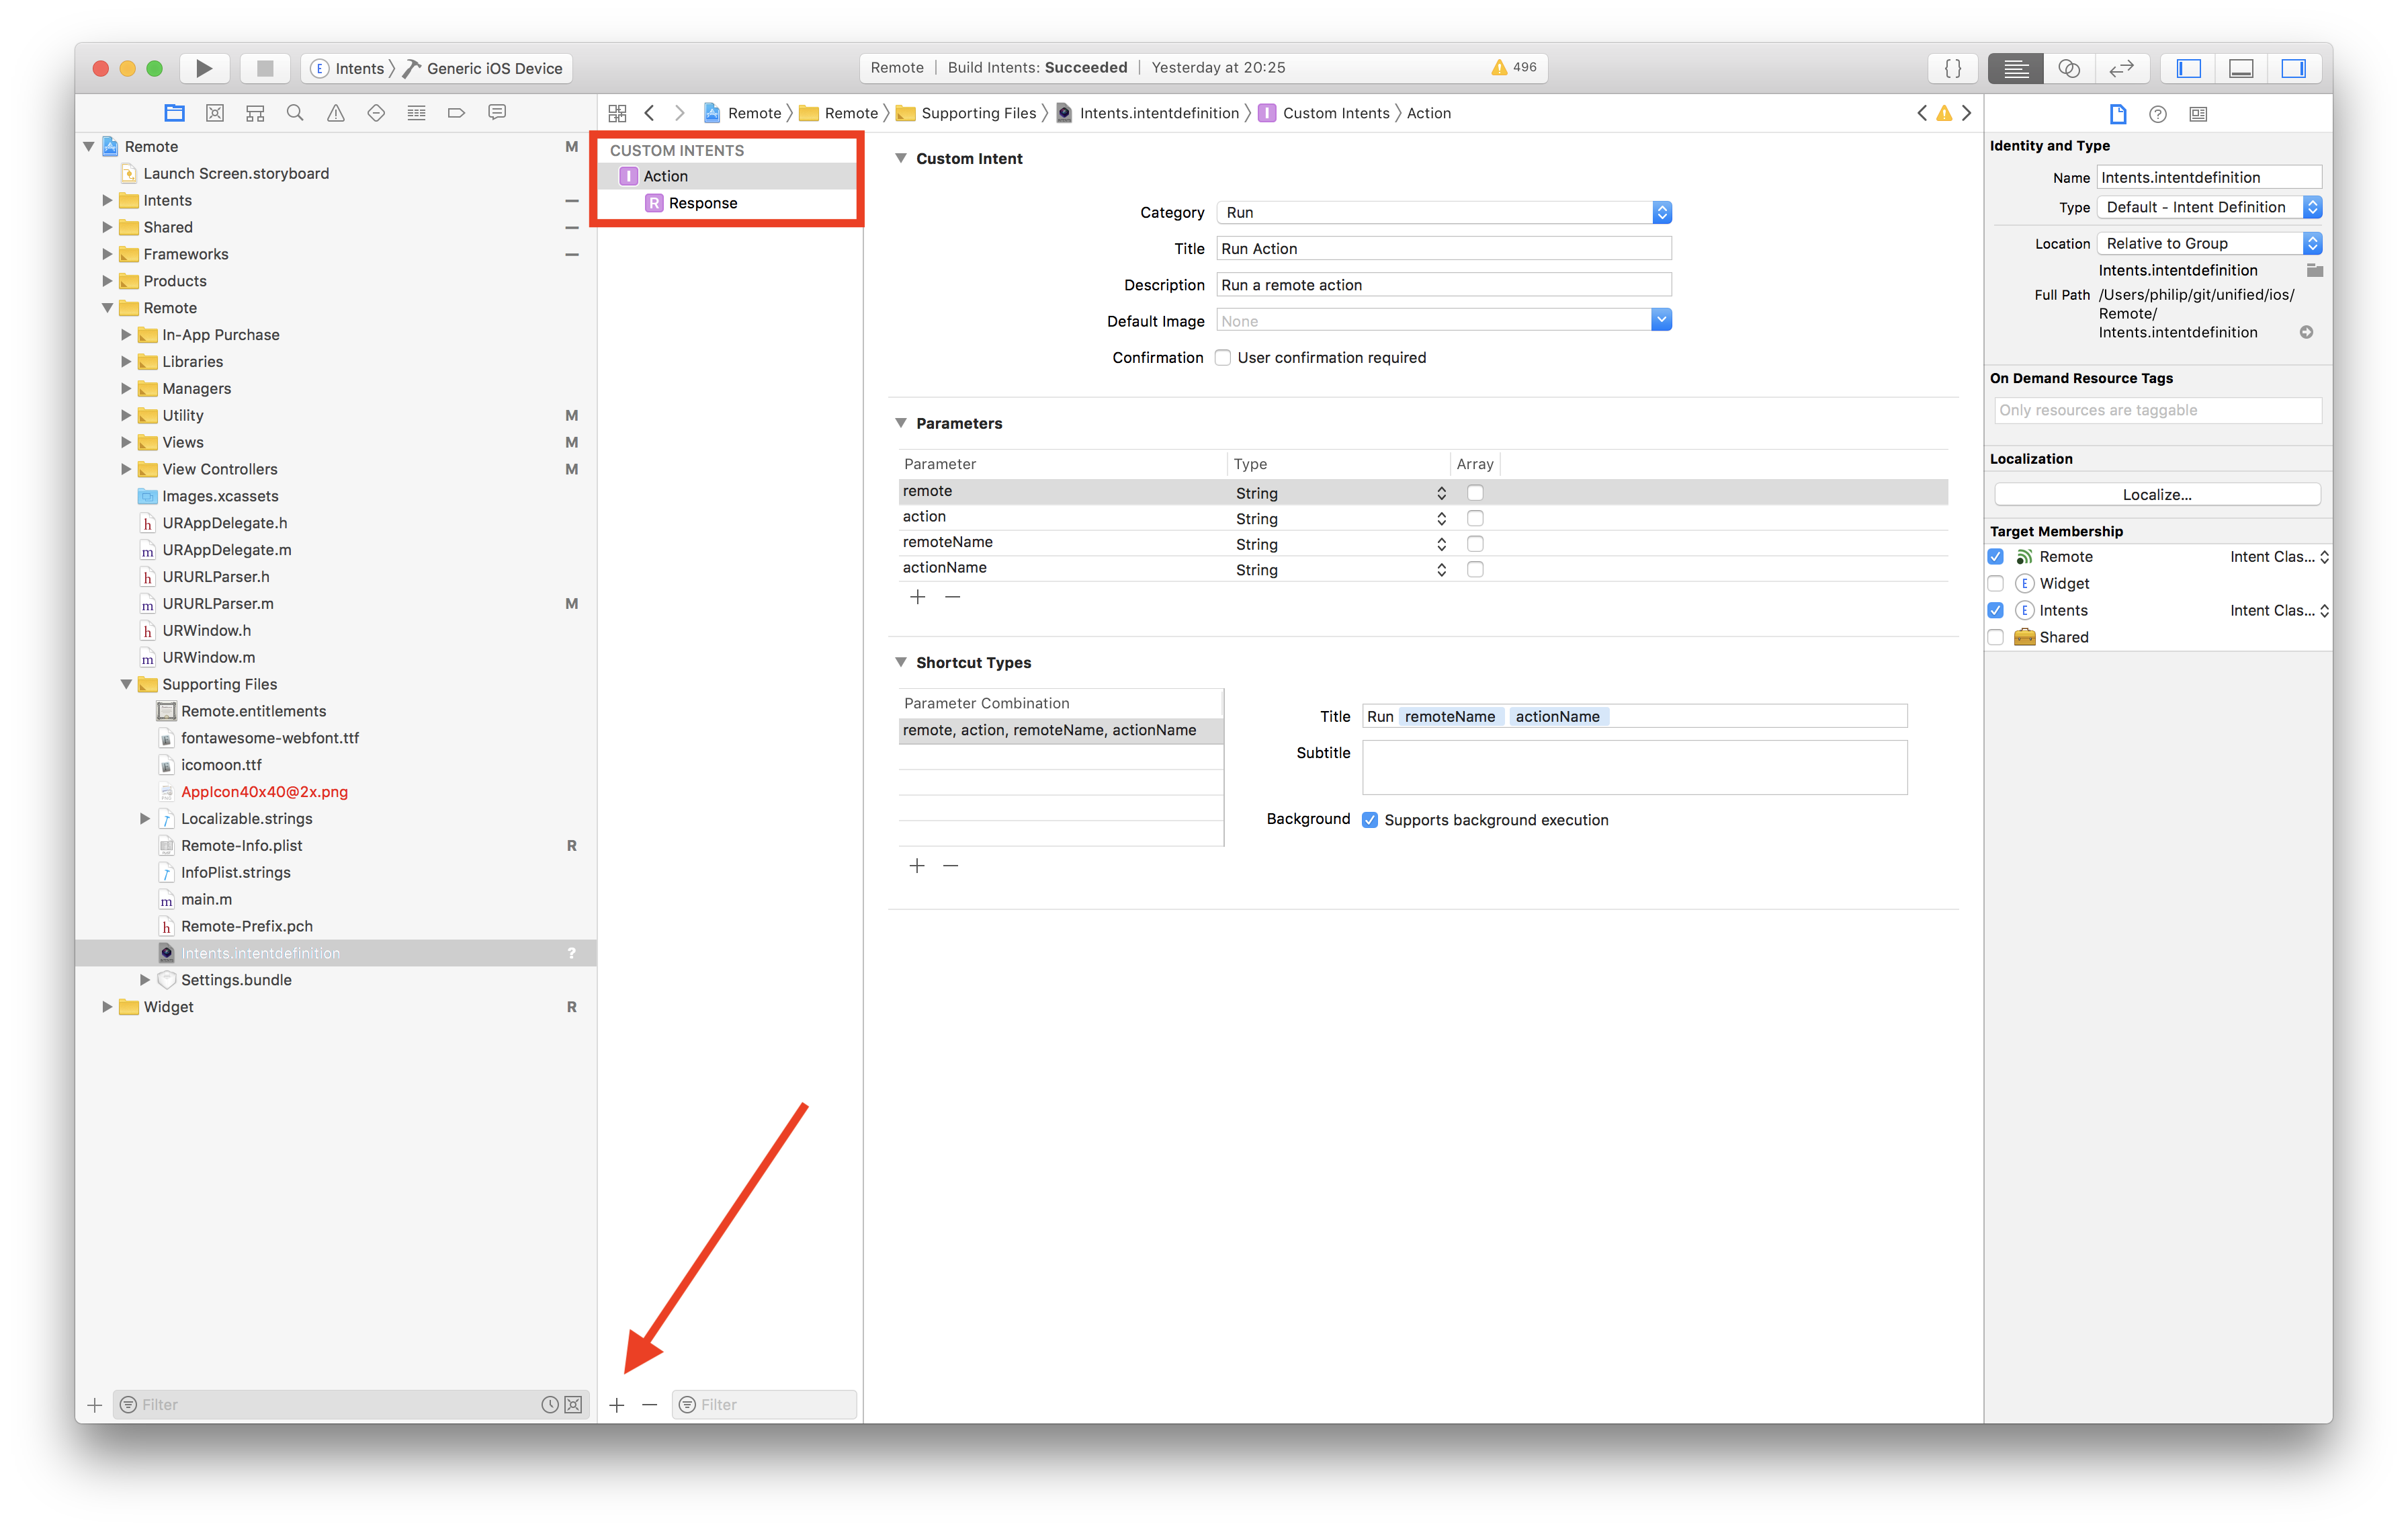
2) Create a new custom intent by clicking the + in the bottom left corner and give your intent a name.
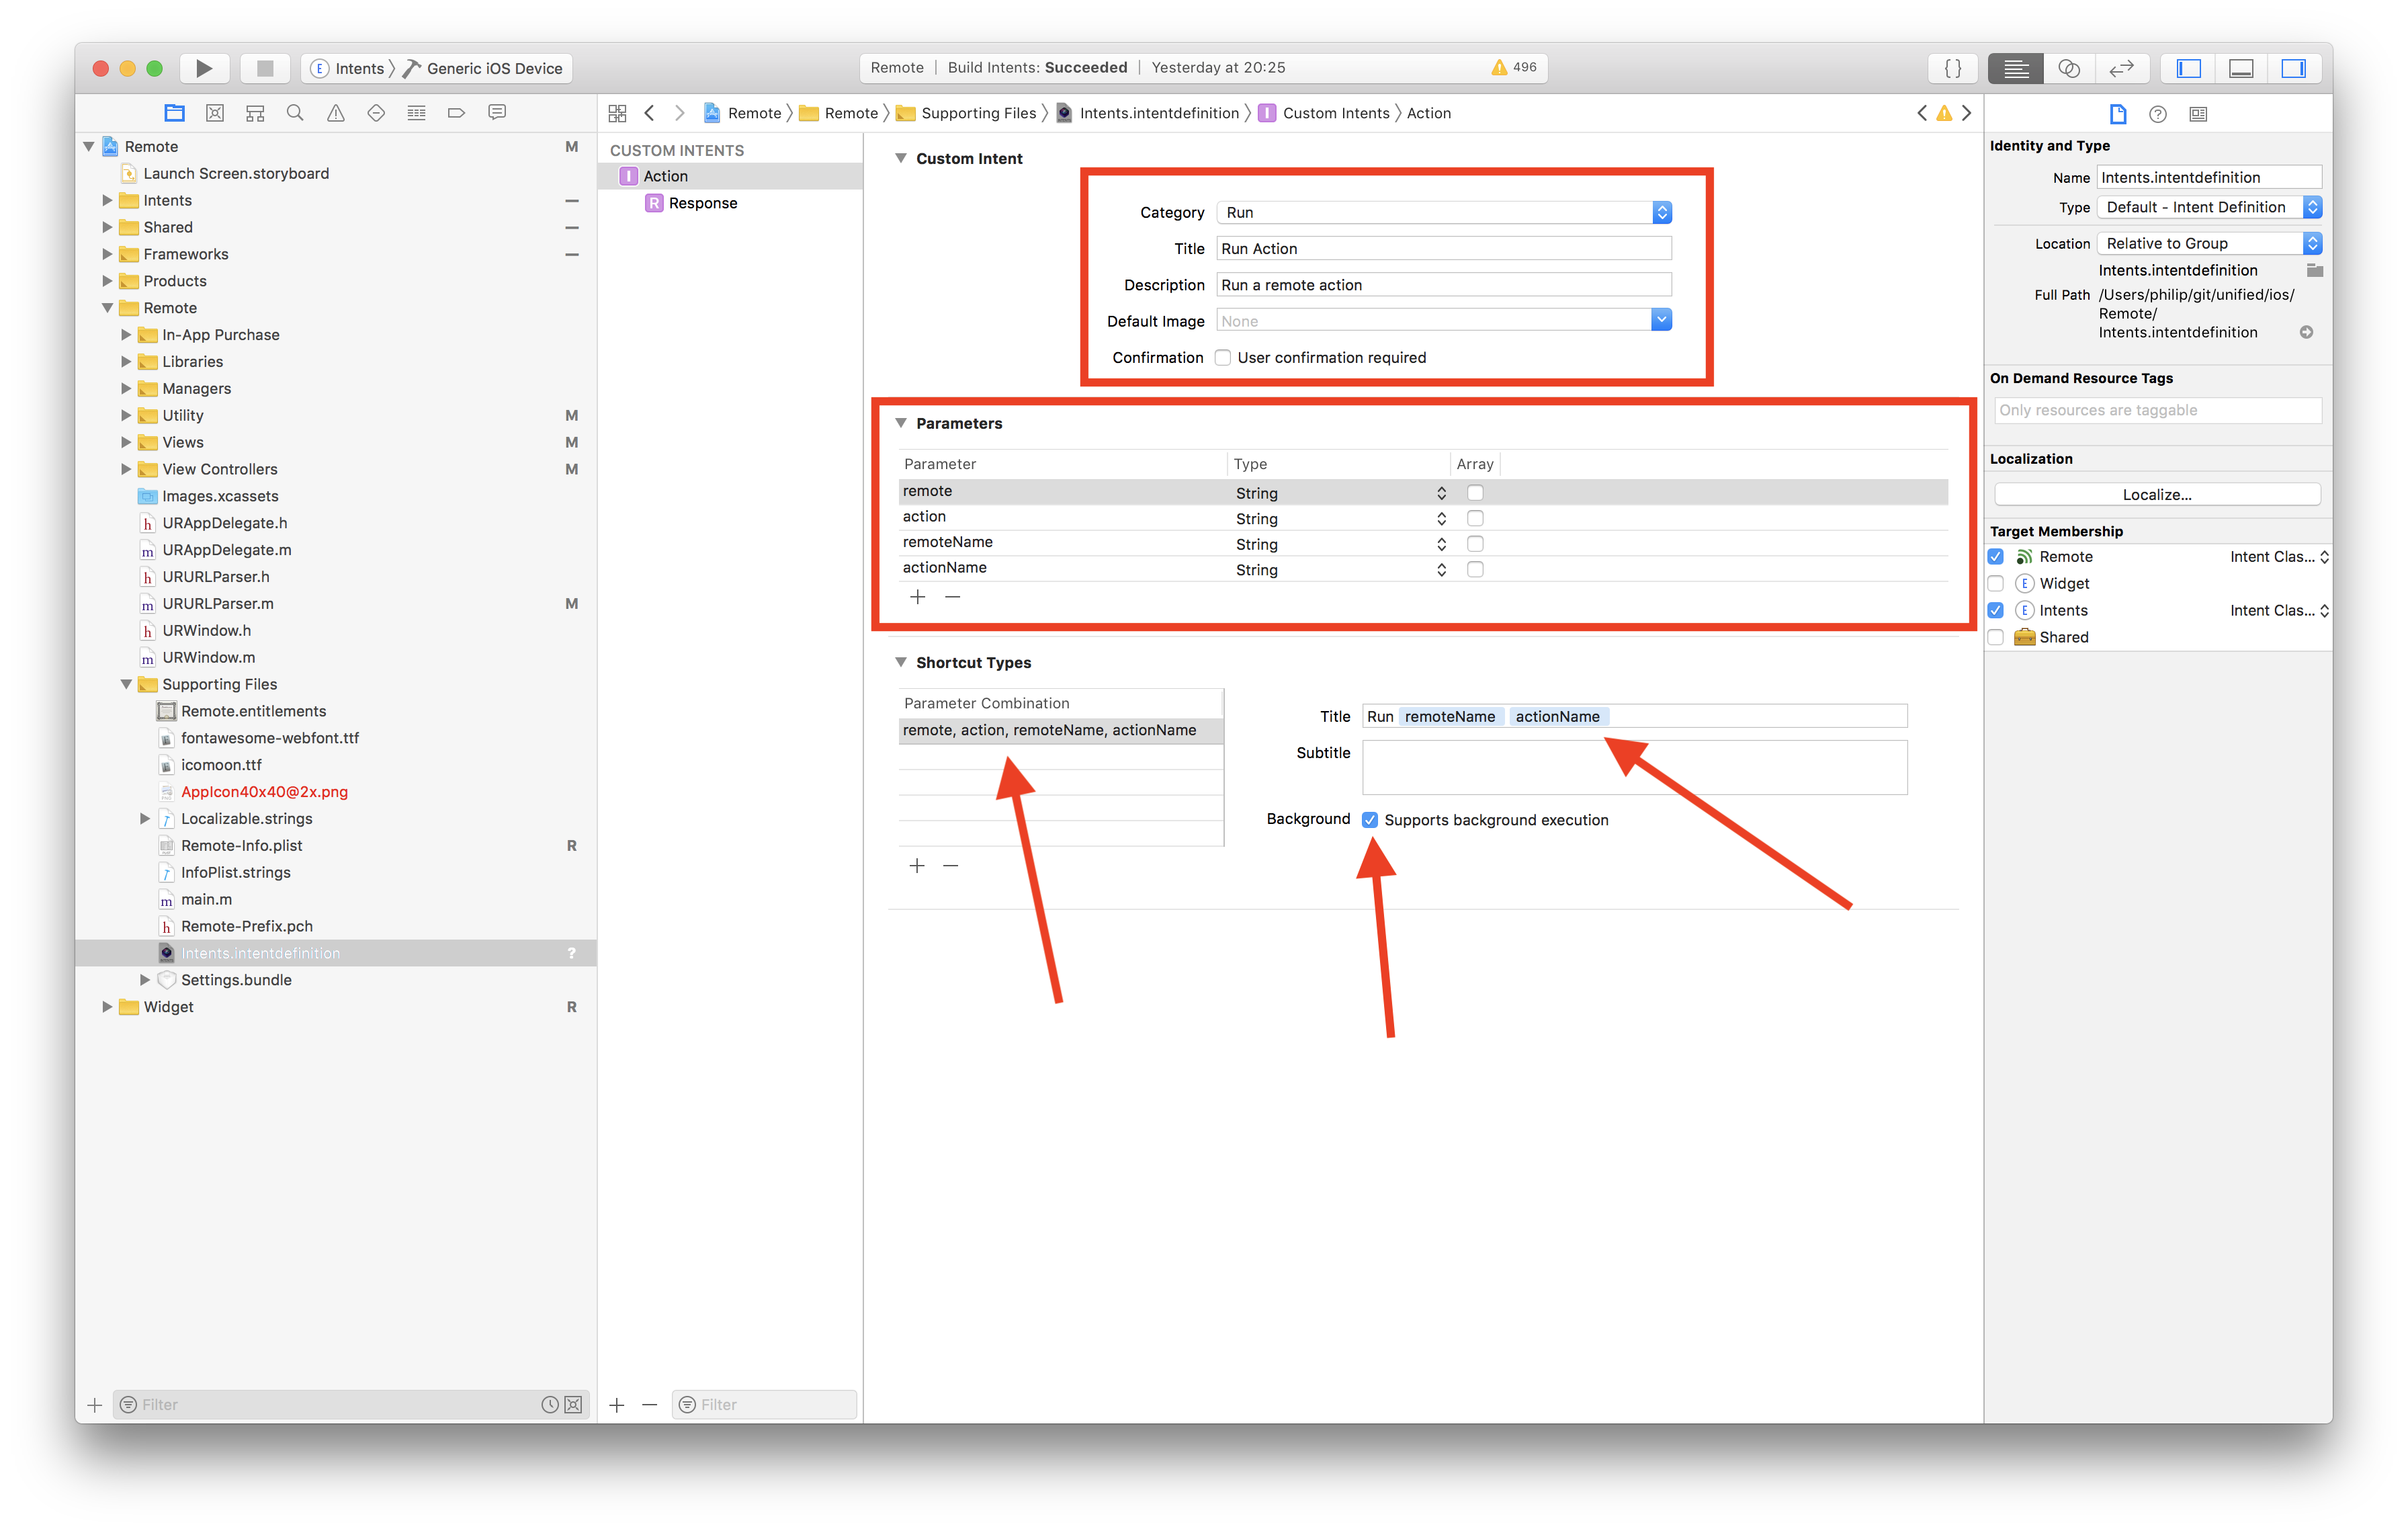
3) Configure the intent settings and add any parameters that you need.
- Select a category (I’m not sure if this actually matters but I chose whatever seemed most fitting).
- Enter a default
TitleandDescription. - Add any parameters that you want to associate with your intent. Note that I add both the “internal” parameters needed for executing the intent later
remoteandaction, plus parameters for constructing pretty UI messagesremoteNameandactionName. - Add one or more shortcut types. A shortcut type is essentially just a combination of parameters. For example, if you have valid types that accept different combinations of parameters then you have to create a type for each combination.
- For each shortcut type, customize the title using the parameter values.
- Make sure to enable
Supports background executionif you want to. - (You can also customize the response messages for success and failure if you wish to.)
4) Next you will want to actually implement where you donate the interaction shortcut. First of all, you need to import the Intents/Intents.h header to be able to use the INInteraction class. You also have to import the generated header for your custom intent. This was a bit tricky to figure out (and not documented at all). Basically it’s just [ClassPrefix][IntentName]Intent.h.
// Import intent headers
#import <Intents/Intents.h>
#import "URActionIntent.h"
5) Find a suitable place in your code to “donate” the interaction shortcut. In my case, this is whenever a user triggers an action inside a remote control.
- (void)userTriggeredAnAction:(DataAction*)action
{
    // Constructor intent and set parameters
    // IMPORTANT: Parameters must match one of the shortcut types that you defined in the intents definition file. Otherwise the donation with fail.
    URActionIntent* intent = [[URActionIntent alloc] init];
    intent.remote = self.remote.ID;
    intent.remoteName = self.remote.name;
    intent.action = action.name;
    intent.actionName = [[action.name stringByReplacingOccurrencesOfString:@"_" withString:@" "] capitalizedString];

    // Set a suggested phrase (displayed when creating shortcuts)
    intent.suggestedInvocationPhrase = [NSString stringWithFormat:@"%@ %@", intent.remoteName, intent.actionName];

    // Donate the interaction shortcut
    INInteraction* interaction = [[INInteraction alloc] initWithIntent:intent response:nil];
    [interaction donateInteractionWithCompletion:^(NSError * _Nullable error)
    {
        if (error)
        {
            NSLog(@"Failed to donate interaction: %@ ", [error localizedDescription] );
        }
    }];
}
Handling an Interaction
This was by far the most difficult step to figure out, especially since the documentation is very lacking.
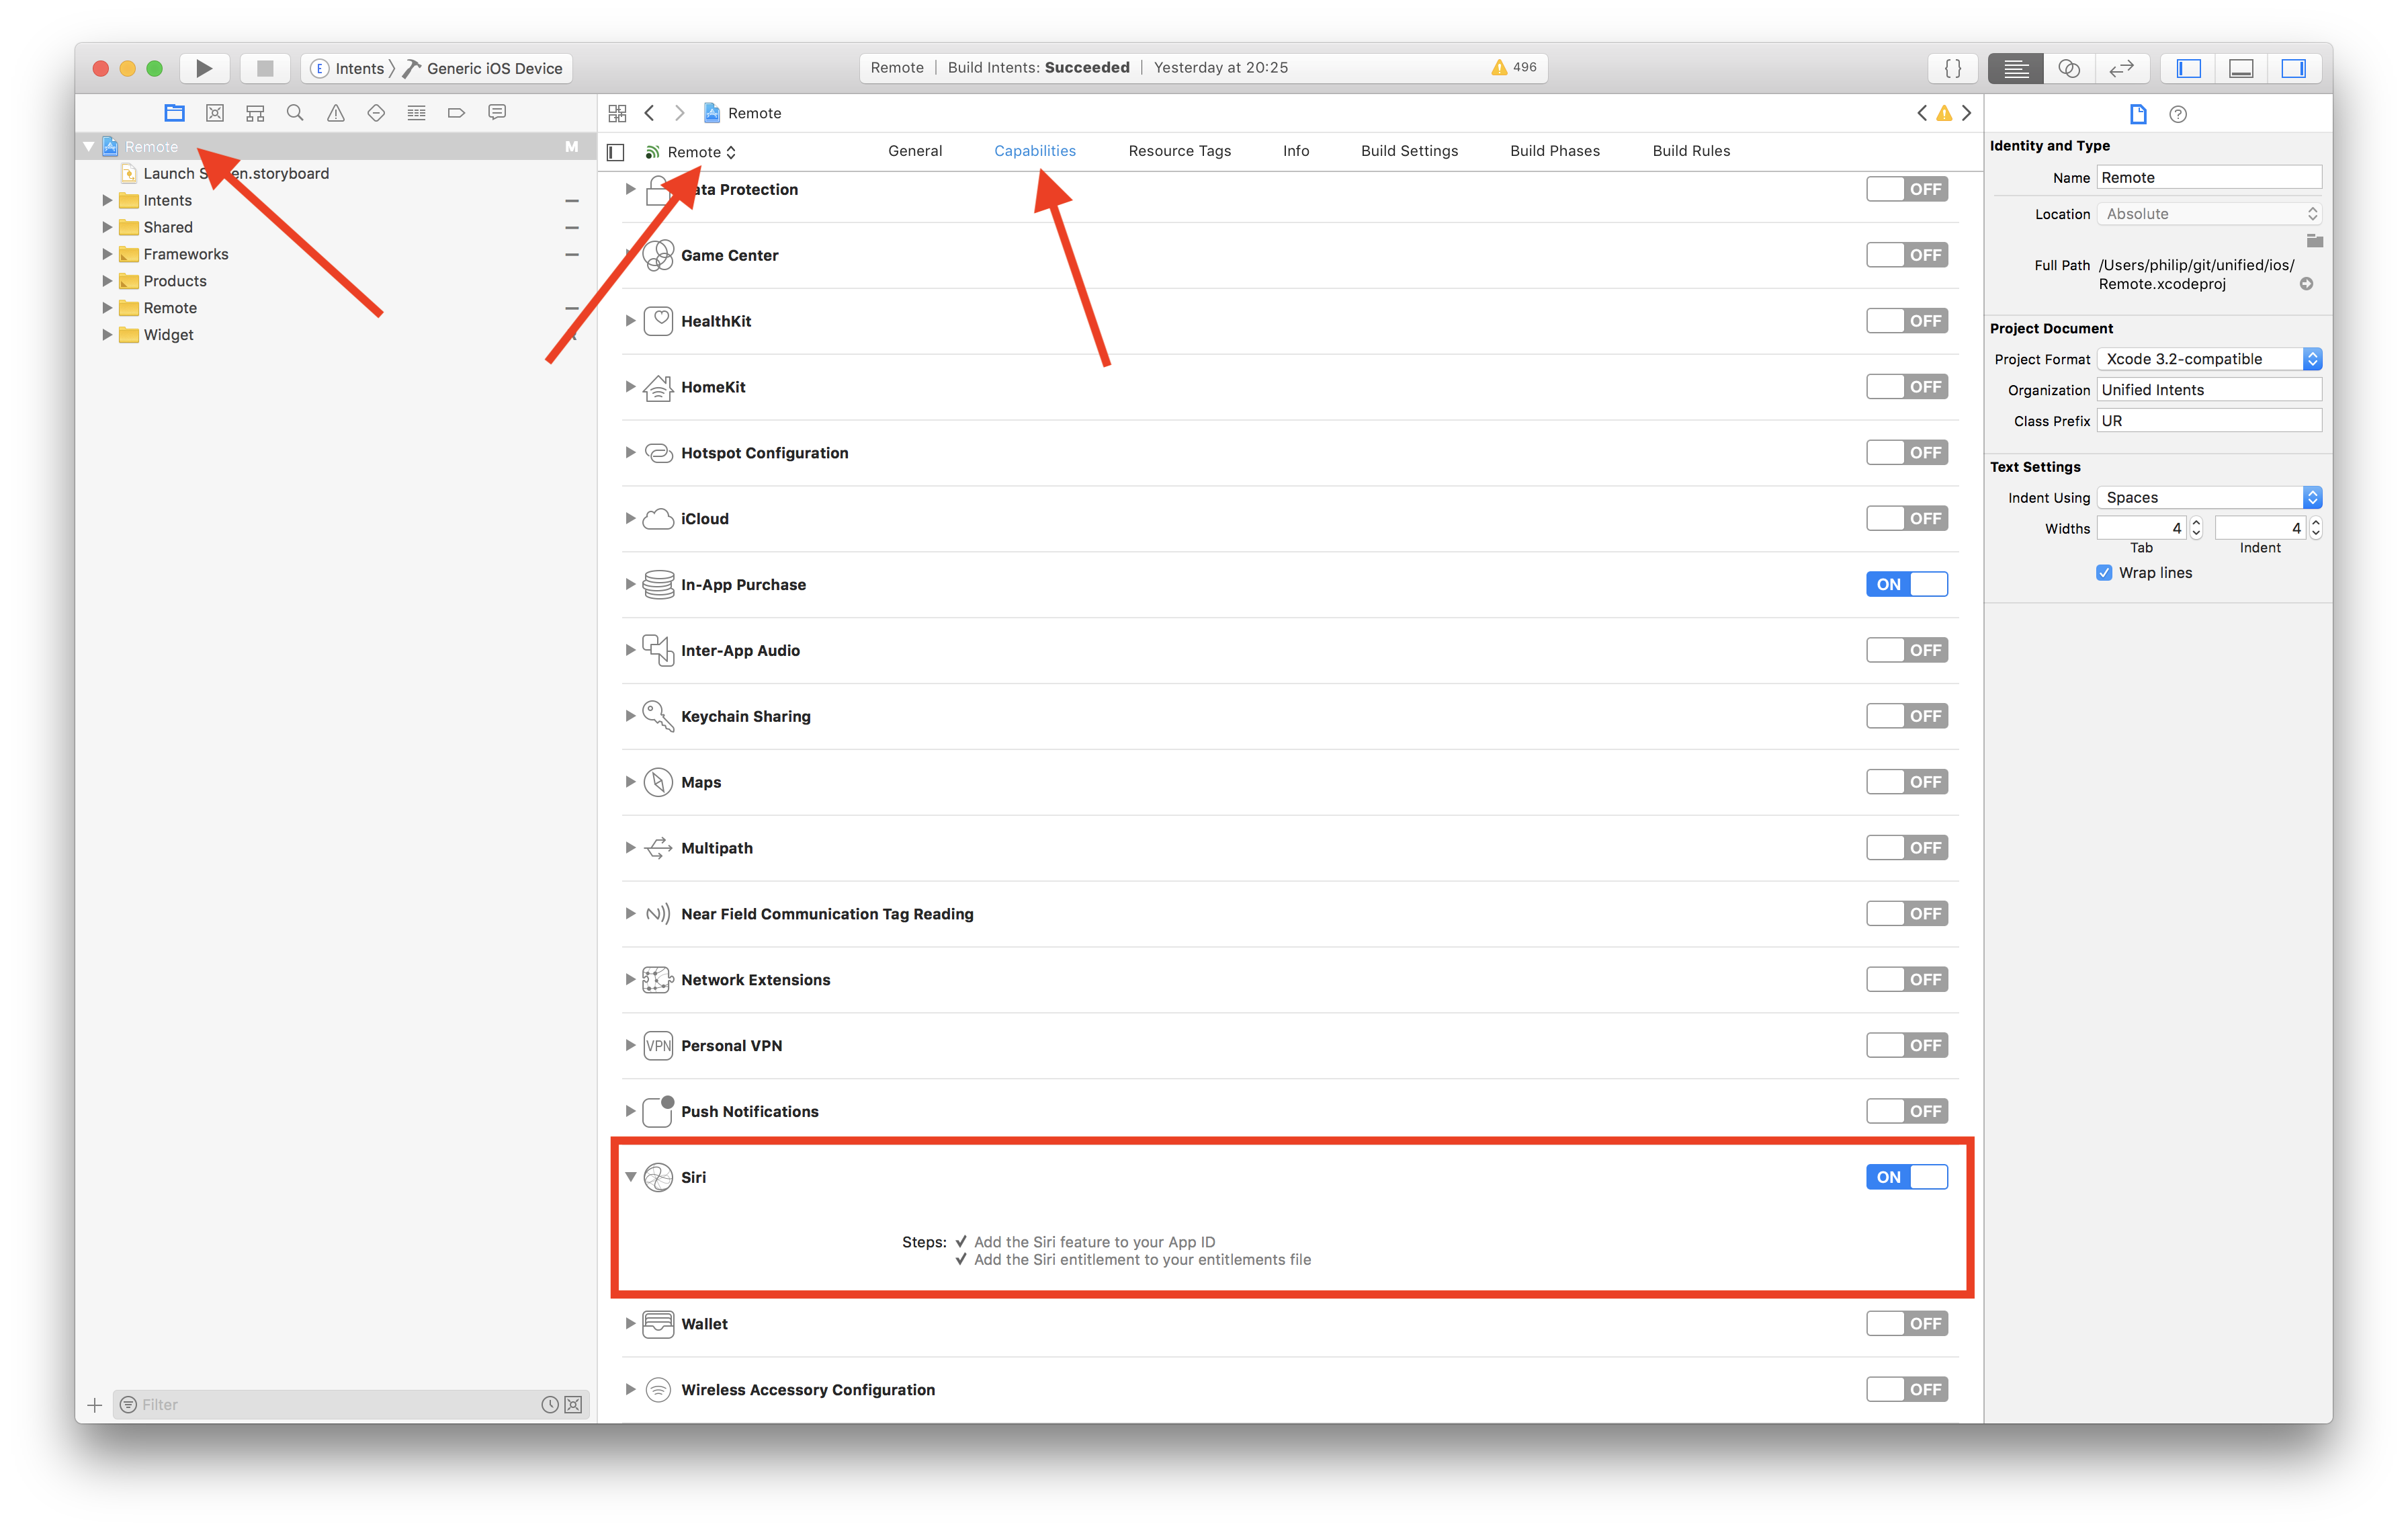
1) Enable the Siri Capability for your main app target.
- Select your project in the project structure
- Select your main app target.
- Select the
Capabilitiestab. - Enable
Siri.
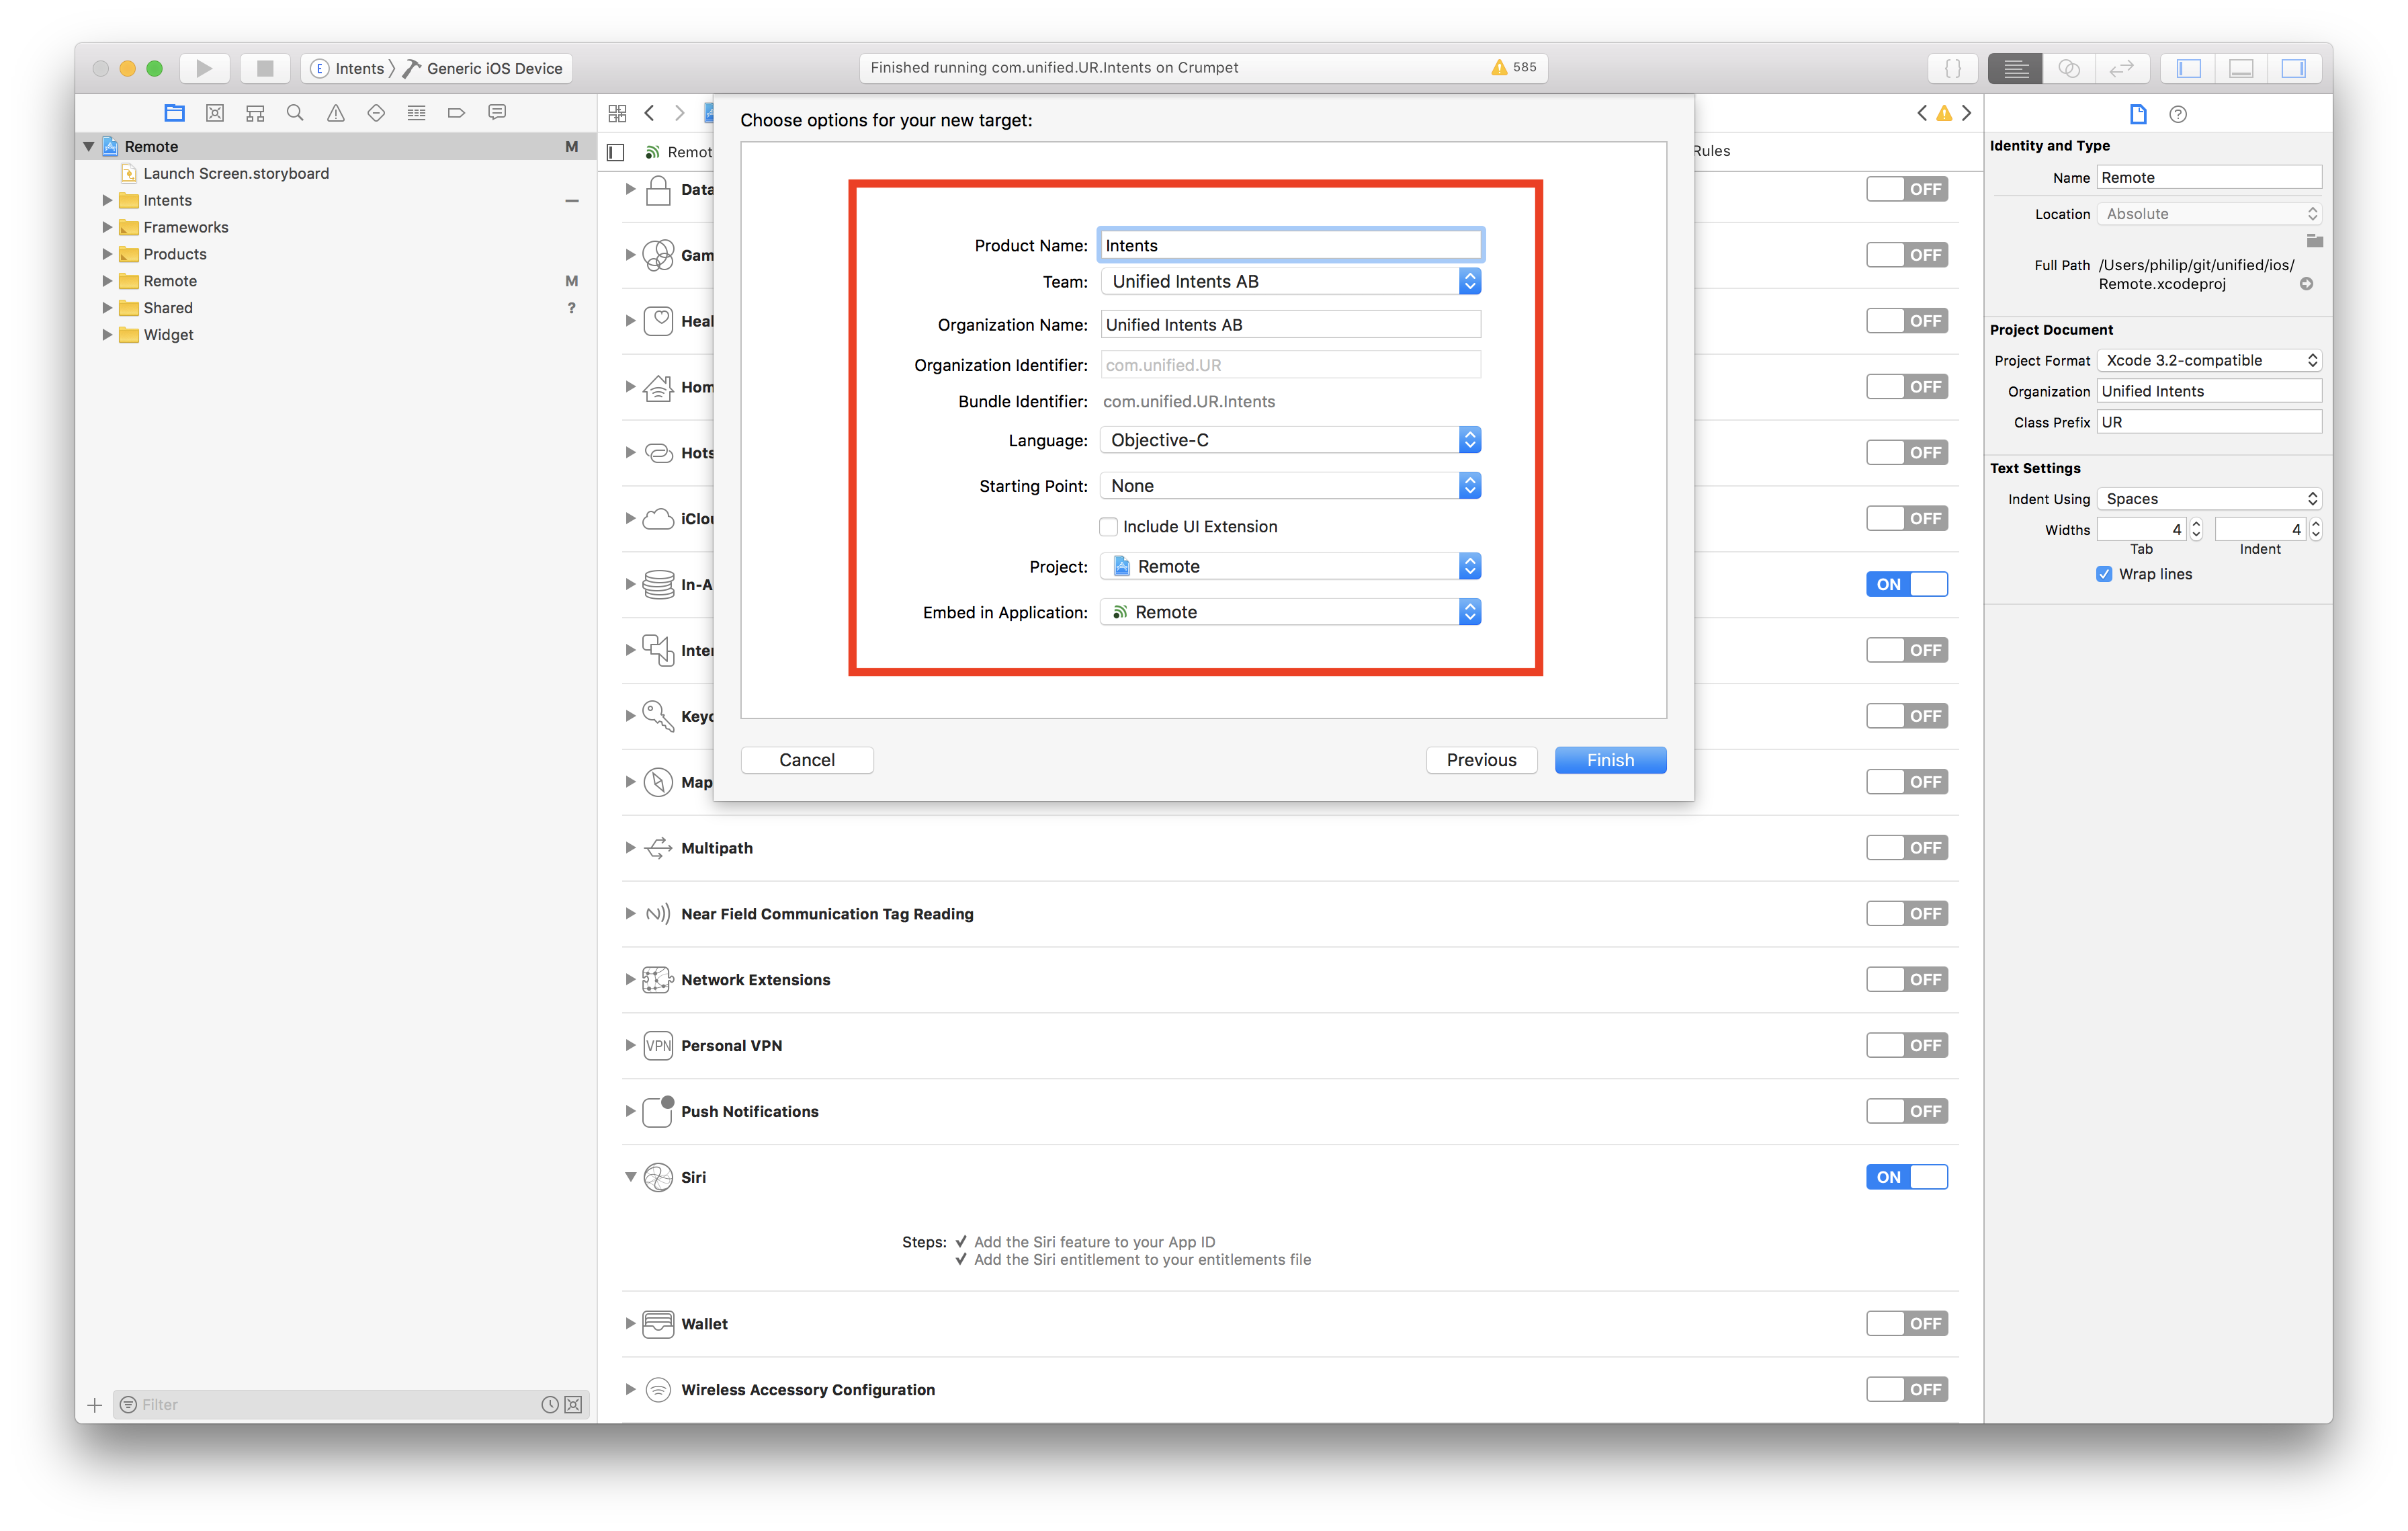
2) Add an Intents Extension to your project. (See Apple Documentation for more details.)
- Click
File > New > Target... - Select
Intents Extension - Enter a product name (e.g.
Intents) - Set
Starting PointtoNone - Deselect
Include UI Extension
3) Add the Intents Definition File to your Intents Extension target. Note: I tried moving the intents definition file to a shared Cocoa Touch Framework that both the main app and the intents extension had access to, however that does not seem to work. So, I recommend leaving the intent definition file in the main app target and just adding the intents target to the target membership setting.
- Select the intents definition file that you created previously.
- Right-click
Show File Inspector. - Add your Intents Extension under
Target Membership.
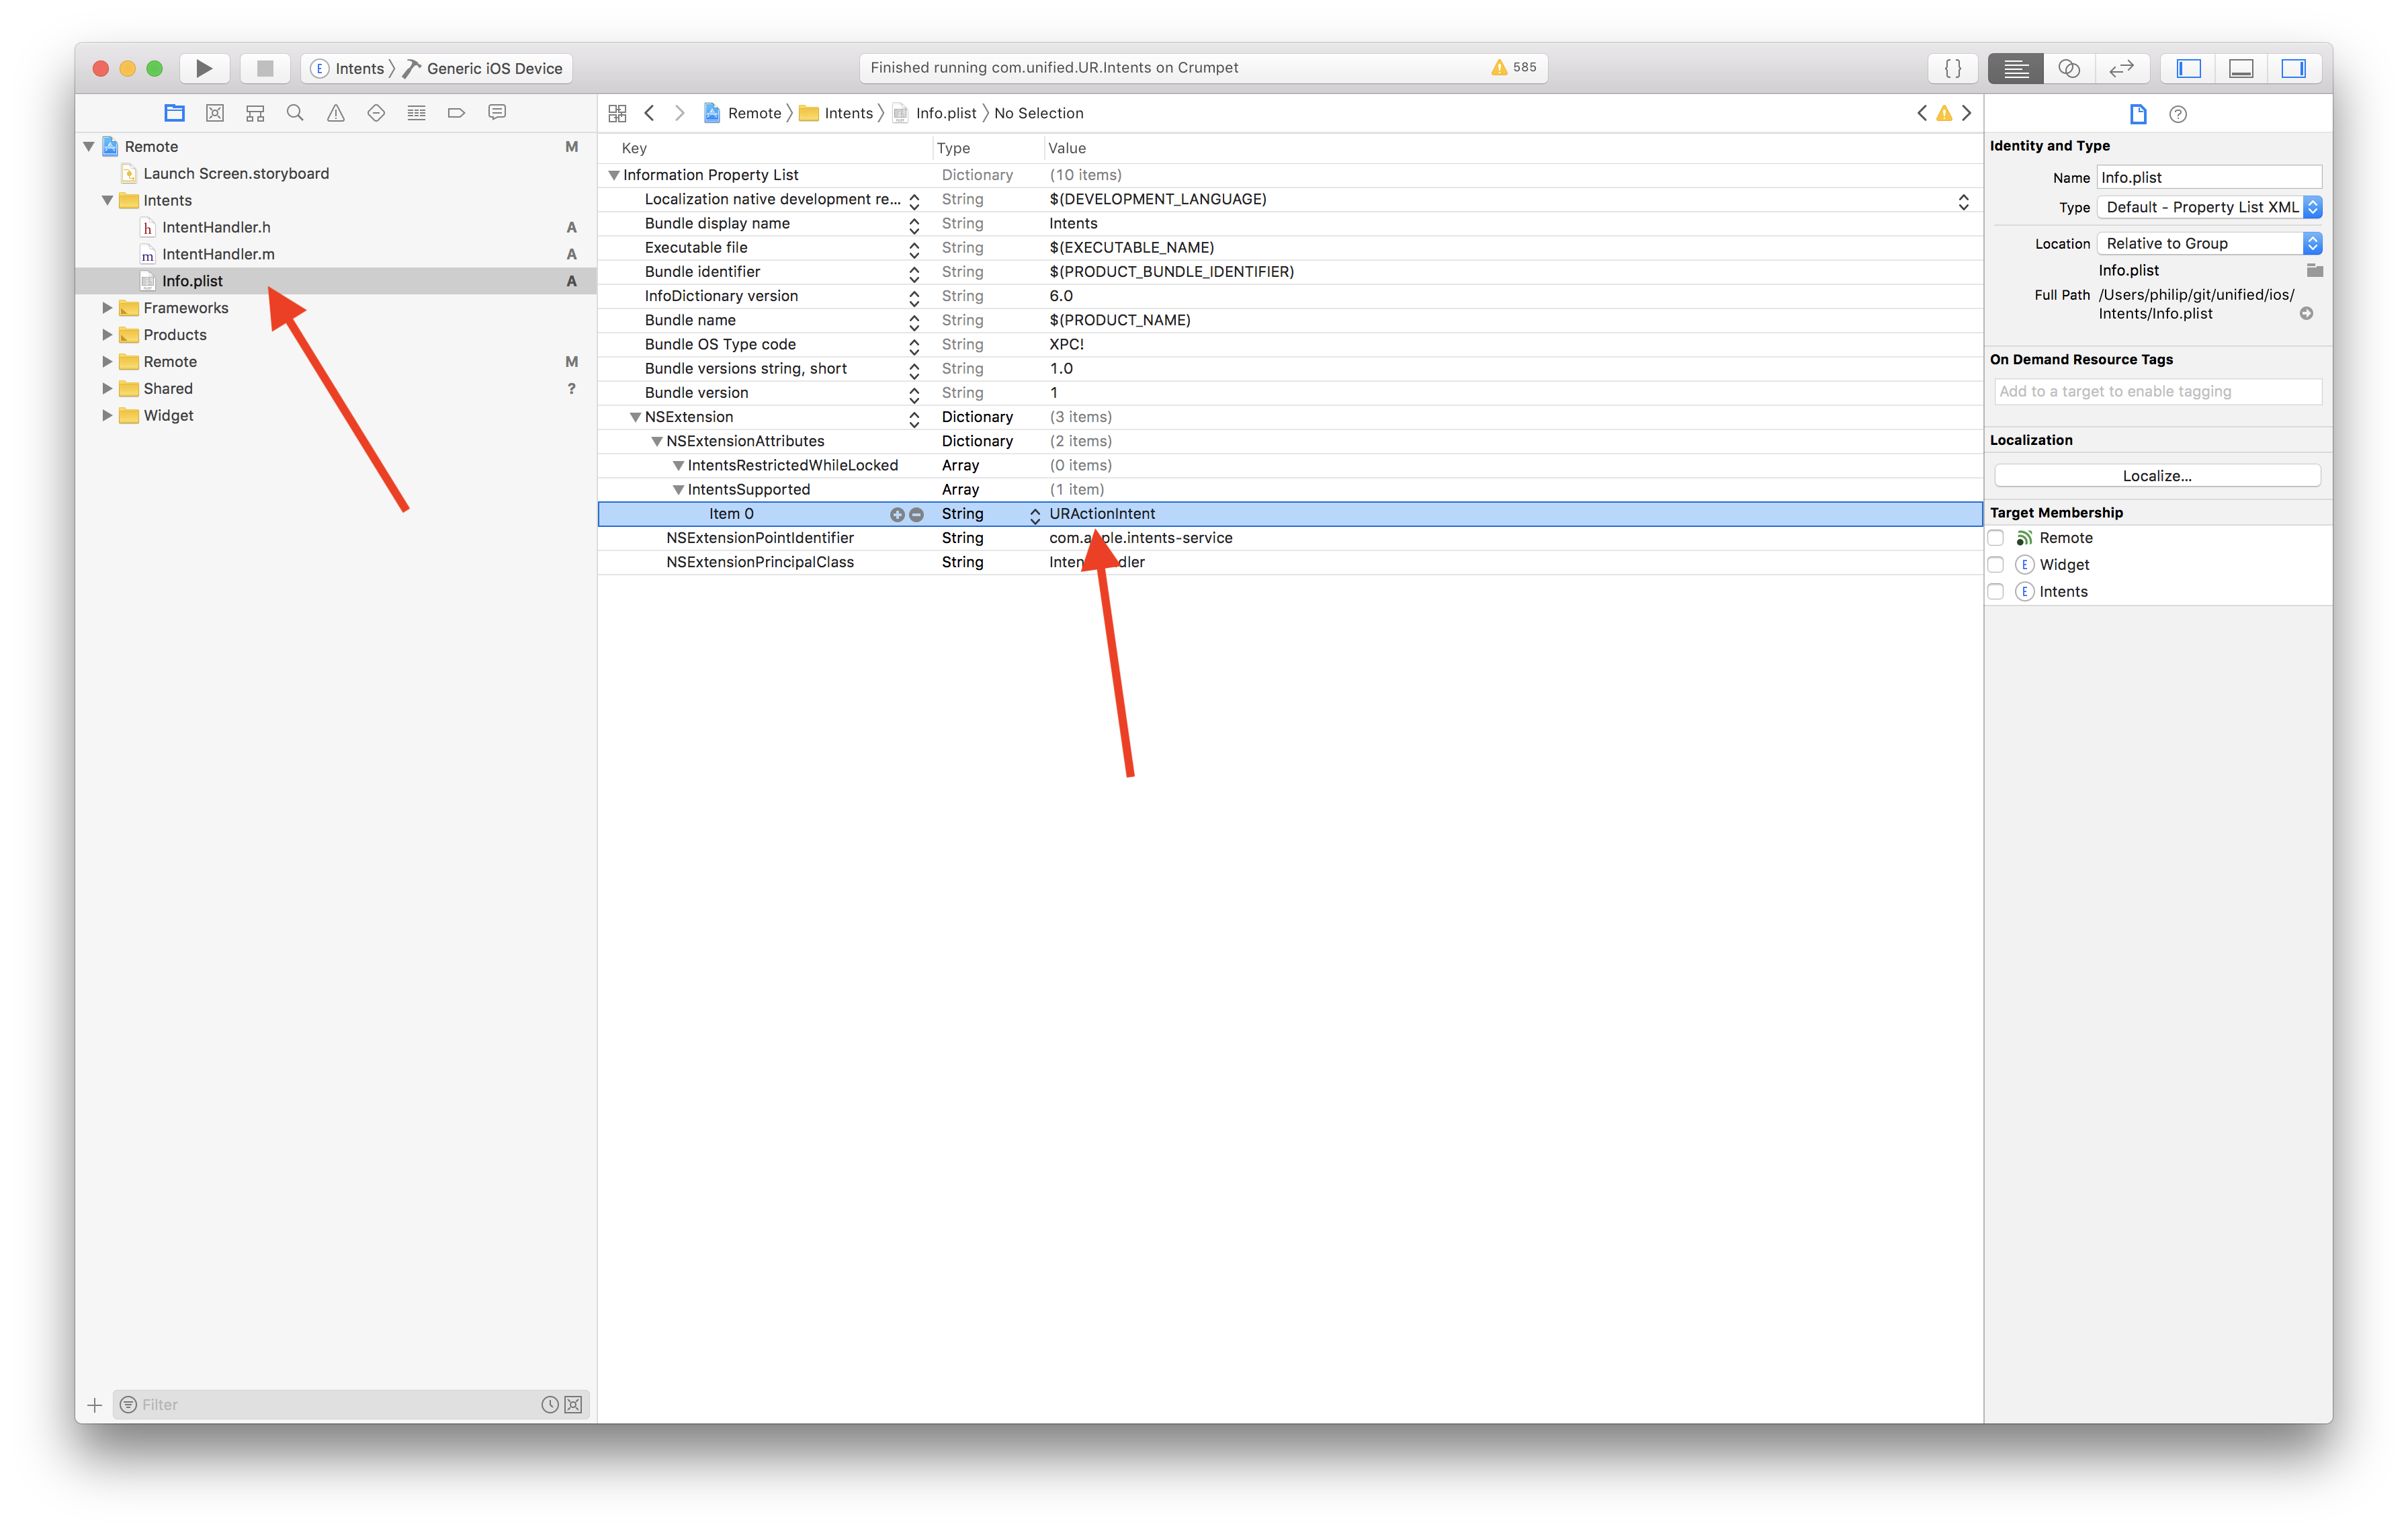
3) Enable your custom intent in the Intents Extension.
- Open
Info.plistfor your Intents Extension - Expand
NSExtension > NSExtensionAttributes > IntentsSupported - Add the full intent name to the list (i.e.
[ClassPrefix][IntentName]Intent).
4) Open IntentHandler.m in your Intents Extension and implement your custom intent.
- Import your intent header.
- Add your generated intent handling protocol (
[ClassPrefix][IntentName]IntentHandling). - Implement your handling code.
- Finish by sending a reponse code (e.g.
FailureorSuccess) using thecompletioncallback.
#import "URActionIntent.h"

@interface IntentHandler () <URActionIntentHandling>

@end

@implementation IntentHandler

- (void)handleAction:(nonnull URActionIntent *)intent completion:(nonnull void (^)(URActionIntentResponse * _Nonnull))completion {
    // Do something...

    // Send response
    URActionIntentResponse* response = [[URActionIntentResponse alloc] initWithCode:URActionIntentResponseCodeSuccess userActivity:nil];
    completion(response);
}

@end
5) Keep in mind that the Intent Extension is a completely separate module, so if you need to access code from your main app you may need to refactor and share the code between the two targets. I basically just moved a lot of the shared core logic into a new folder called “Shared” and added these files to both targets (main app and intent extension). Note: Even “user defaults” are separate. However, you can share user defaults between both targets using App Groups.
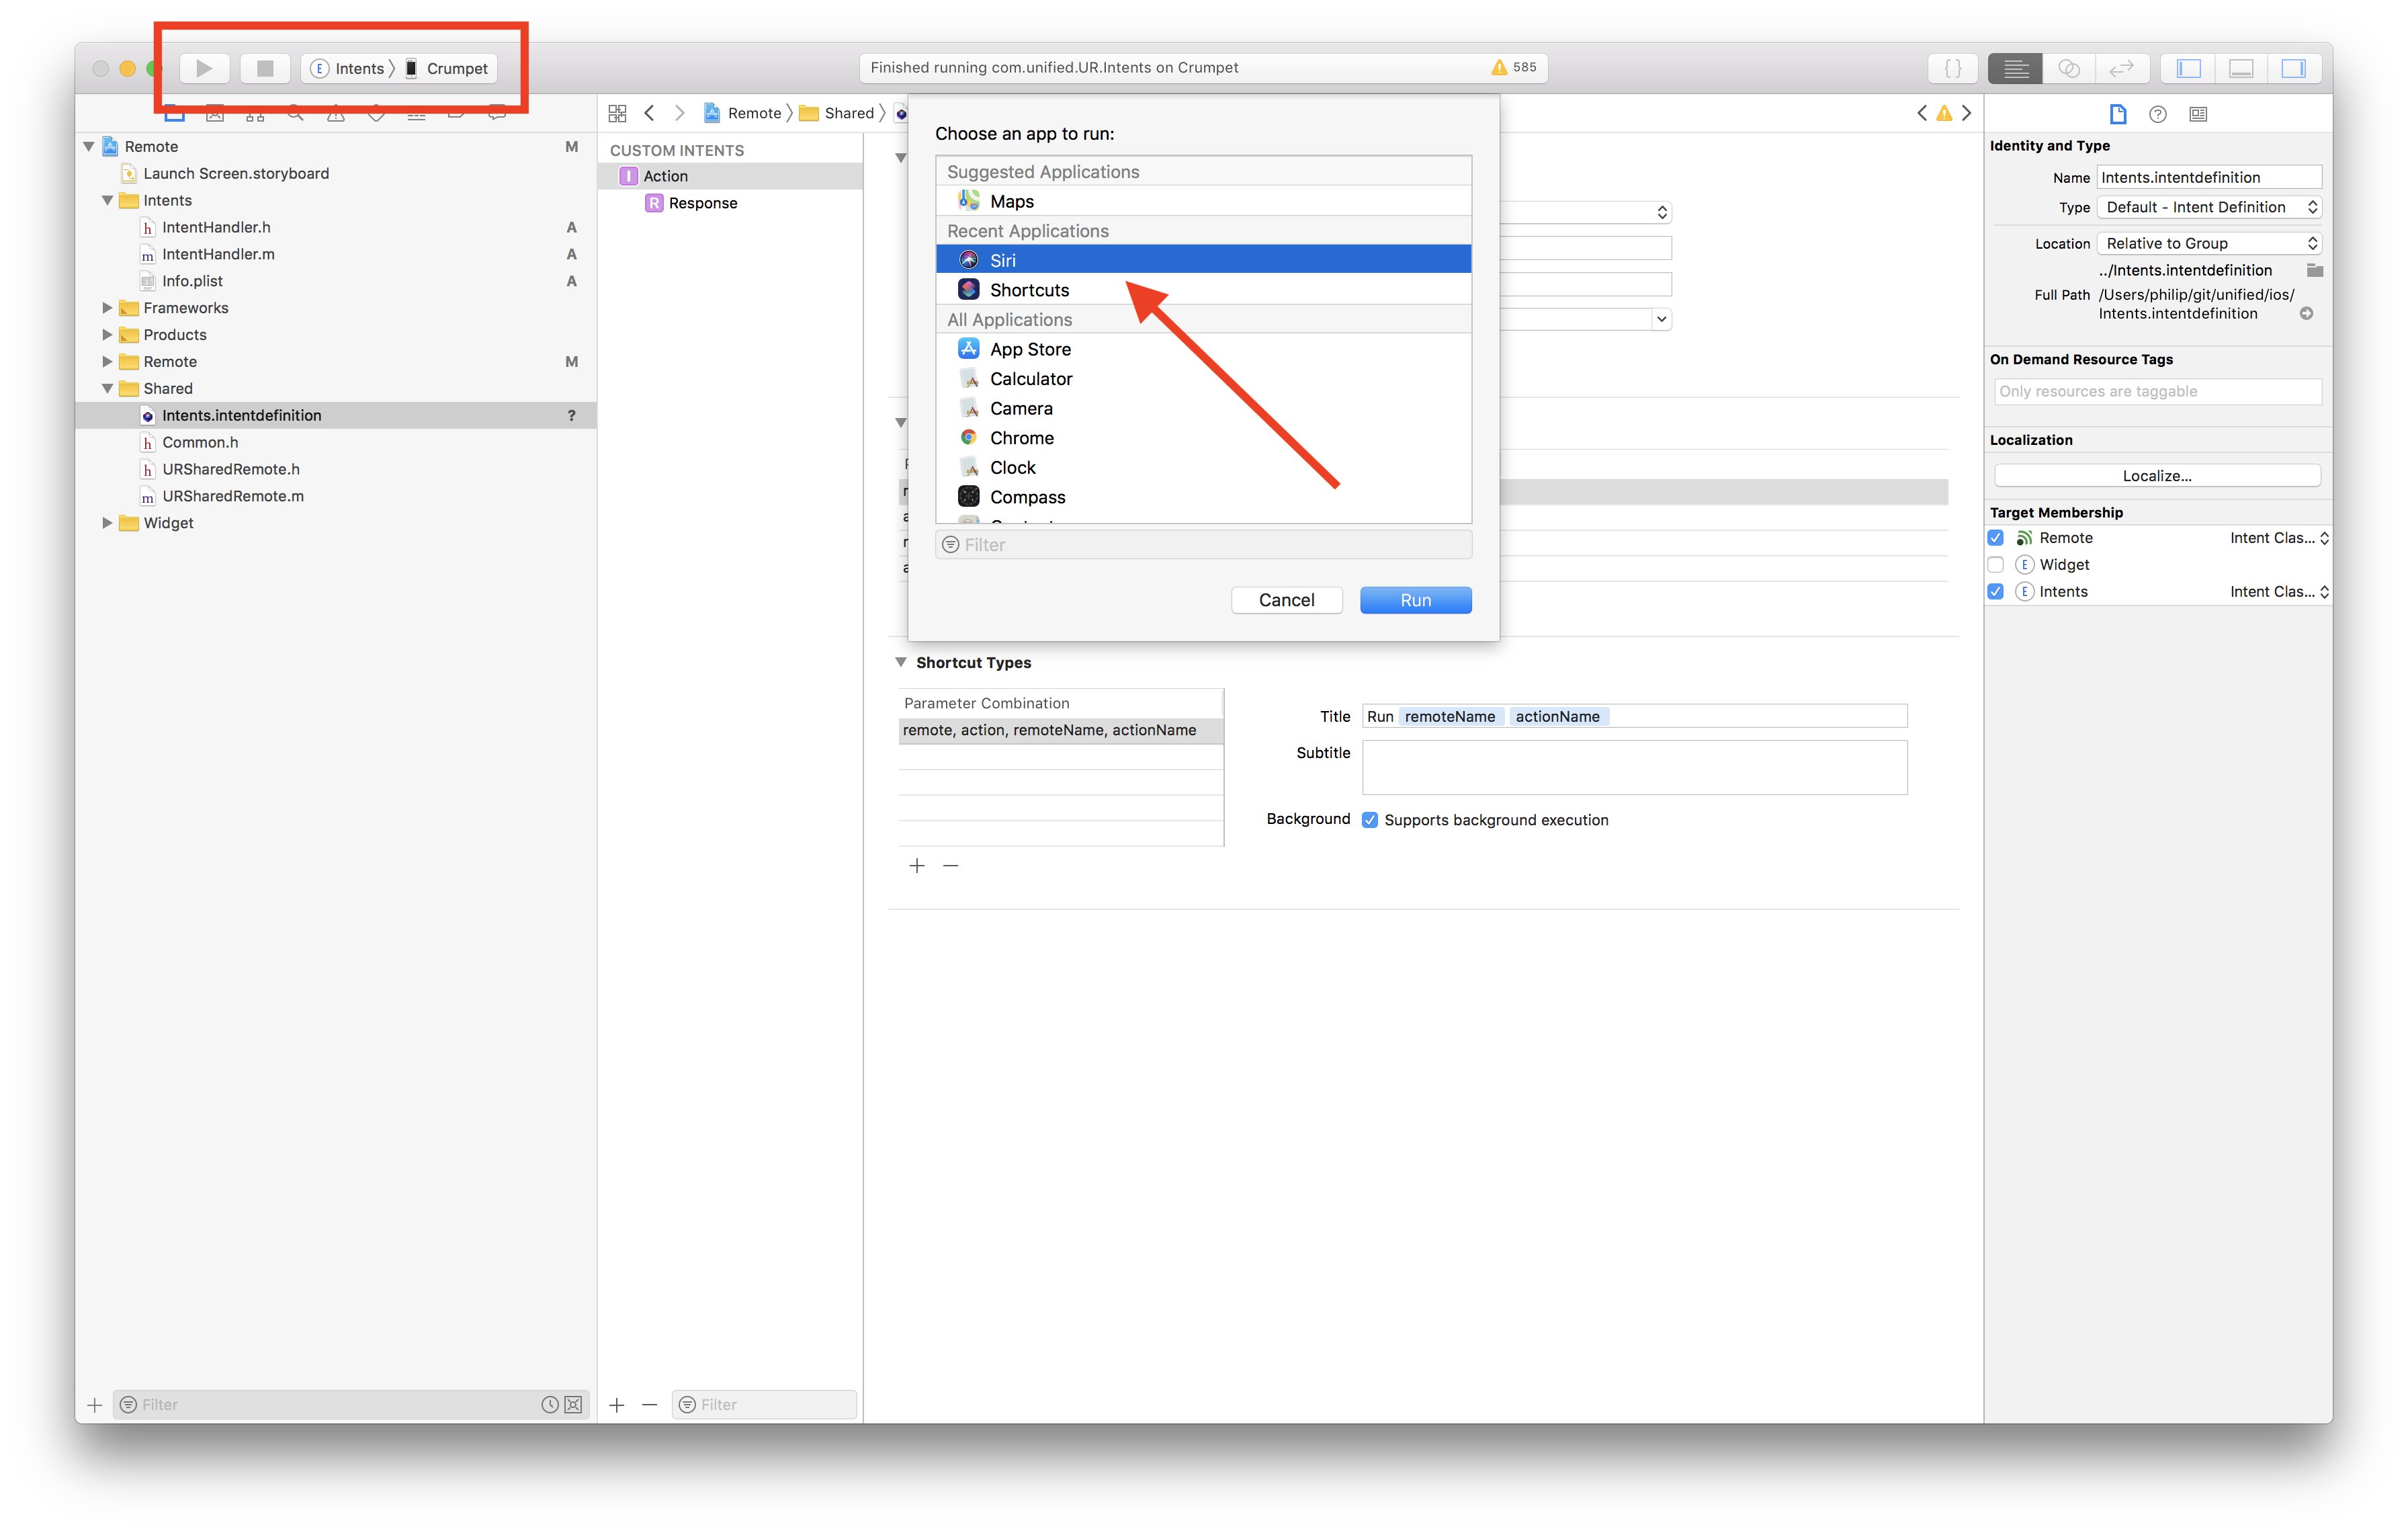
6) To test and debug your Intent Extension, choose the intent target and click run. When asked to choose an app to run click Siri. Once Siri starts on your phone you can test your shortcut there, or switch to the Shortcuts app and test it there as well.
Tips & Troubleshooting
Suggested Shortcuts not updating
Occasionally iOS stops responding to donated shortcuts for some reason. I’m not exactly sure why this happens, but it seems you can clear up the issue by doing the following:
- Remove all saved shortcuts
- Uninstall your app
- Restart your device
New shortcuts not appearing in the Shortcuts app
It seems that new donated shortcuts don’t immediatley appear in the Shortcuts app. However, you can force the app to detect new shortcuts by force quitting the Shortcuts app and then opening it again.
Custom error messages in the Shortcuts app
It seems that custom error responses from an interaction shortcut aren’t supported in the Shortcuts app. It just shows an alert saying “An unknown error occured”. However, if the shortcut is triggered directly from Siri, then the actual error messsage configured in the custom intent is shown.
Targeting iOS 8 (backwards compatibility)
According to Apple’s documentation, it is possible to include intents in apps targeting iOS 8 or higher. Obviously, if the device isn’t running iOS 12 then shortcuts won’t work, however the app itself should still function on older versions of iOS. However, it seems that there is a bug in the iOS 8 simulator. If you try to run an app that includes an Intent Definition File in the iOS 8 simulator then the app will crash immediately.
dyld: Library not loaded: /System/Library/Frameworks/CoreServices.framework/Versions/A/CoreServices
  Referenced from: /System/Library/Frameworks/Intents.framework/Intents
  Reason: no suitable image found.  Did find:
    /System/Library/Frameworks/CoreServices.framework/Versions/A/CoreServices: mach-o, but not built for iOS simulator
I created a StackOverflow issue and started an Apple Developer forums thread to try to figure out what the problem was. However, this did not lead anywhere. Eventually I created an Apple TSI (Technical Support Incident). After a couple of days I just received a reply saying that my issue would be better suited as a bug report. So finally, I submitted a bug report. I won’t be holding my breath, especially considering how few people still use iOS 8.
Localizing your Intents Definition File
If your app is localized then you have to localize your custom intents (i.e. your intents definition file). Otherwise you will receive an error when uploading your app to the App Store:
Invalid Siri Support - Localized title for custom intent: "<action>" not found for locale: <locale>
To localize your intent defintion file: 1) Select it in the project navigator. 2) Click “Localize…” in the File Inspector (right panel). 3) Move the current file to your default language (e.g. English). 4) Select your other languages and provide localized strings.
Conclusion
I hope you found this useful. Feel free to leave feedback if I’ve missed any useful details. Also, why not check out Unified Remote in the App Store or on Google Play!